 HVAC Equipment Locator Online Help
The updated HVAC Equipment Locator is a revolutionary application for Apple iPhone and iPad that lets you track, share, and customize your equipment nameplate and maintenance data — saving your company time and improving accuracy.
Sections
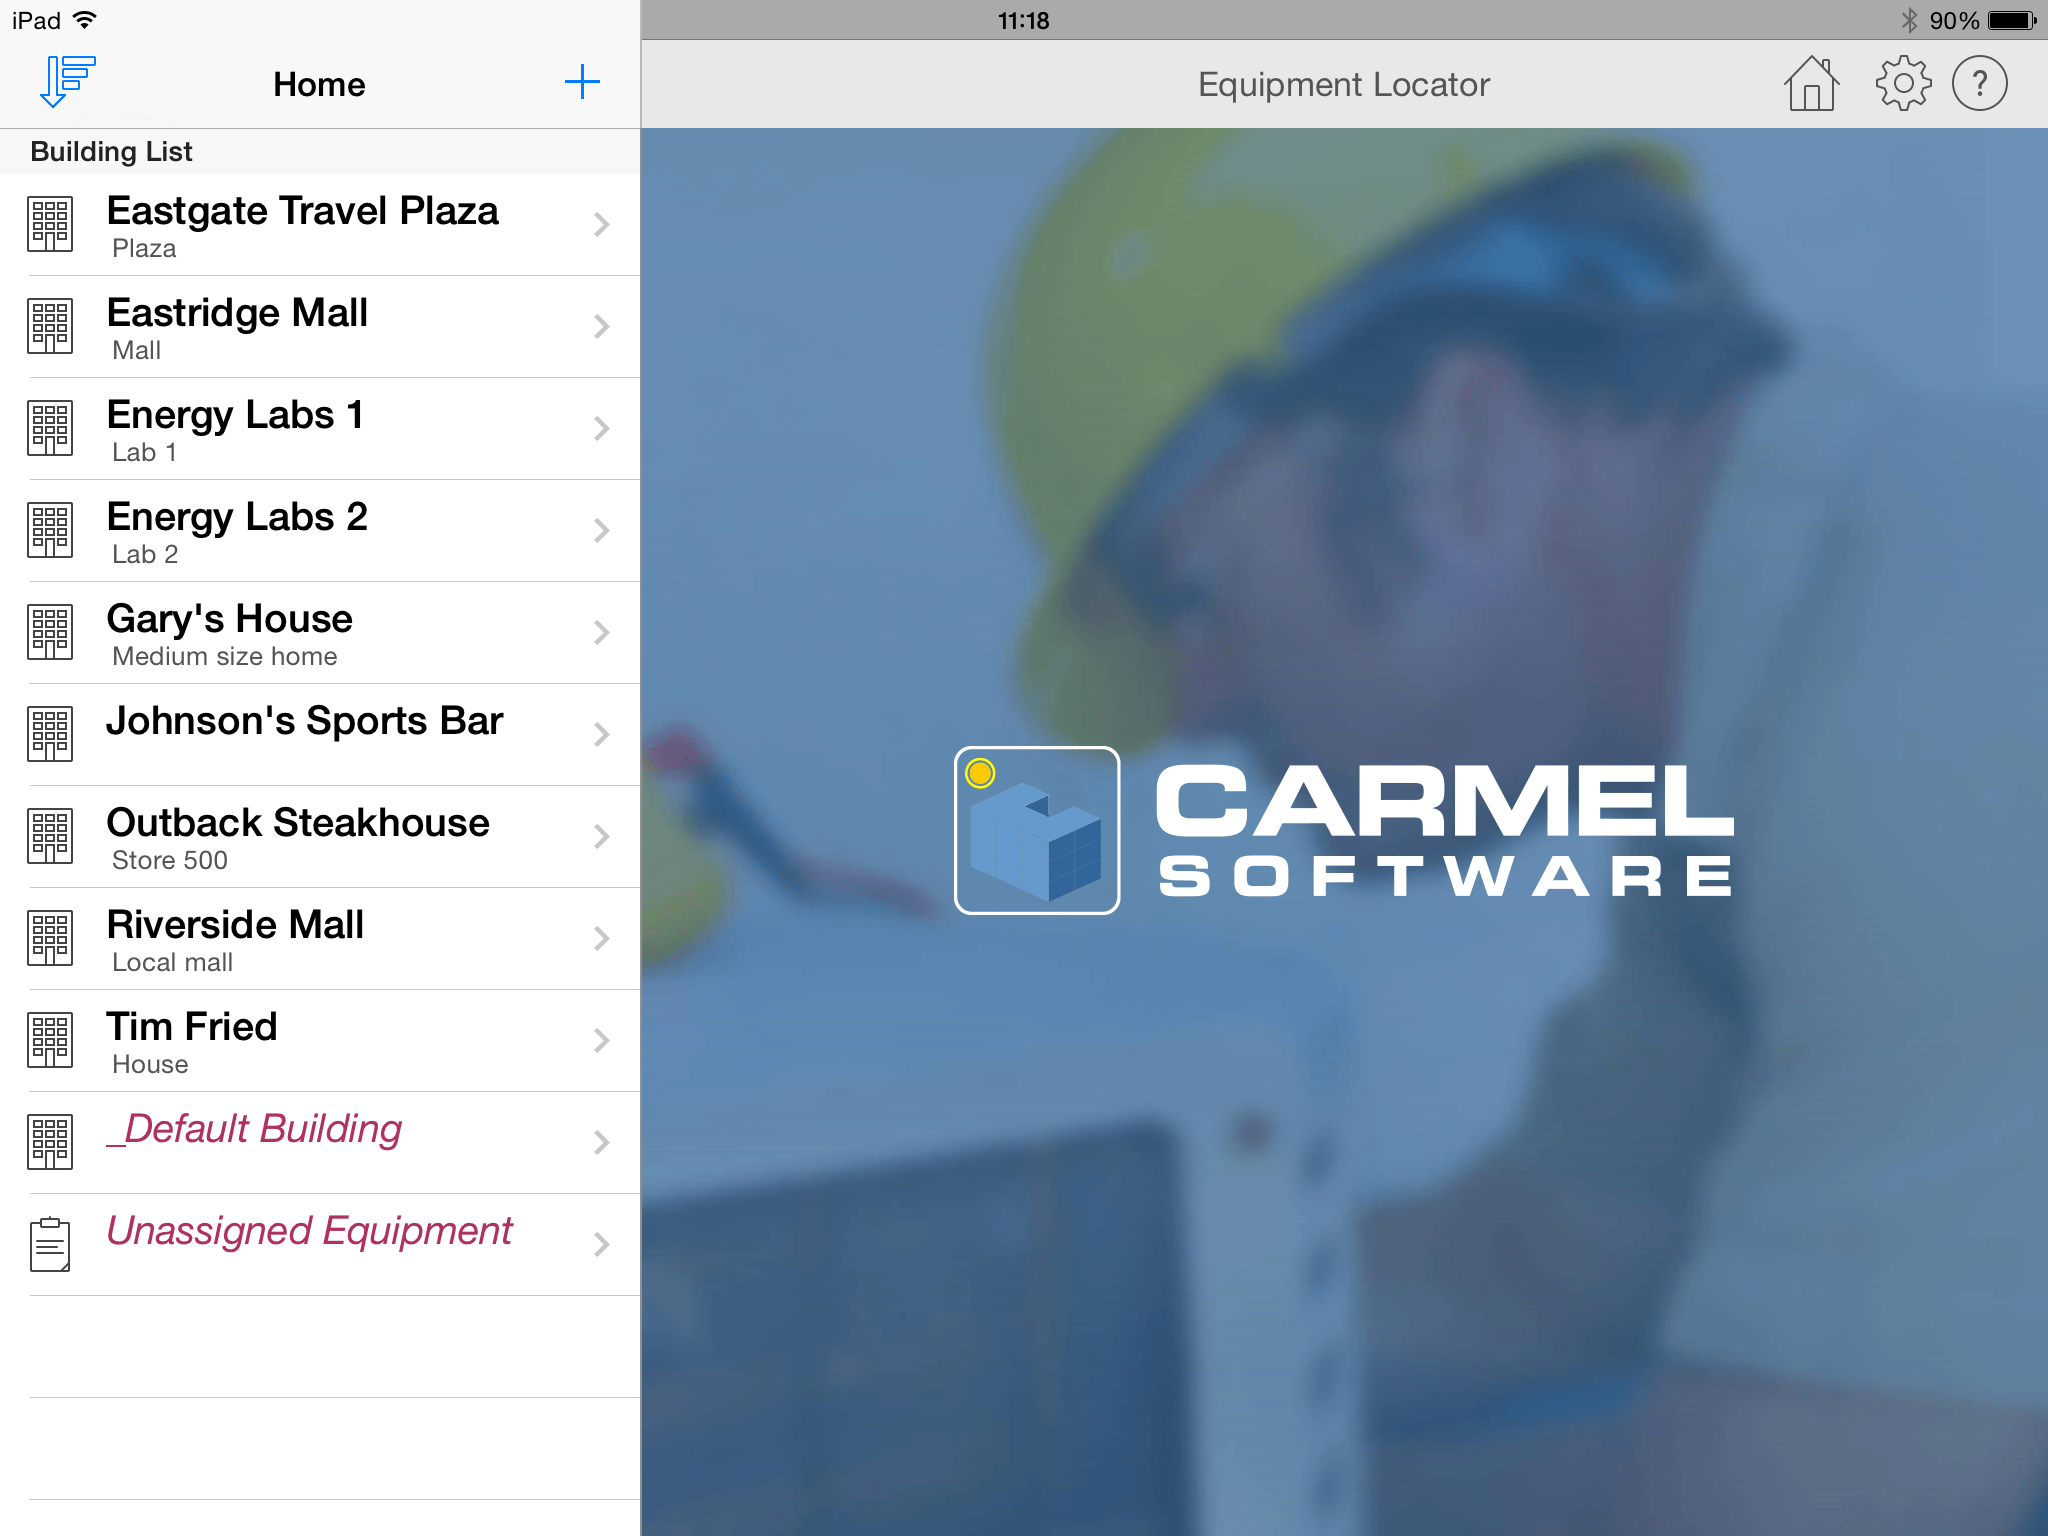
The Home view when the app opens on iPad.
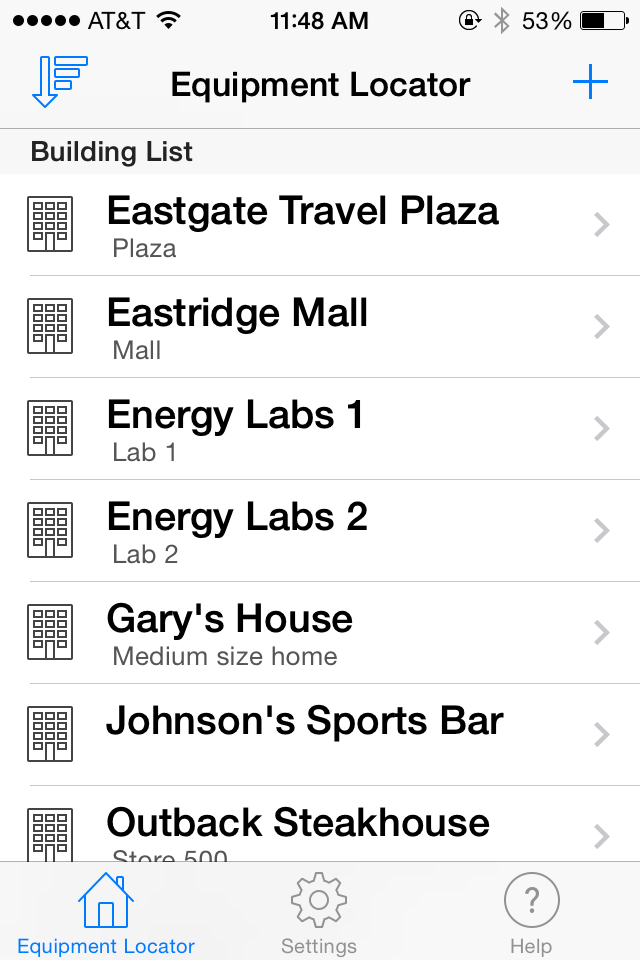
The Home view when the app opens on iPhone.
The HVAC Equipment Locator consists of two components:
- The HVAC Equipment Locator Mobile App: which is described below
- The Equipment Locator Cloud: This is the website that allows you to display, edit, and share all of the equipment information that is uploaded from the app. Click here for more details.
Overview
The HVAC Equipment Locator has been entirely rewritten from the ground up. To understand how this app works requires understanding some basic concepts about it:
- Similar to the previous version of this app, there are two components: The app, itself, which is called the HVAC Equipment Locator app, and the web or "cloud" component which is now called the "Equipment Locator Cloud".
- The app allows you to define one or more buildings (home, office complex, mall, etc.) and enter location and other information about the building. After defining a building, you can create as many pieces of equipment as you want for that building. For each piece of equipment, you can create as many maintenance events as you want for the piece of equipment. For the purposes of this help, buildings, equipment, and maintenance events are referred to as objects.
- Unlike the previous version of this app, if you have already registered or logged in, all syncing of all objects is automatic. There is no need to tell the app which equipment to sync. Also, there is no need to press a "sync" button. The app will sync periodically (you can set the time period in the app settings), so all of your data will be synced to the "cloud" and also to other devices whose logged-in users are authorized to view the equipment information.
- If you have the app installed on multiple devices, you can use the same login on these multiple devices and all of the information will uniformly synchronize.
- You can now add as many photos as you want for buildings, equipment, and maintenance events.
- You can now assign documents such as specification sheet PDFs, Microsoft Word or Excel docs and more to buildings, equipment, and maintenance events. This is done by emailing yourself a document and when you select it on your device, you will have the option to "open" it with the Locator app, and then assign it to any object. You can also upload documents to the Equipment Locator Cloud.
- A major new feature of the app is the "customization" feature. This allows you to add custom input fields to the building, equipment, and maintenance events input screens. You can add input box, dropdown, and numerical input type fields.
- Like you, we are in business to make money. Therefore, we are charging for some of the premium features discussed above including the customization capabilities and the ability to add more than 5 photos or documents per object. Also, if you want to sync and store more than 15 pieces of equipment, then you will need to pay a tiered monthly fee.
- Object "ownership" means that a building or piece of equipment can only be edited by the user who created the object. Any other authorized users who belong to the same company can only view it. "Ownership" of an object can be changed to another user using the Equipment Locator Cloud website.
- There are three categories of users defined by the Locator app: administrators, technicians, and clients.
- Administrators have full access to all buildings and equipment for a company. In other words, admins can view, edit, and delete all buildings and equipment, even those that are "owned" by other technicians within the same company. Also, anytime a technician within the same company adds a building or piece of equipment, it will automatically sync to the admin's device and web account. There is no need for the technician to "share" the object with the admin. Admins can also manage technicians from the same company so that they can view, edit, and assign (or "own") building and equipment information. An admin is always the first person to sign up for a company. In the app registration screen (described below), the admin can register by entering a registration email and password. Once the user is authenticated, the user is automatically assigned a new company id (viewed in the Manage Account portion of the Equipment Locator Cloud website). This company id is subsequently used by a technician, who belongs to the same company, to register (there is a company id input on the app registration screen).
- Technicians only have access to the buildings and equipment that they have created or that have been assigned to them by the company administrator. Technicians are able to log into the Equipment Locator Cloud website and manage their own buildings and equipment. They can also share their buildings and equipment with other technicians within the same company.
- Clients are able to only view the buildings and equipment that are assigned to them by the company administrator. They never have any type of editing capabilities. Go to the Equipment Locator Cloud website help for more information on how clients are managed.
Where appropriate, the help explanations are divided between the iPhone and iPad versions of the app. In most cases, the help for both versions are combined. Images for both the iPhone and iPad are represented in almost all the sections.
Registration and Login
If you wish to sync and backup your equipment data, you need to register with the Equipment Locator Cloud using the Locator app. The registration/login screen appears when you start the app for the first time. You can choose to login if you have previously registered (either on a previous version of the app or on another device), register if you are a new user, or skip login and just enter information locally on the device. Below is an explanation of each of these options:
RegisterClick the Register link to display the registration screen. This screen allows you to create a new user registration. Enter a valid registration email, a password (twice to confirm), and if available, a company id that you were given by the administrator from your company. After you click the "Register" button, a confirmation email will be sent to you. Close the app and open your email client, then click the link within the email to confirm that you are a valid registrant. After clicking the email, return to the app, and login using the same credentials. You are now a registered user, and you will not have to login again on the app.
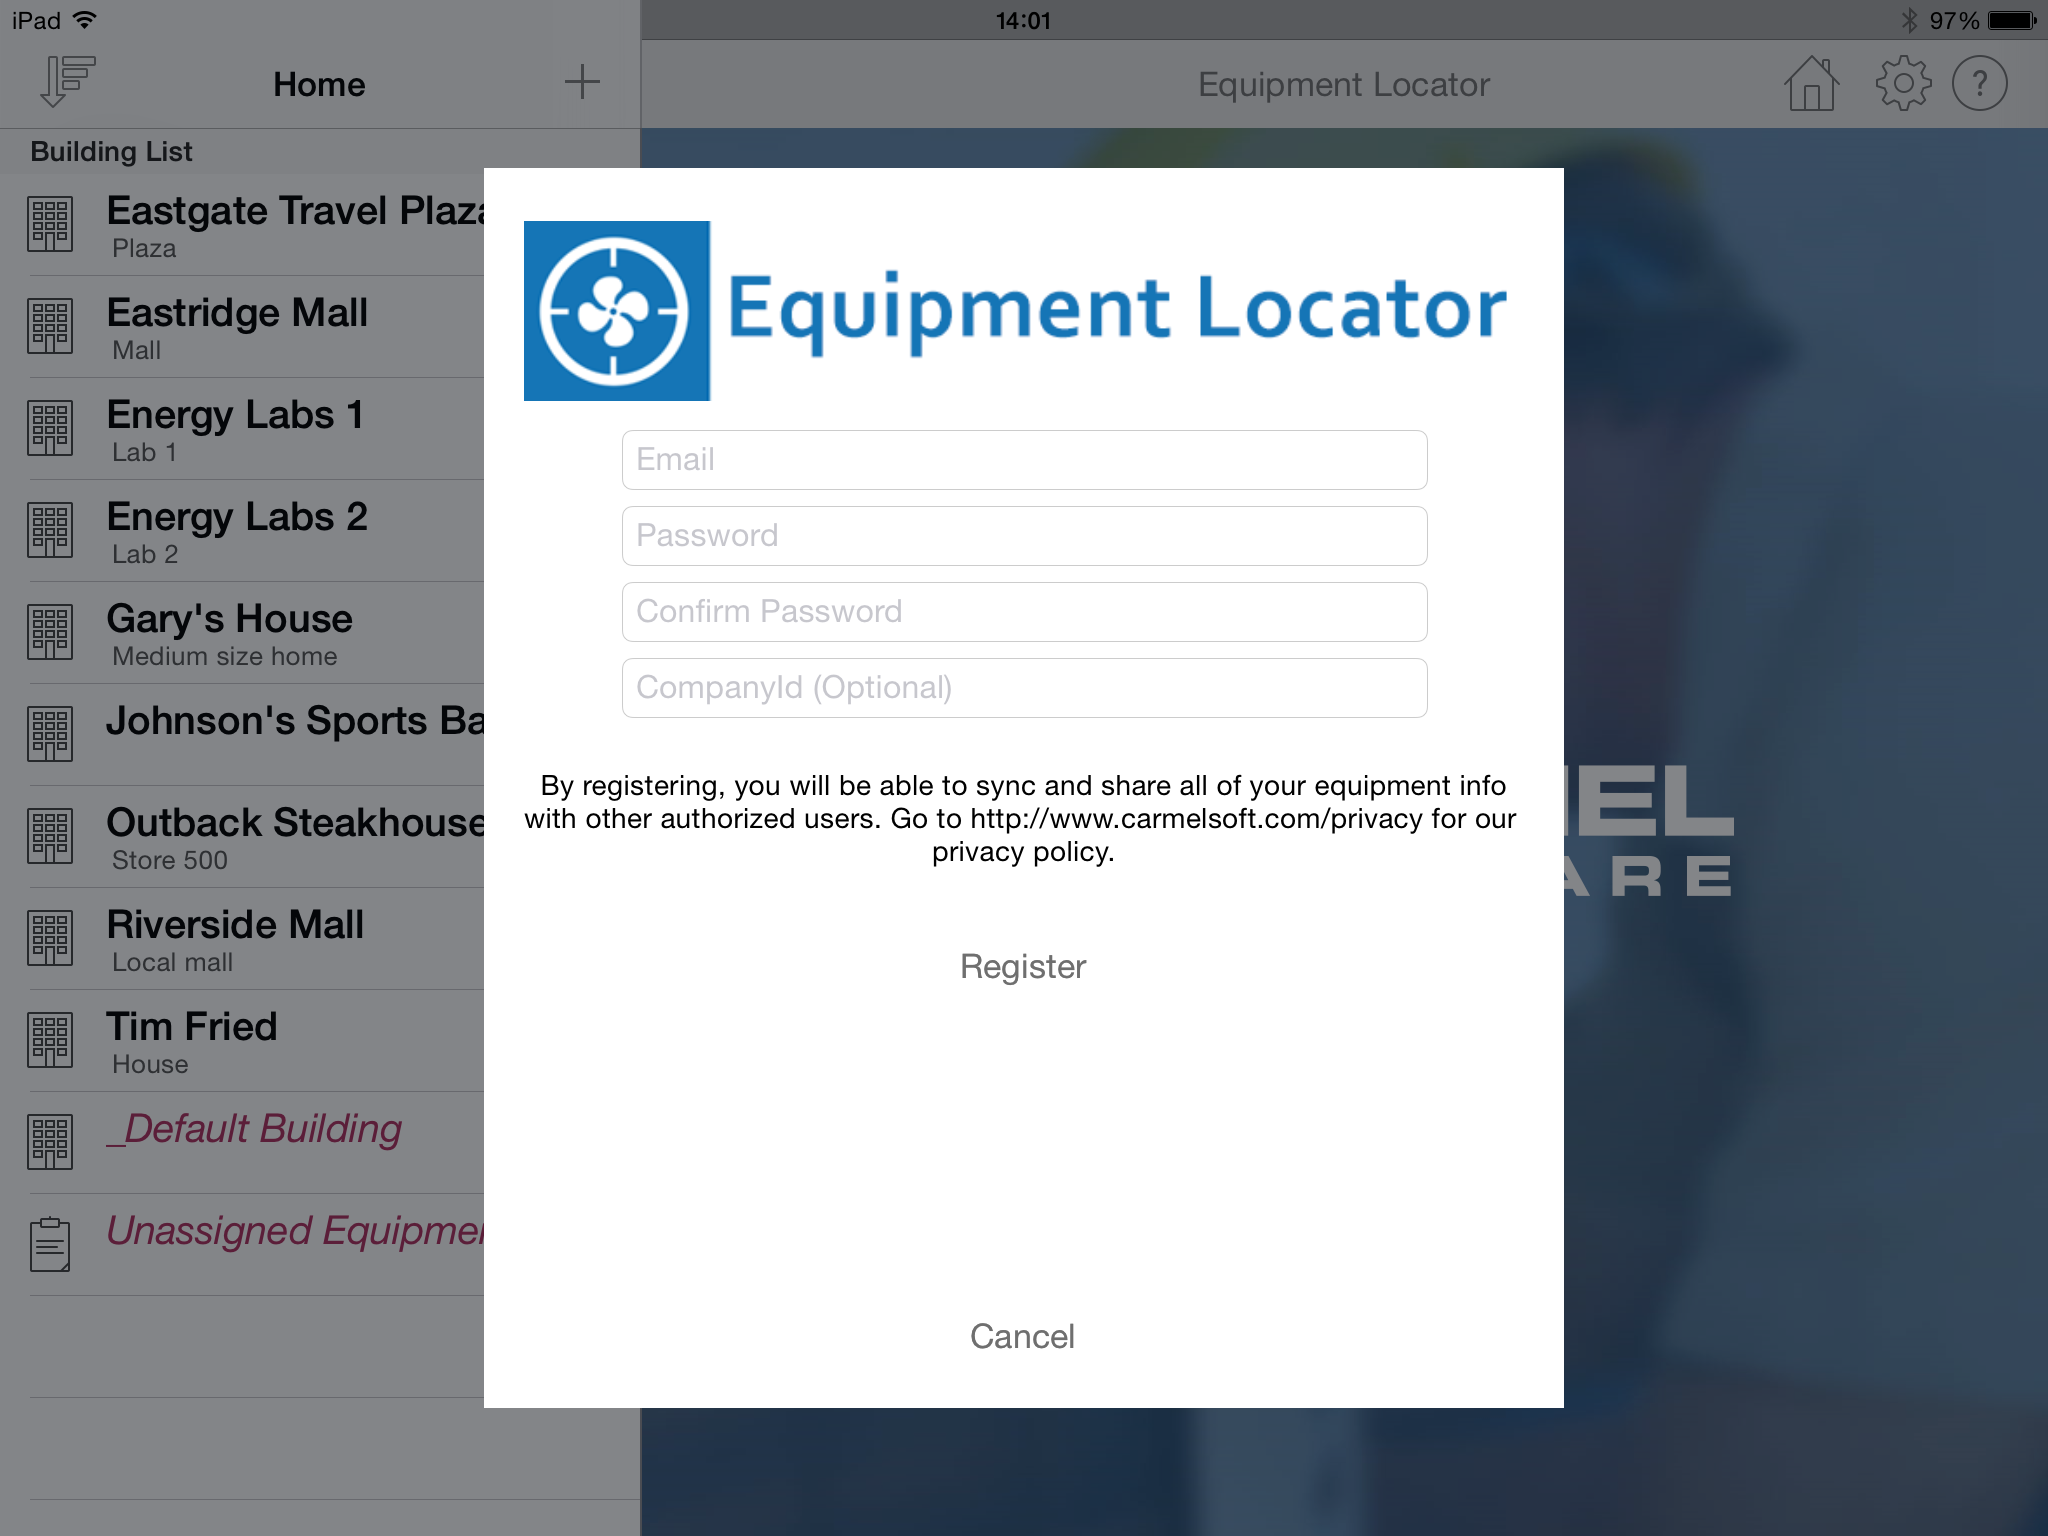
If you have previously registered on another device or directly through the Equipment Locator Cloud, then re-enter the registration information (email login and password) and click the Login link to log in. If successful, a "Login Successful" message will appear, and all of your objects will sync (if any exist).
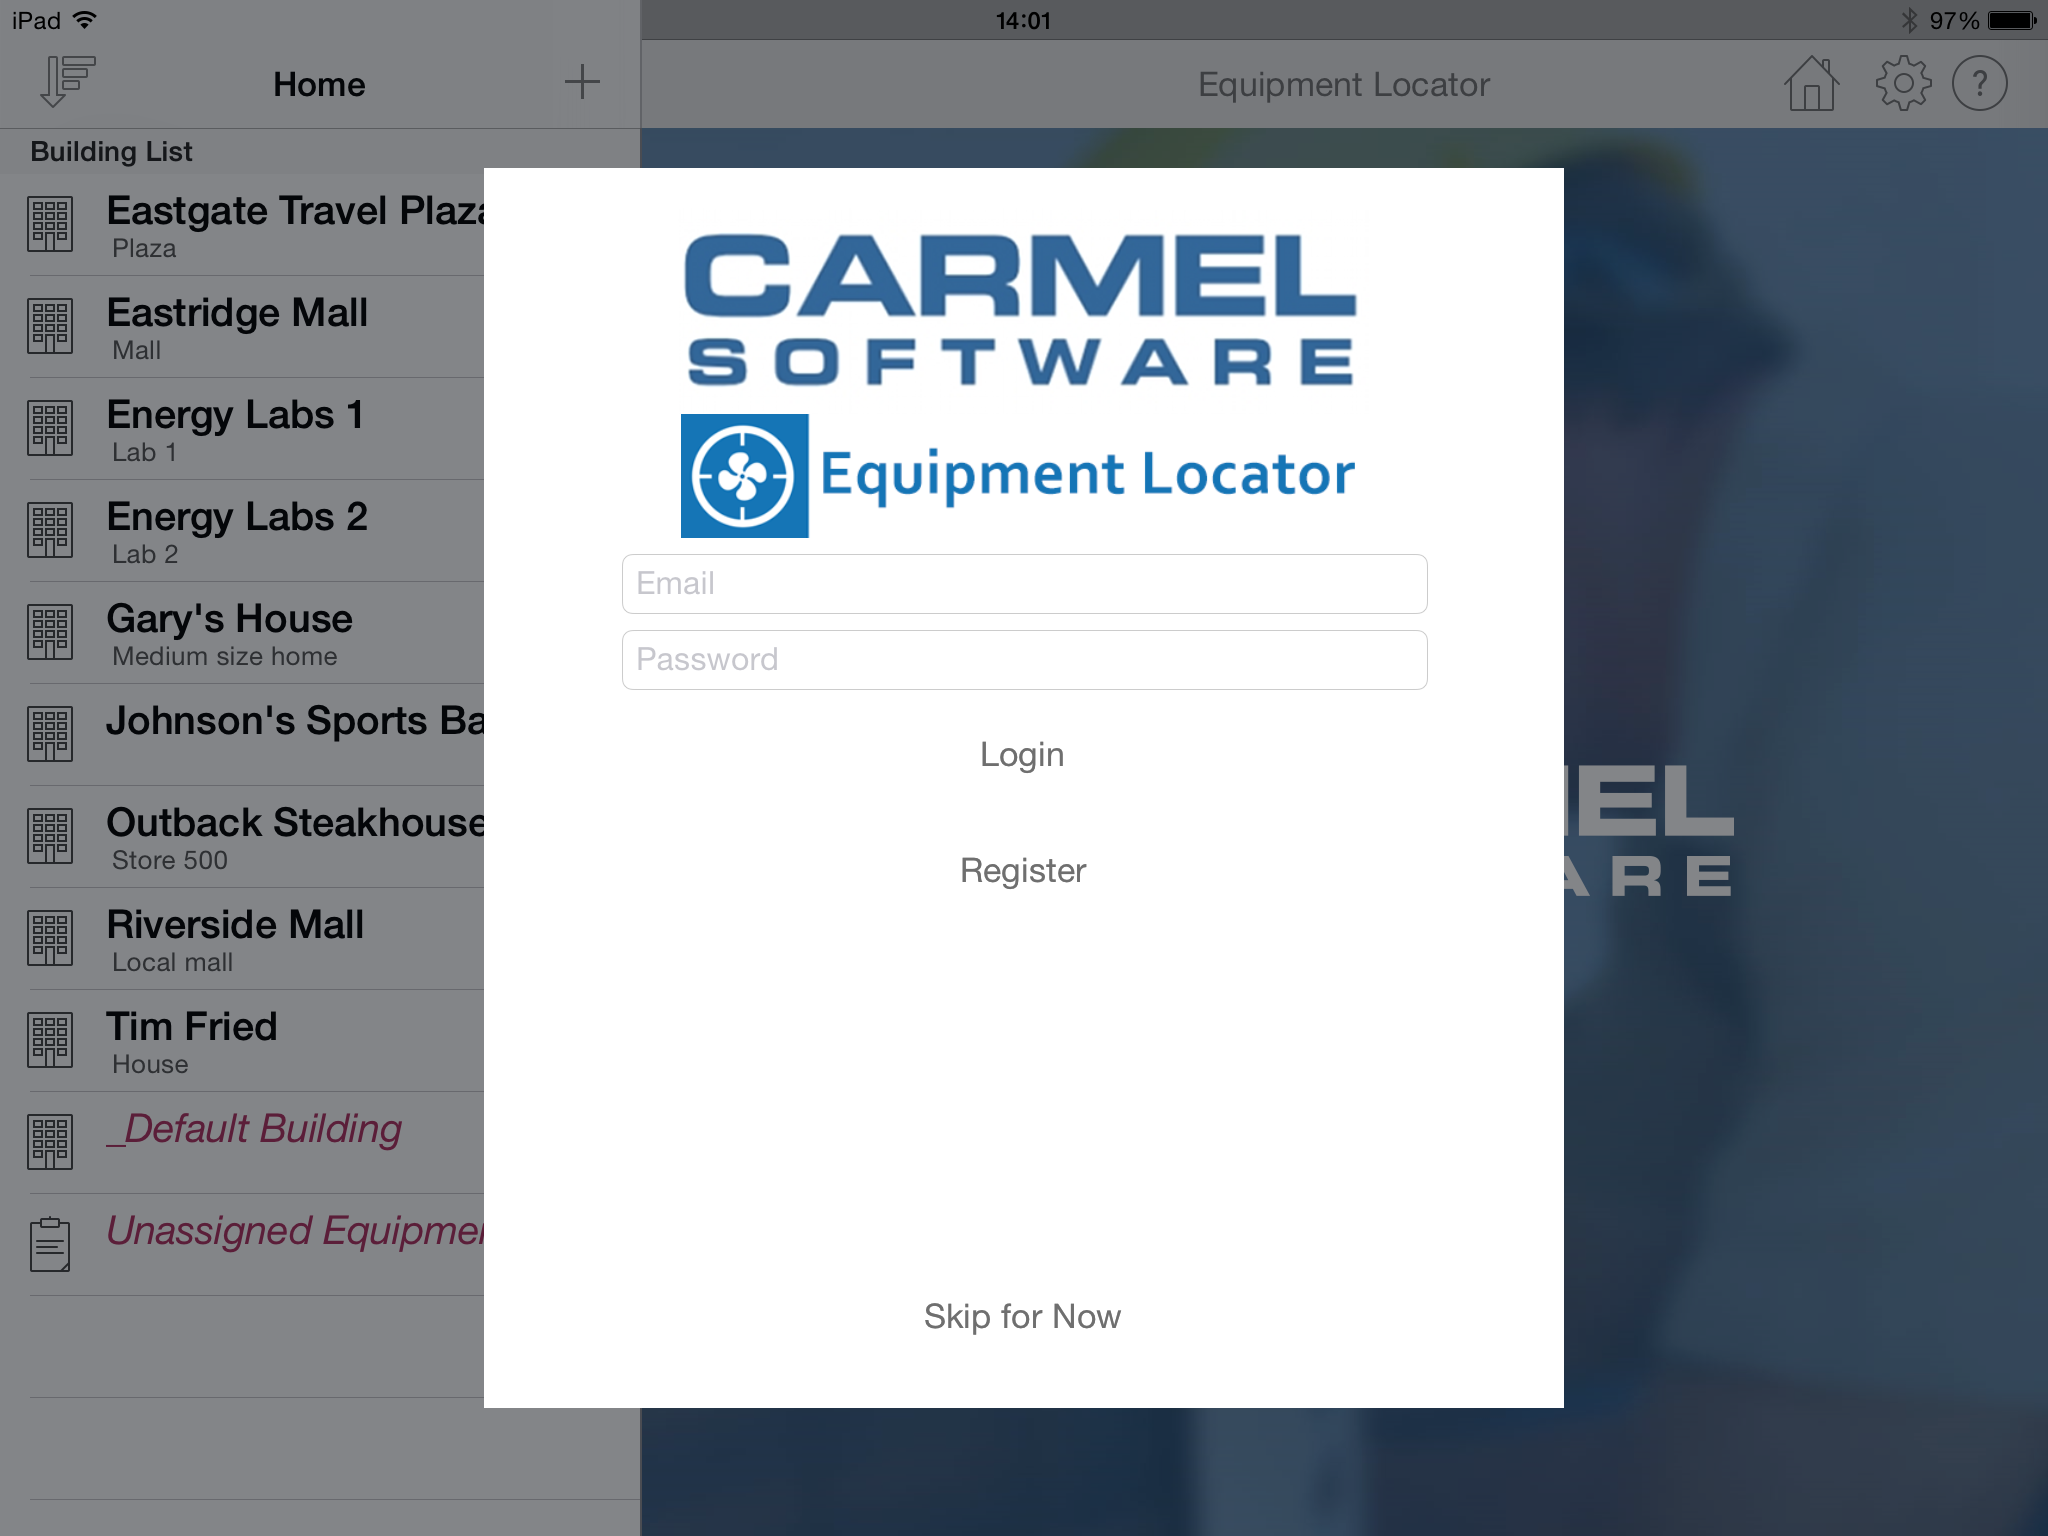
This link allows you to skip registration and login. You are still able to use the app as if you were registered. However, none of your information will sync to the cloud. You have the option of being reminded to register/login after every 5 uses of the app, or you can choose not to display a reminder at all. If, at a later time, you wish to register/login, then select the Settings tab and click the Login button to display the registration/login screen.
Getting Started
After you have successfully logged in (or postponed logging in), you can begin using the app.iPhone Version:
When you first open the iPhone version of the HVAC Equipment Locator app, you will see 3 tabs at the bottom of your screen:
- The Equipment Locator tab is the first screen that appears when you start up the application. It displays a list of all of your buildings.
- The Settings tab allows you to specify global settings such as syncronization login information. Read the Settings section below for more details.
- The Help tab displays this help screen formatted for the mobile device.
When you first open the iPad version of the HVAC Equipment Locator app, you will see a couple of buttons in the top right-hand corner of the screen:
- Click the Home icon to return to the initial Building List that first displays when you open the app
- Click the Gear icon to display the Settings form that allows you to specify syncronization login information, in-app purchases, and more. Read the "Settings" section below for more details.
- Click the Help icon to display this help screen formatted for the iPad.
Equipment Locator
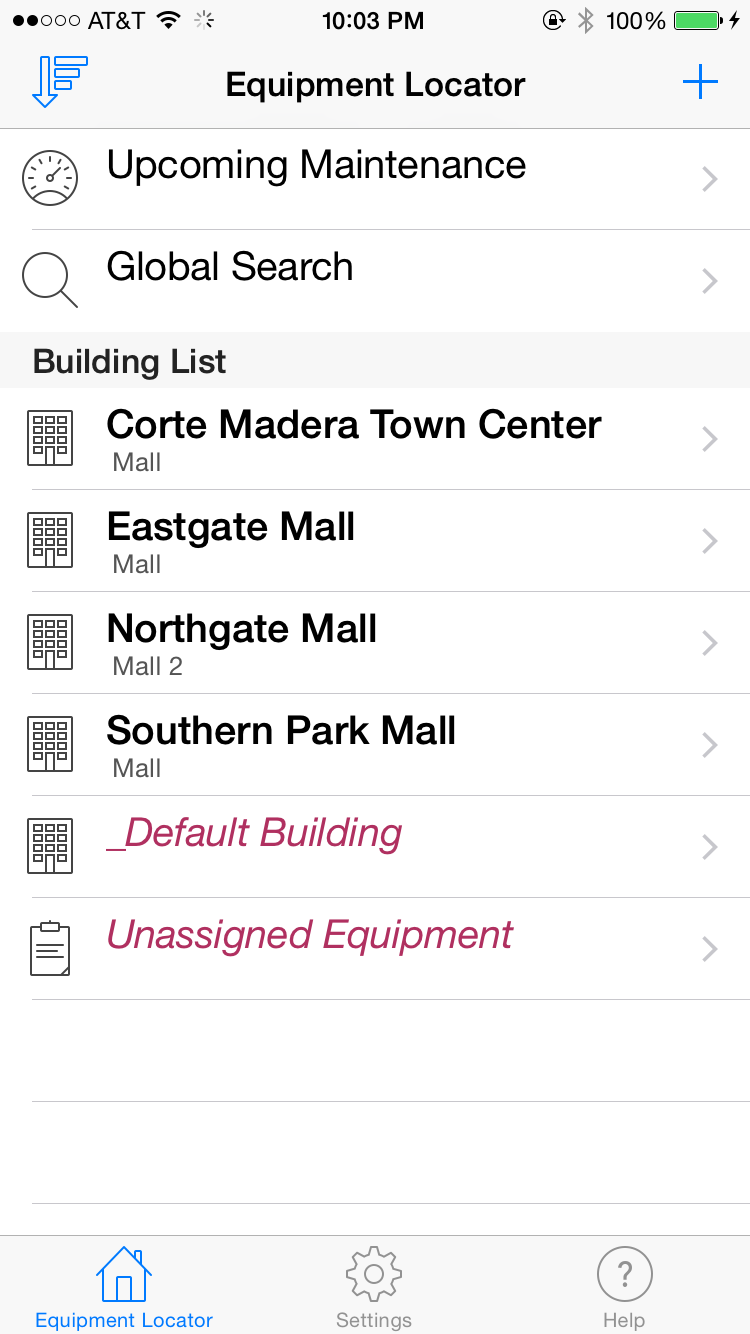
On the iPhone version, when you first start the app, the list of buildings will appear. On the iPad version, click the image in the upper left-hand corner to display the list of buildings.Some newer features that have been added as of mid-2015 include upcoming maintenance lists and global search. Above the list of buildings, are the 2 options: "Upcoming Maintenance" and "Global Search". Upcoming Maintenance lists all maintenance events that will occur within the next week. Click here for more details. Global Search is a premium feature that allows you to perform a global text search throughout all building, equipment, and maintenance inputs. Click here for more details.
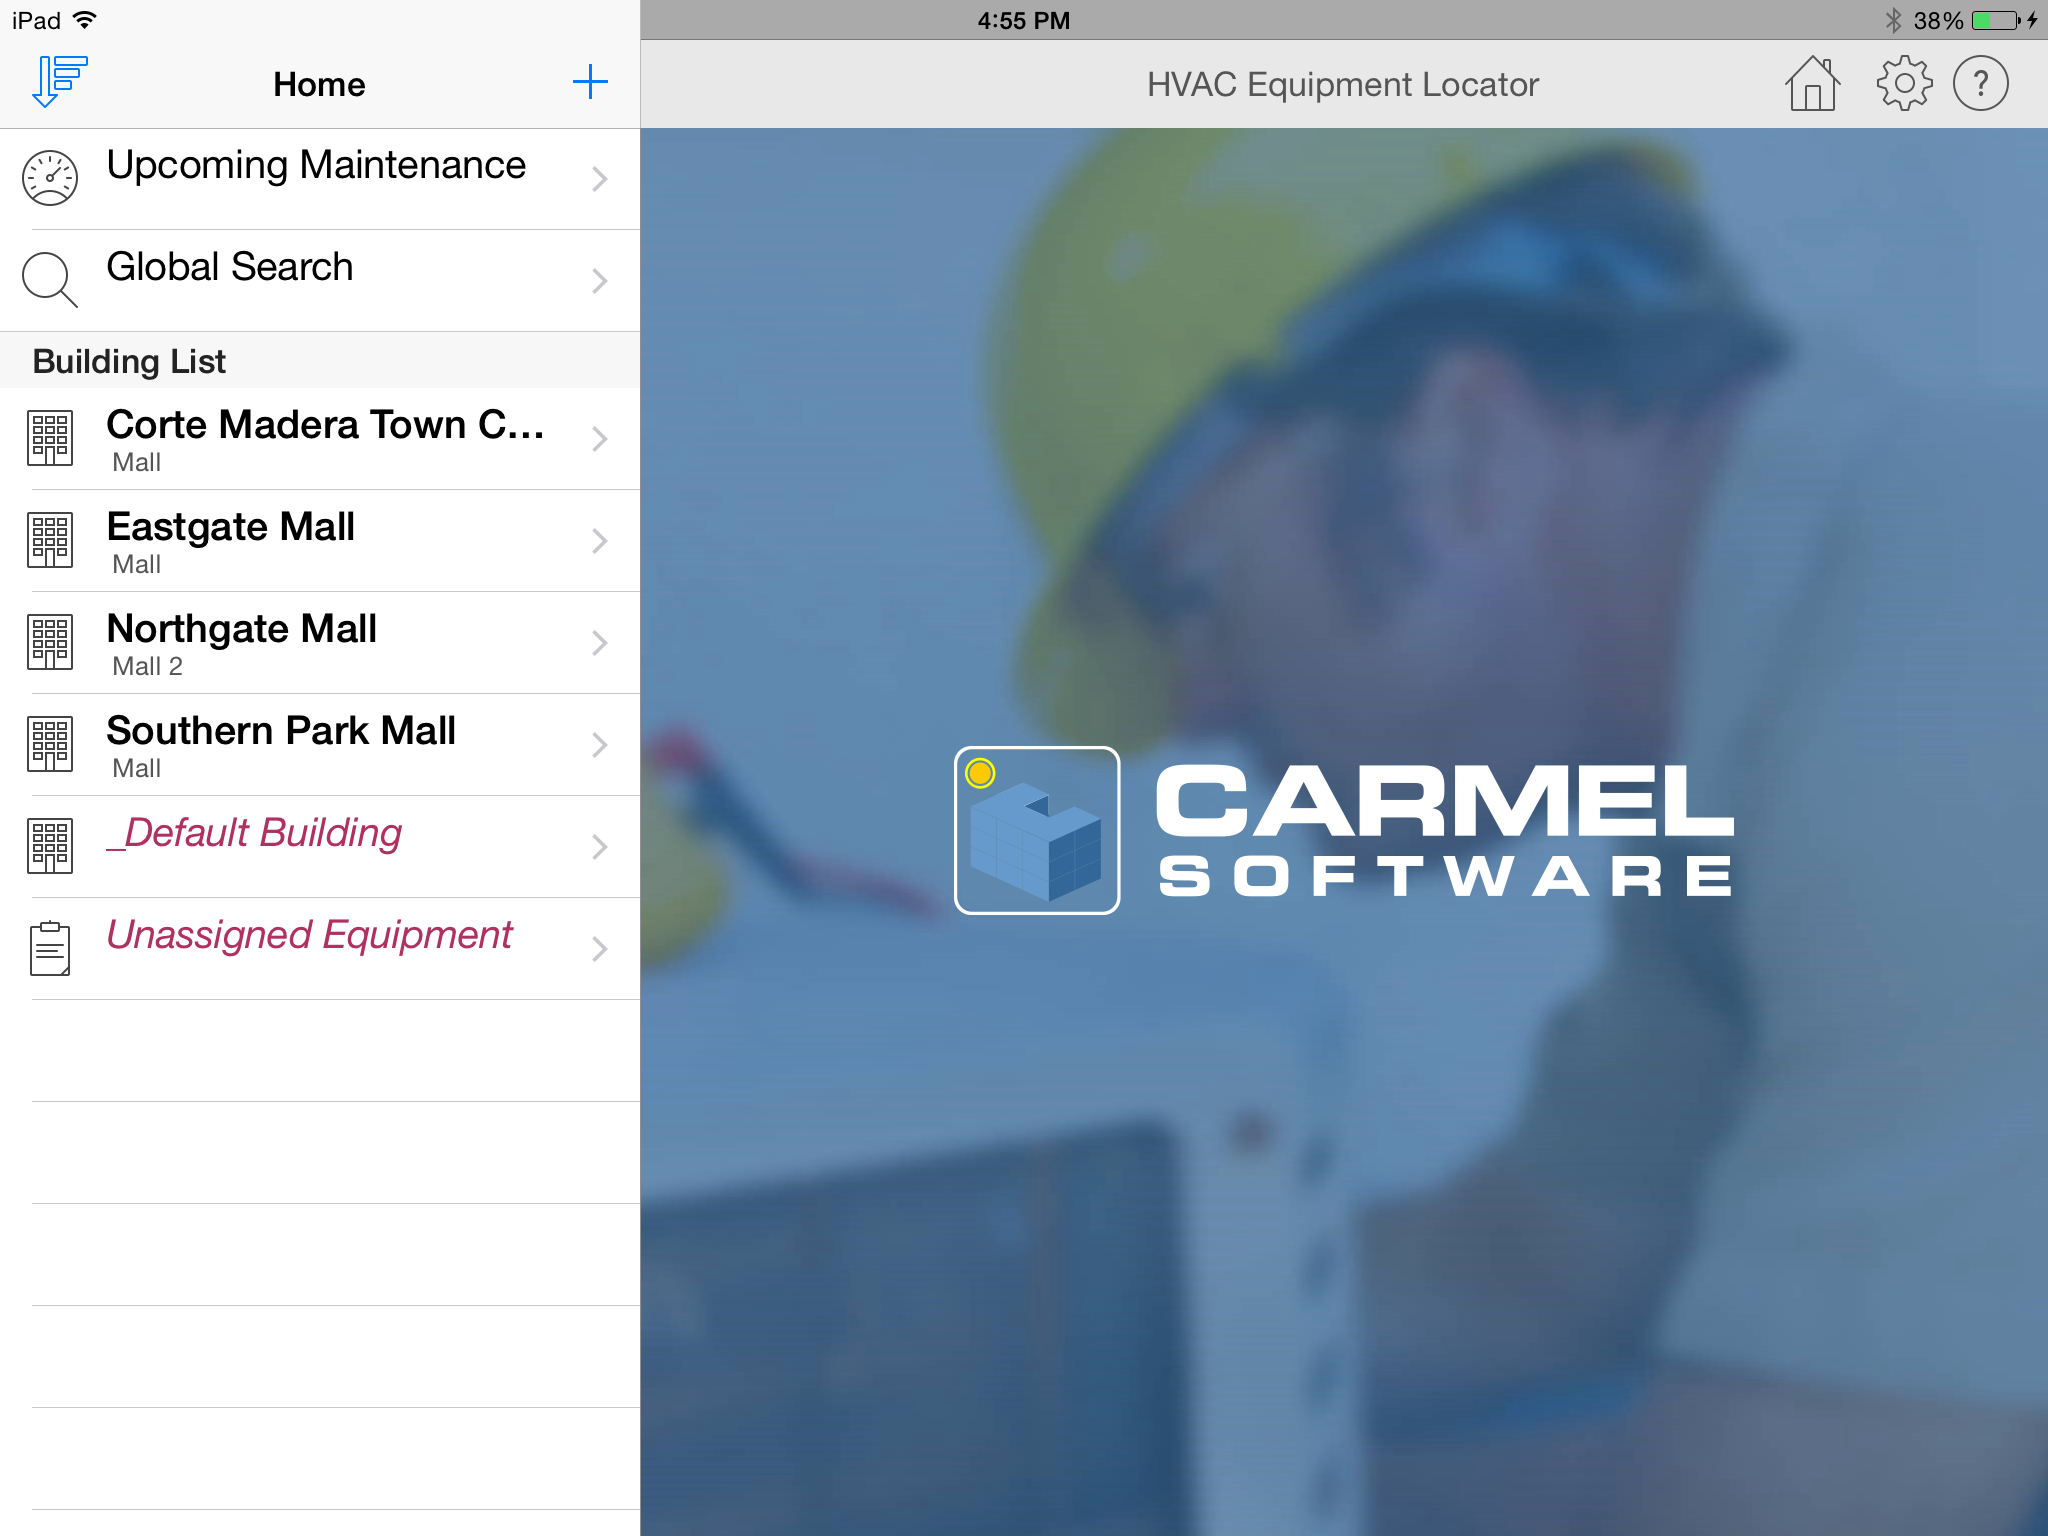
- The "_Default Building" option, as the name implies, is a template building that is used to create all new buildings. Within the default building is a default equipment and a default maintenance event.
Any information you input into the default bldg/equipment/maintenance event will be copied into any new bldg/equipment/maintenance.
You cannot delete the default building and you also cannot add additional equipment or maintenance events to it.

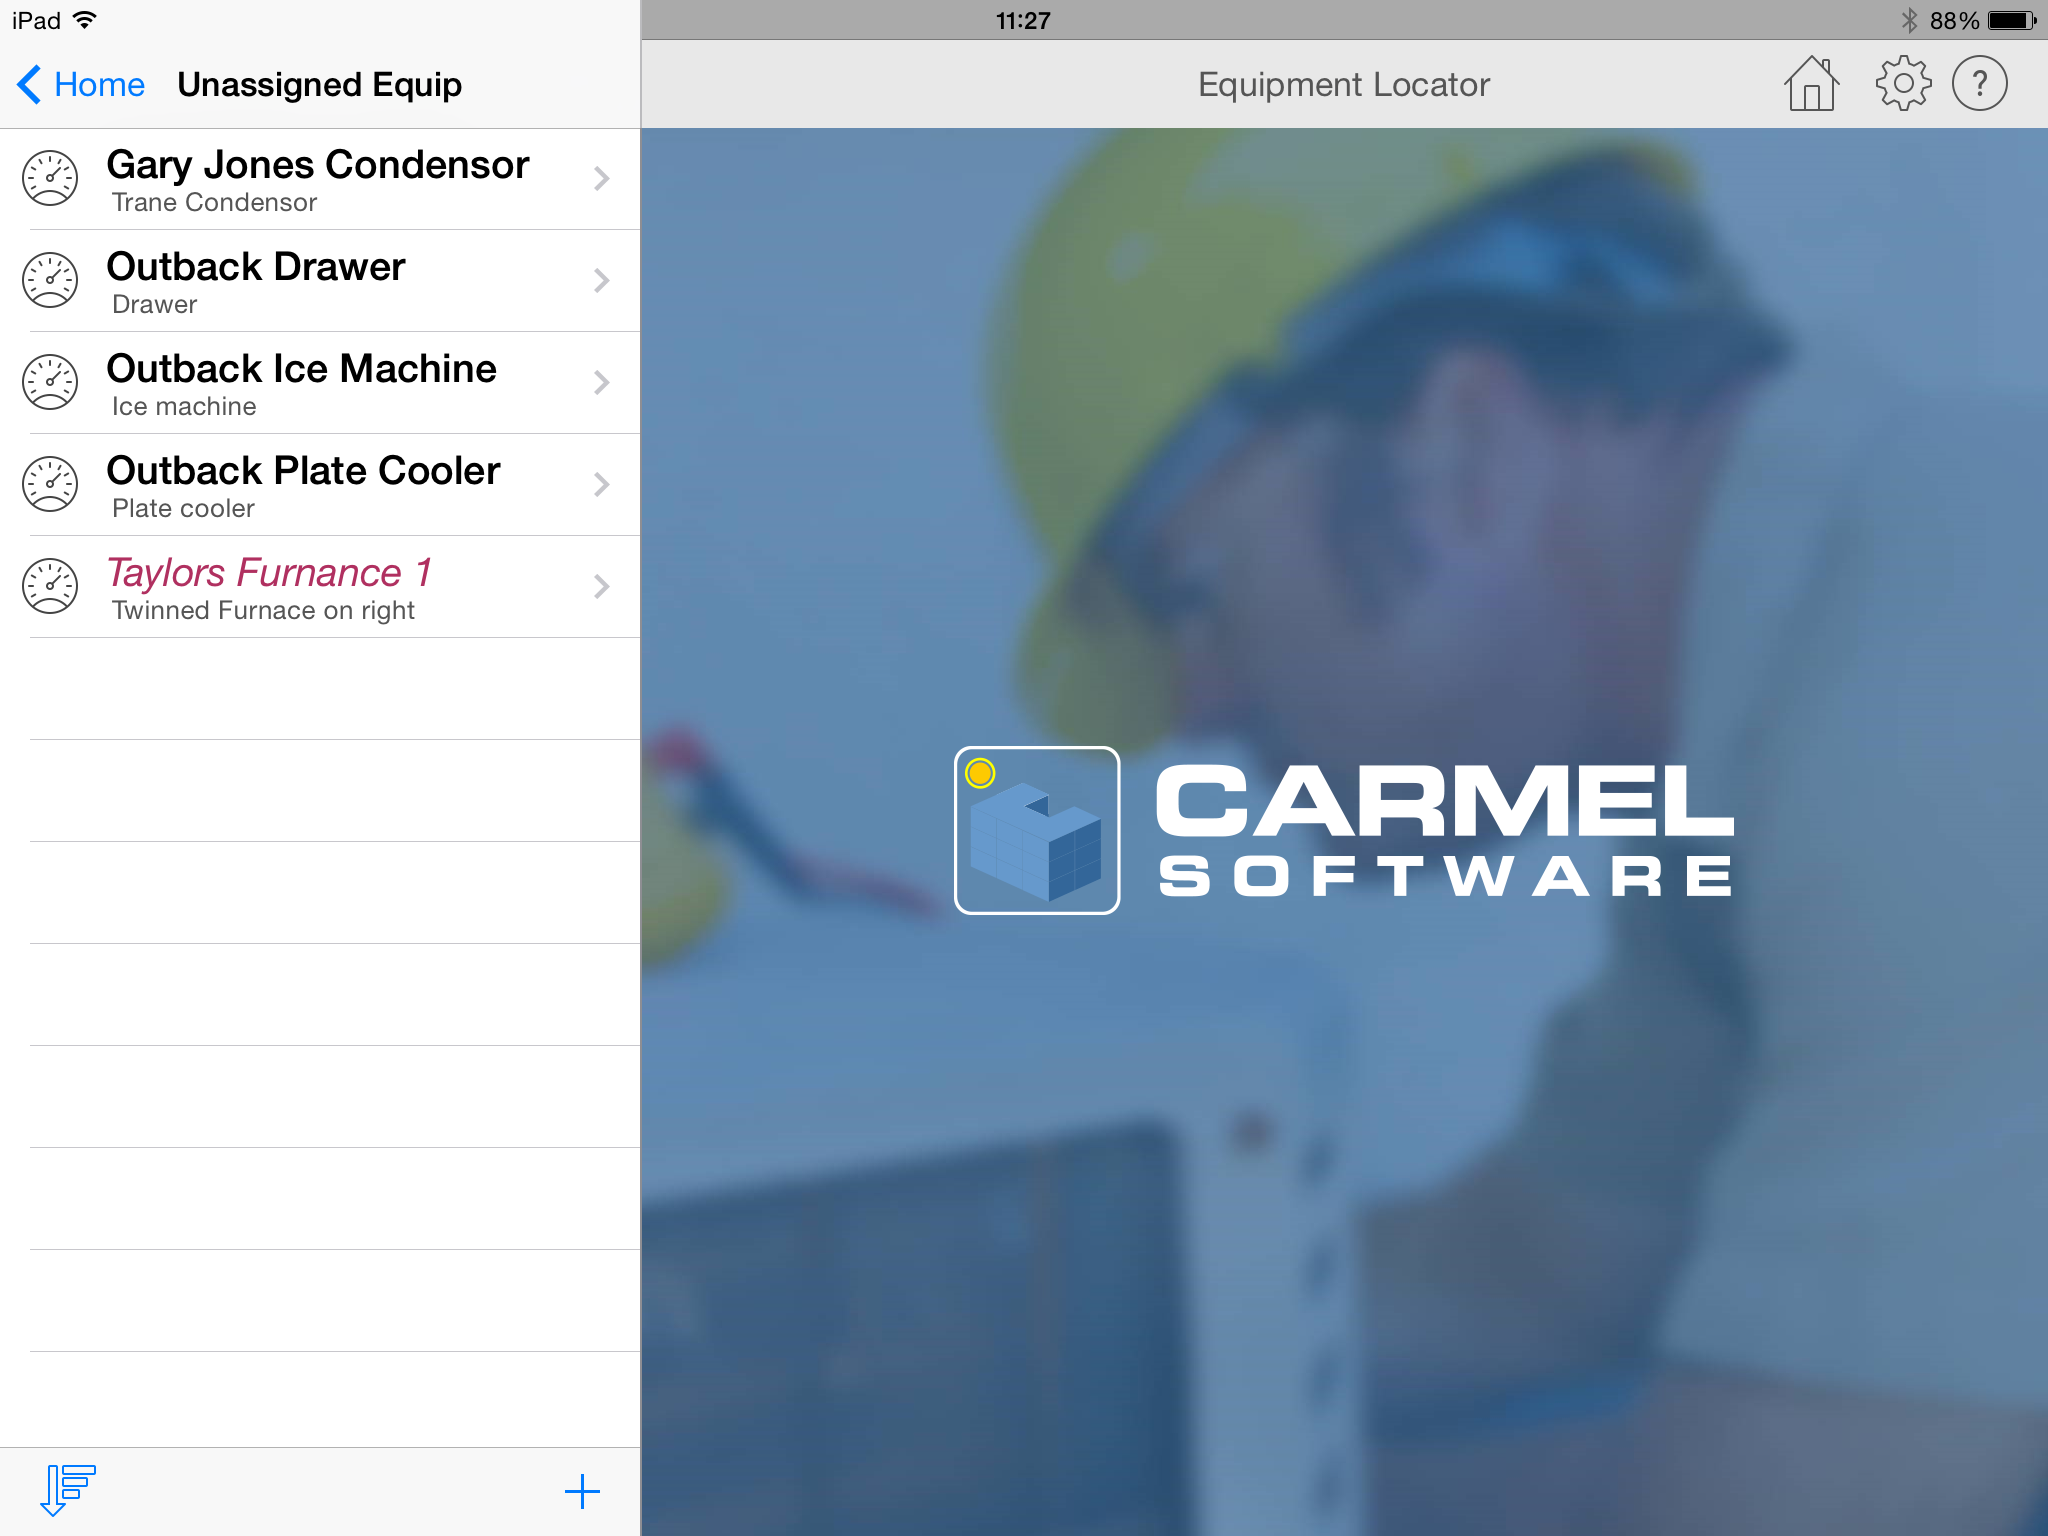
- The "Unassigned Building" option lists all equipment that are not assigned to any buildings. This occurs when equipment are migrated from a prior version of the Locator app and no location information
was inputted for the equipment. Also, you can add equipment to the "Unassigned Equipment" category if you do not want to assign it to a building. After it syncs to the cloud, you can view the equipment
under the "Unassigned Equipment" listing on the website. On the website, you are able to assign the unassigned equipment to an existing building.
- Any building names that are listed with maroon color and italics font indicate that the buildings are not "owned" by you (see definition of "ownership" above). Any buildings that are not owned by you cannot be editted nor deleted by you. However, you can view the building information.
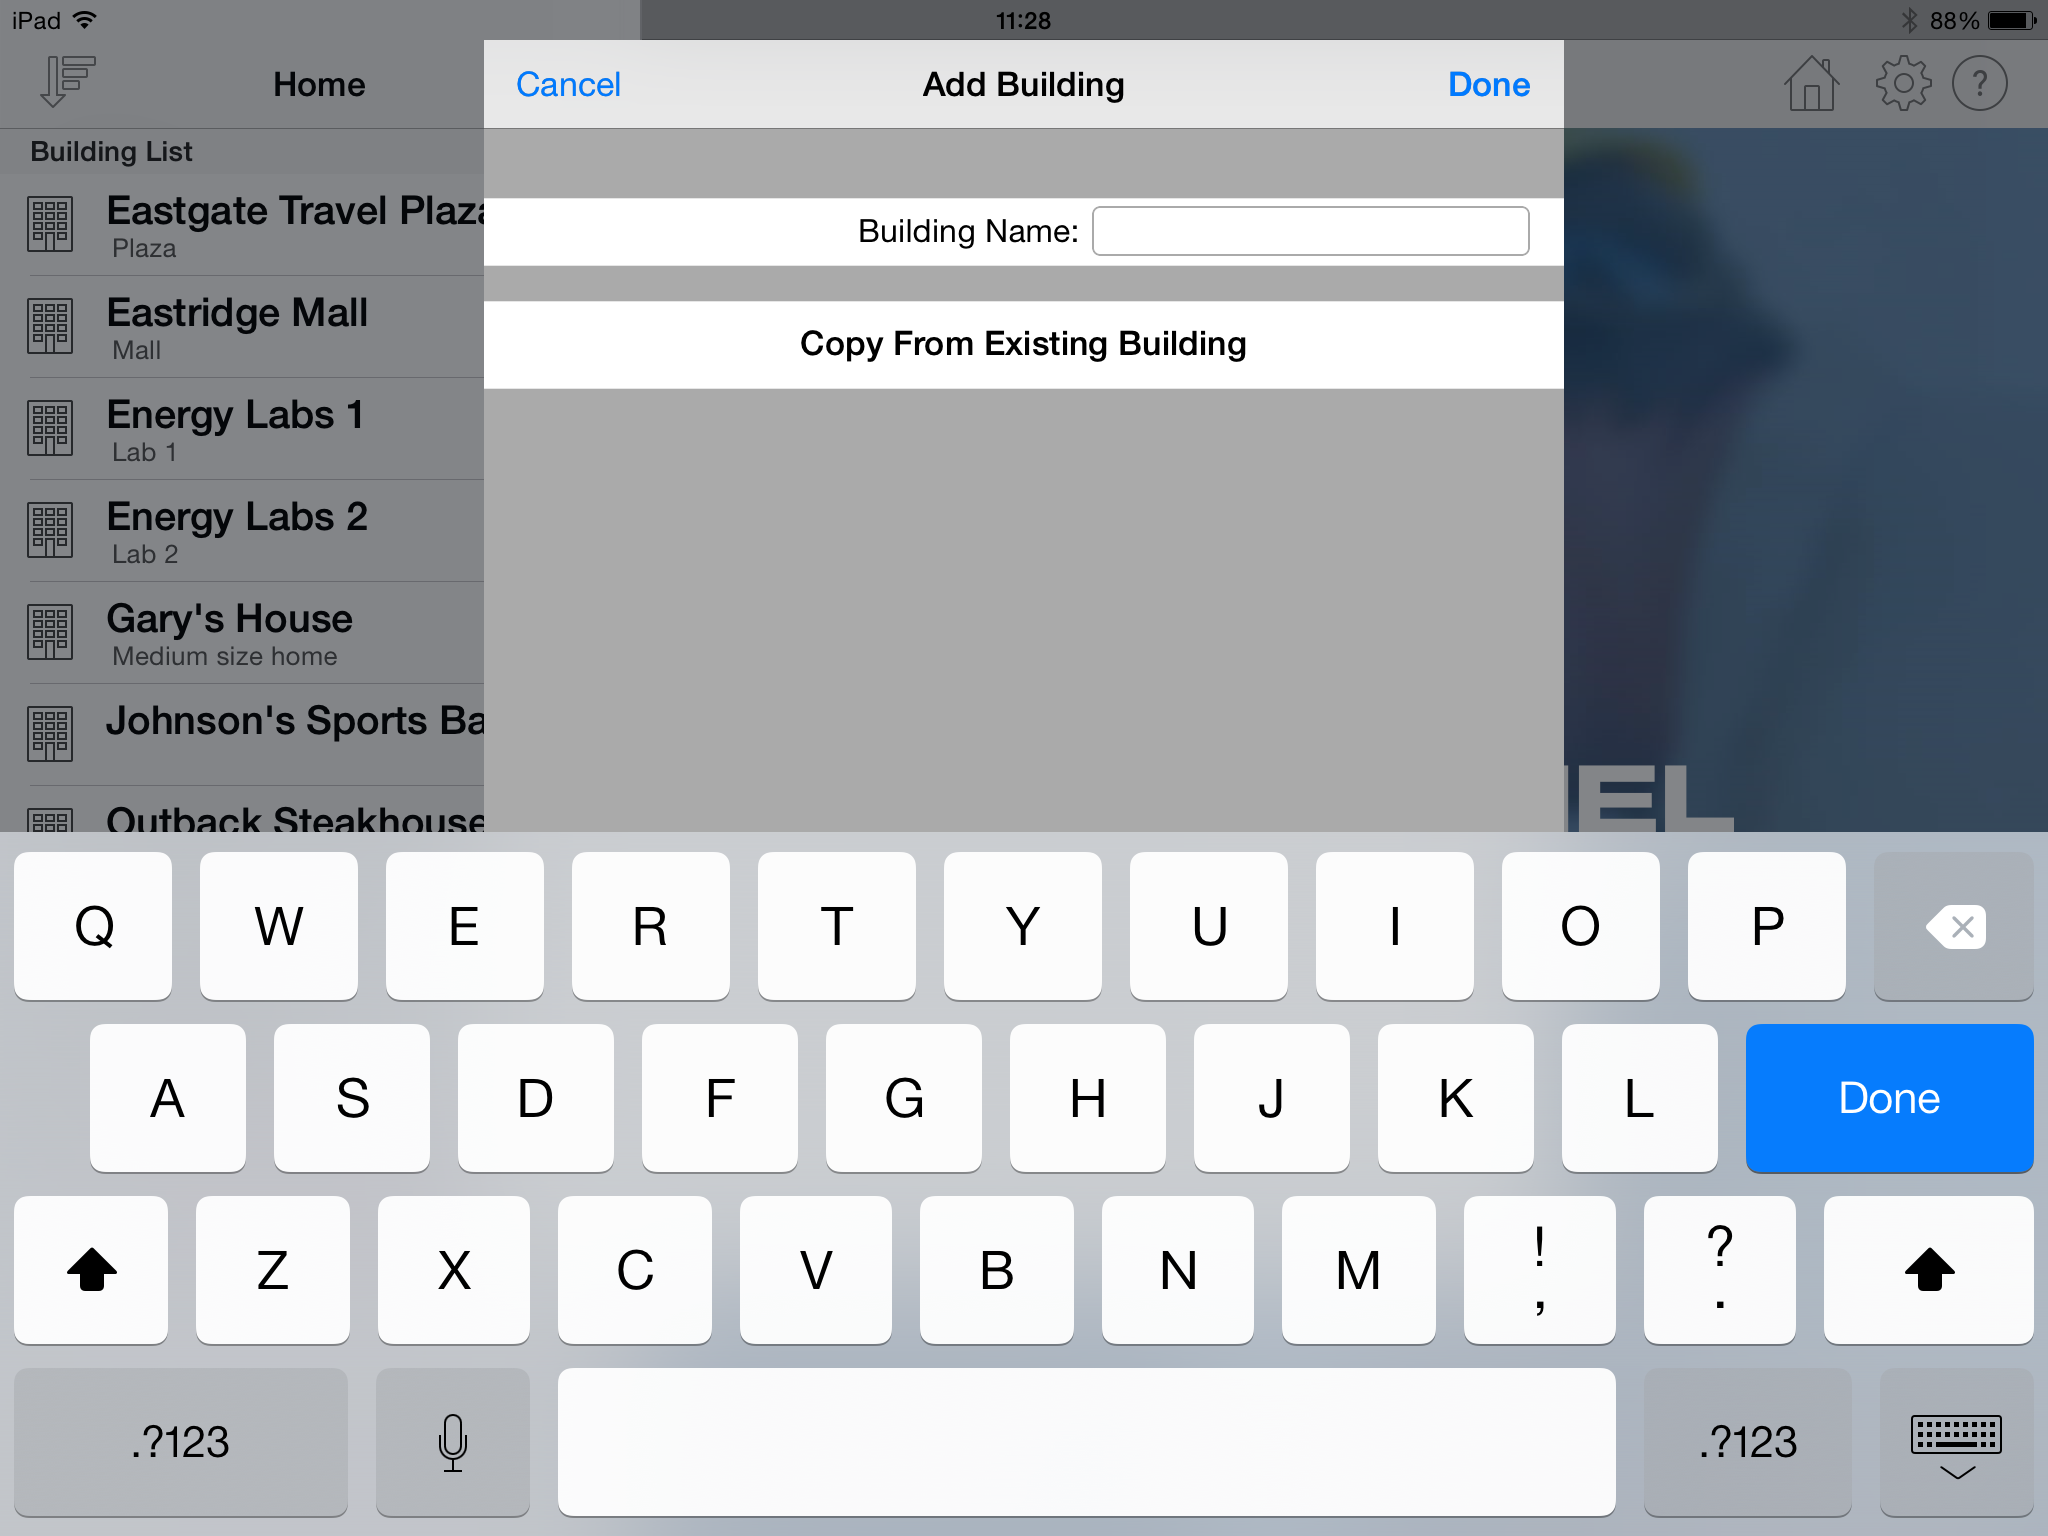
- Create a New Building: To create a new building,
click the "+" button located in the upper right-hand corner of the screen. A
new screen will appear allowing you to enter a new building name.
The "_Default Building" is always used as the basis for creating a new building. The new building will include
any of the data entered in the "_Default Building" including any custom inputs.
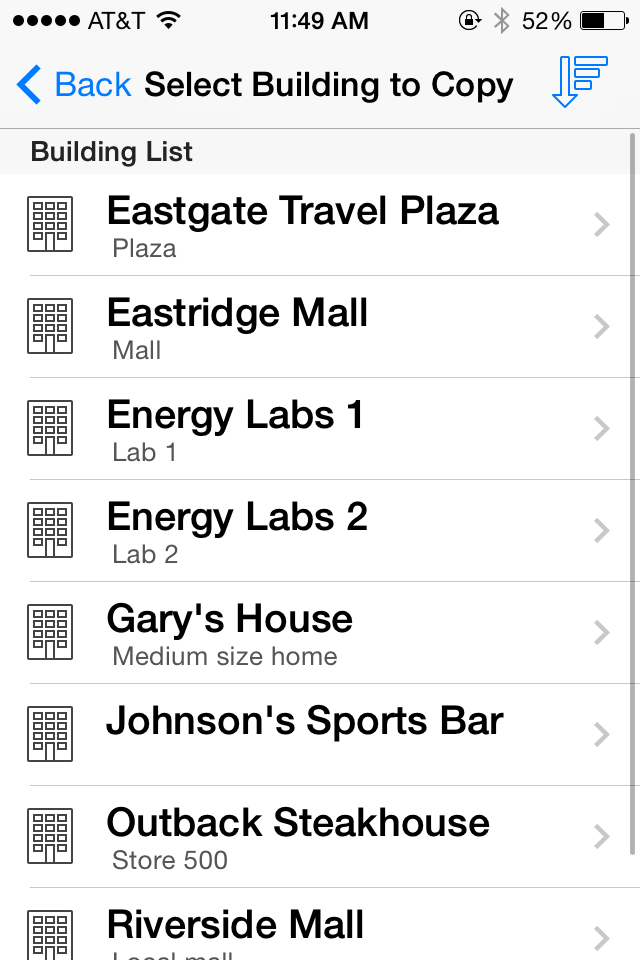
You can also copy all information (including custom inputs) from an existing building by pressing the
button labelled "Copy from Existing Building". A list of all existing buildings
will appear allowing you to select from one. When
you return to the "Add Building" screen, the new building name will be the same as the one you copied from plus the word " Copy" appended to it.
You can change this name by selecting the "Building Info" option and changing the "Building Name" property. When you copy from an existing building, none of the equipment or
maintenance information is copied, only the building information.

- Edit an Existing Building: To edit an existing building,
select the building name with your finger and the building information screen will appear.
- Delete an Existing Building: Swipe your finger across the name of the building that you wish to delete. A "delete" button will appear allowing you to press it to delete the building.
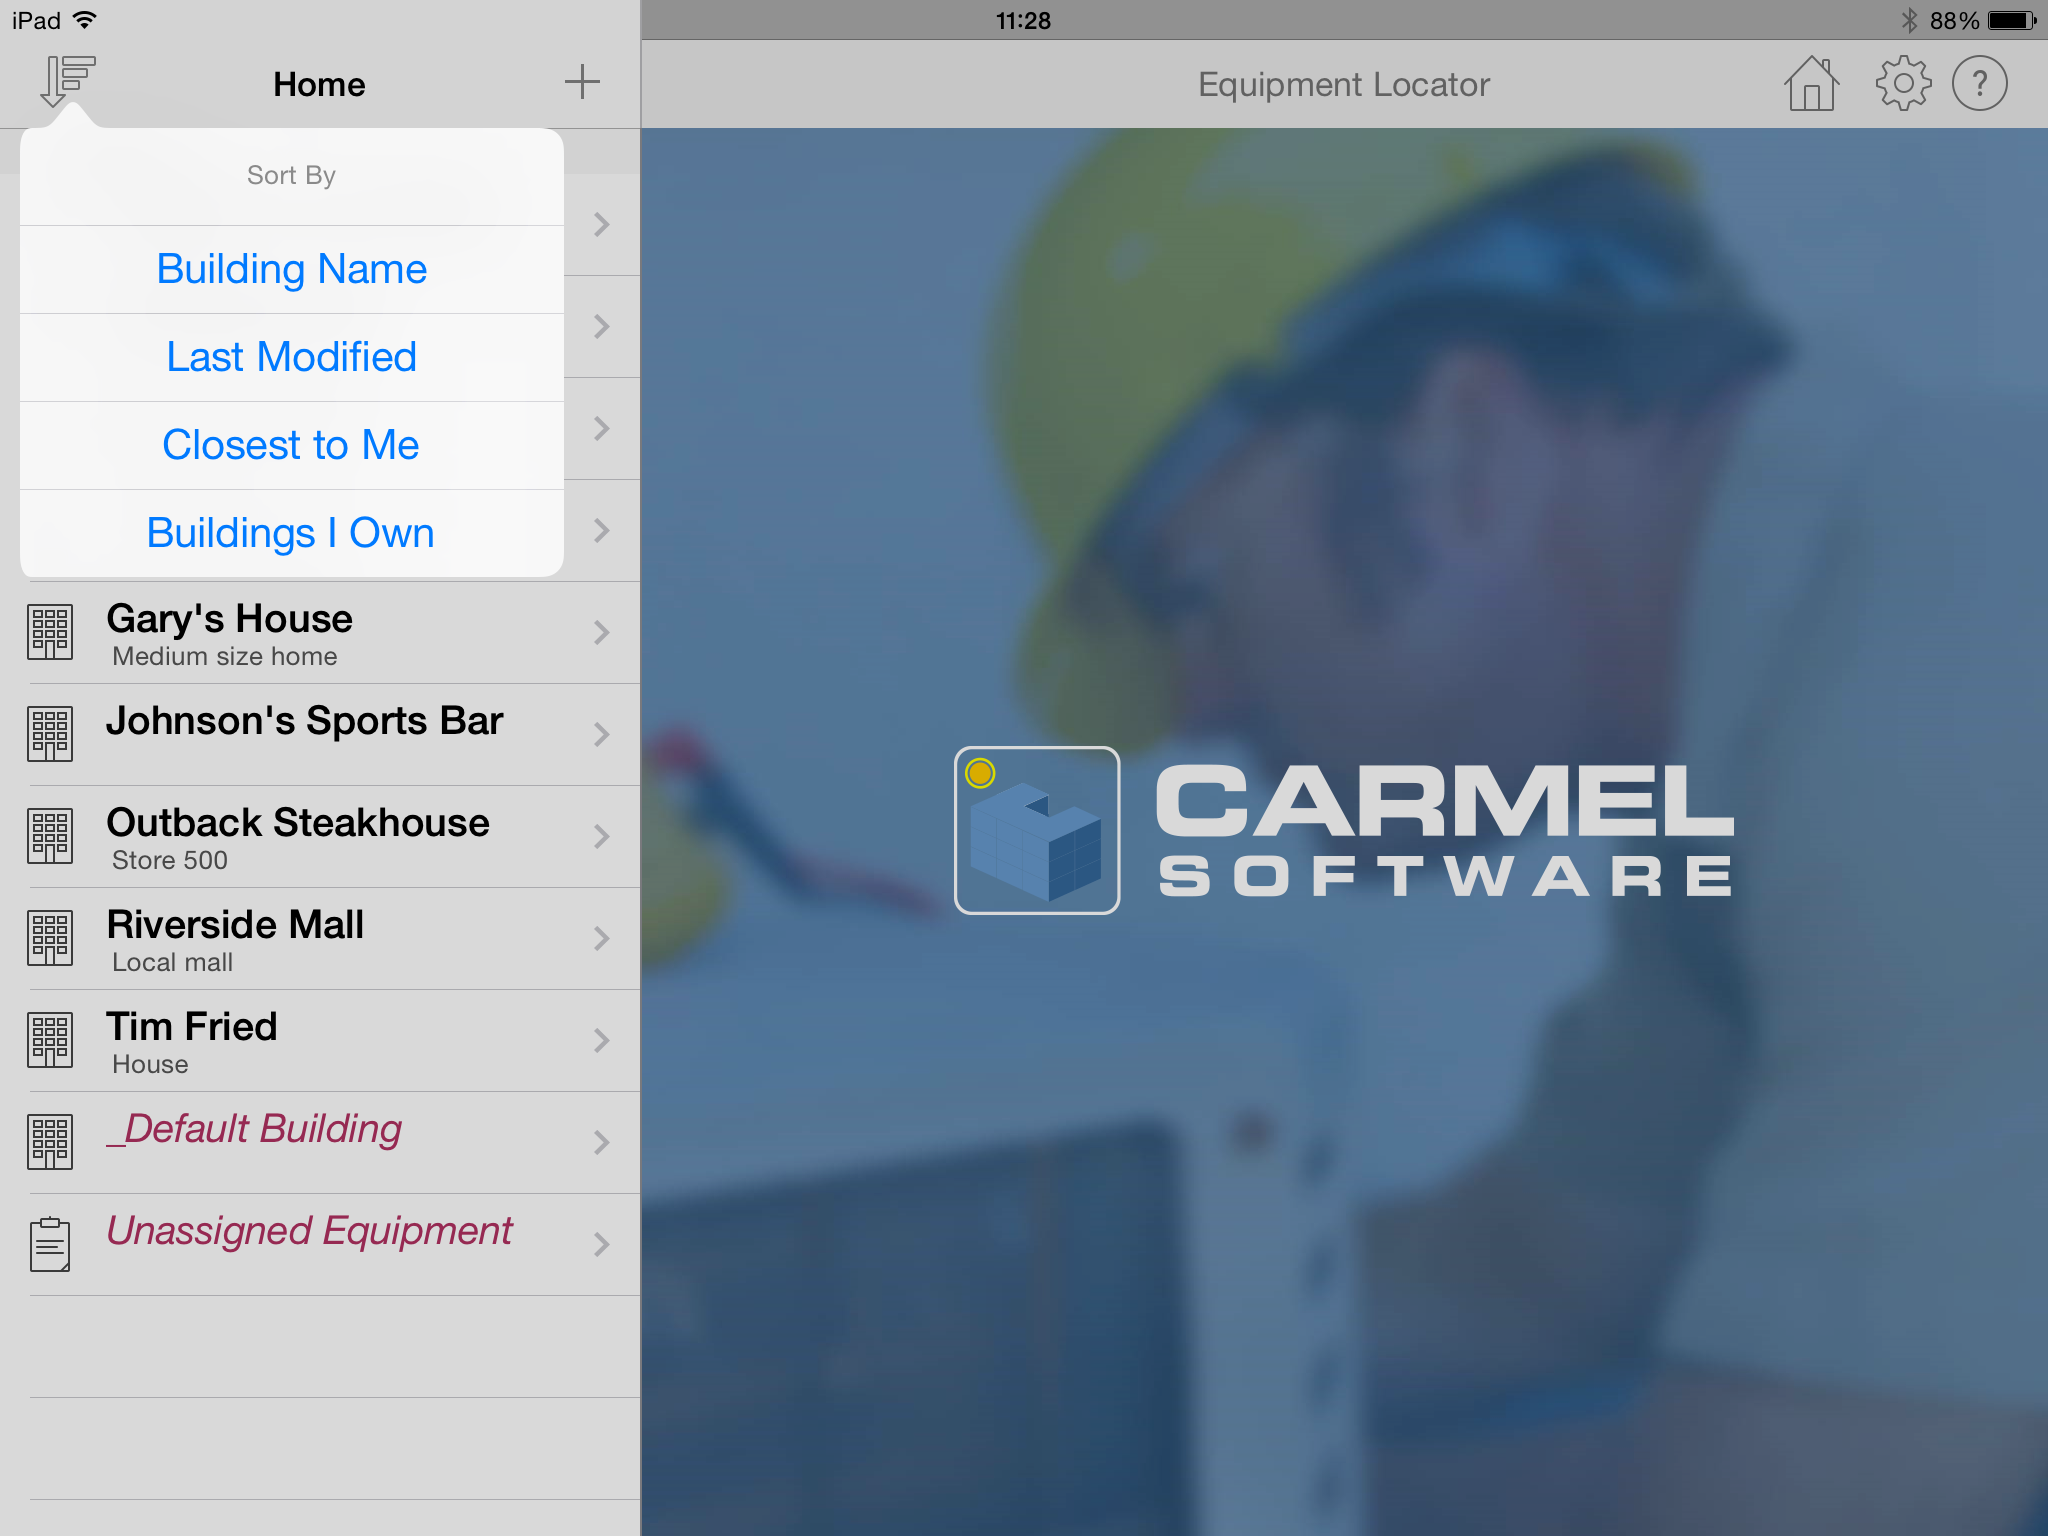
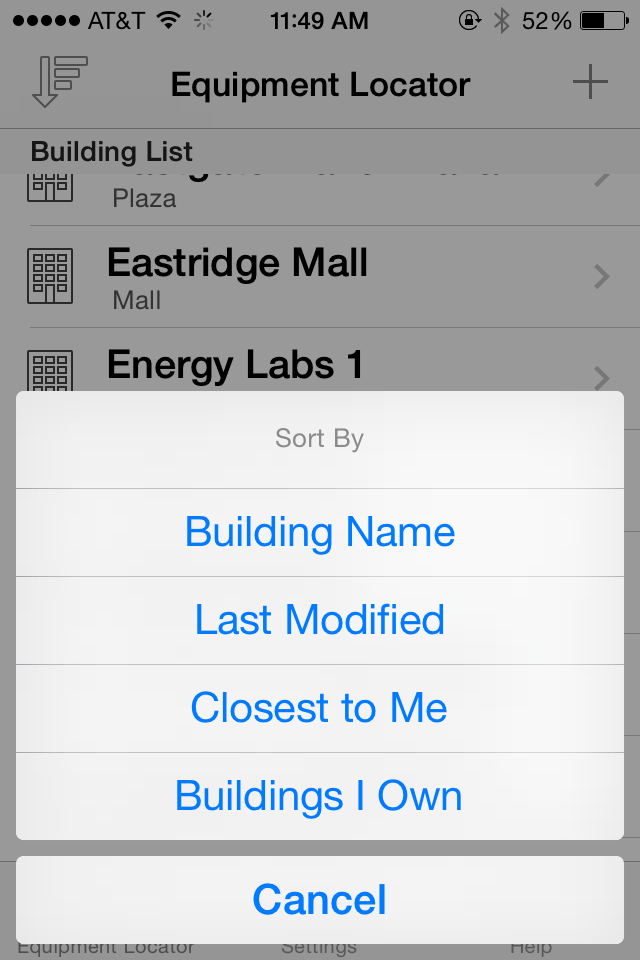
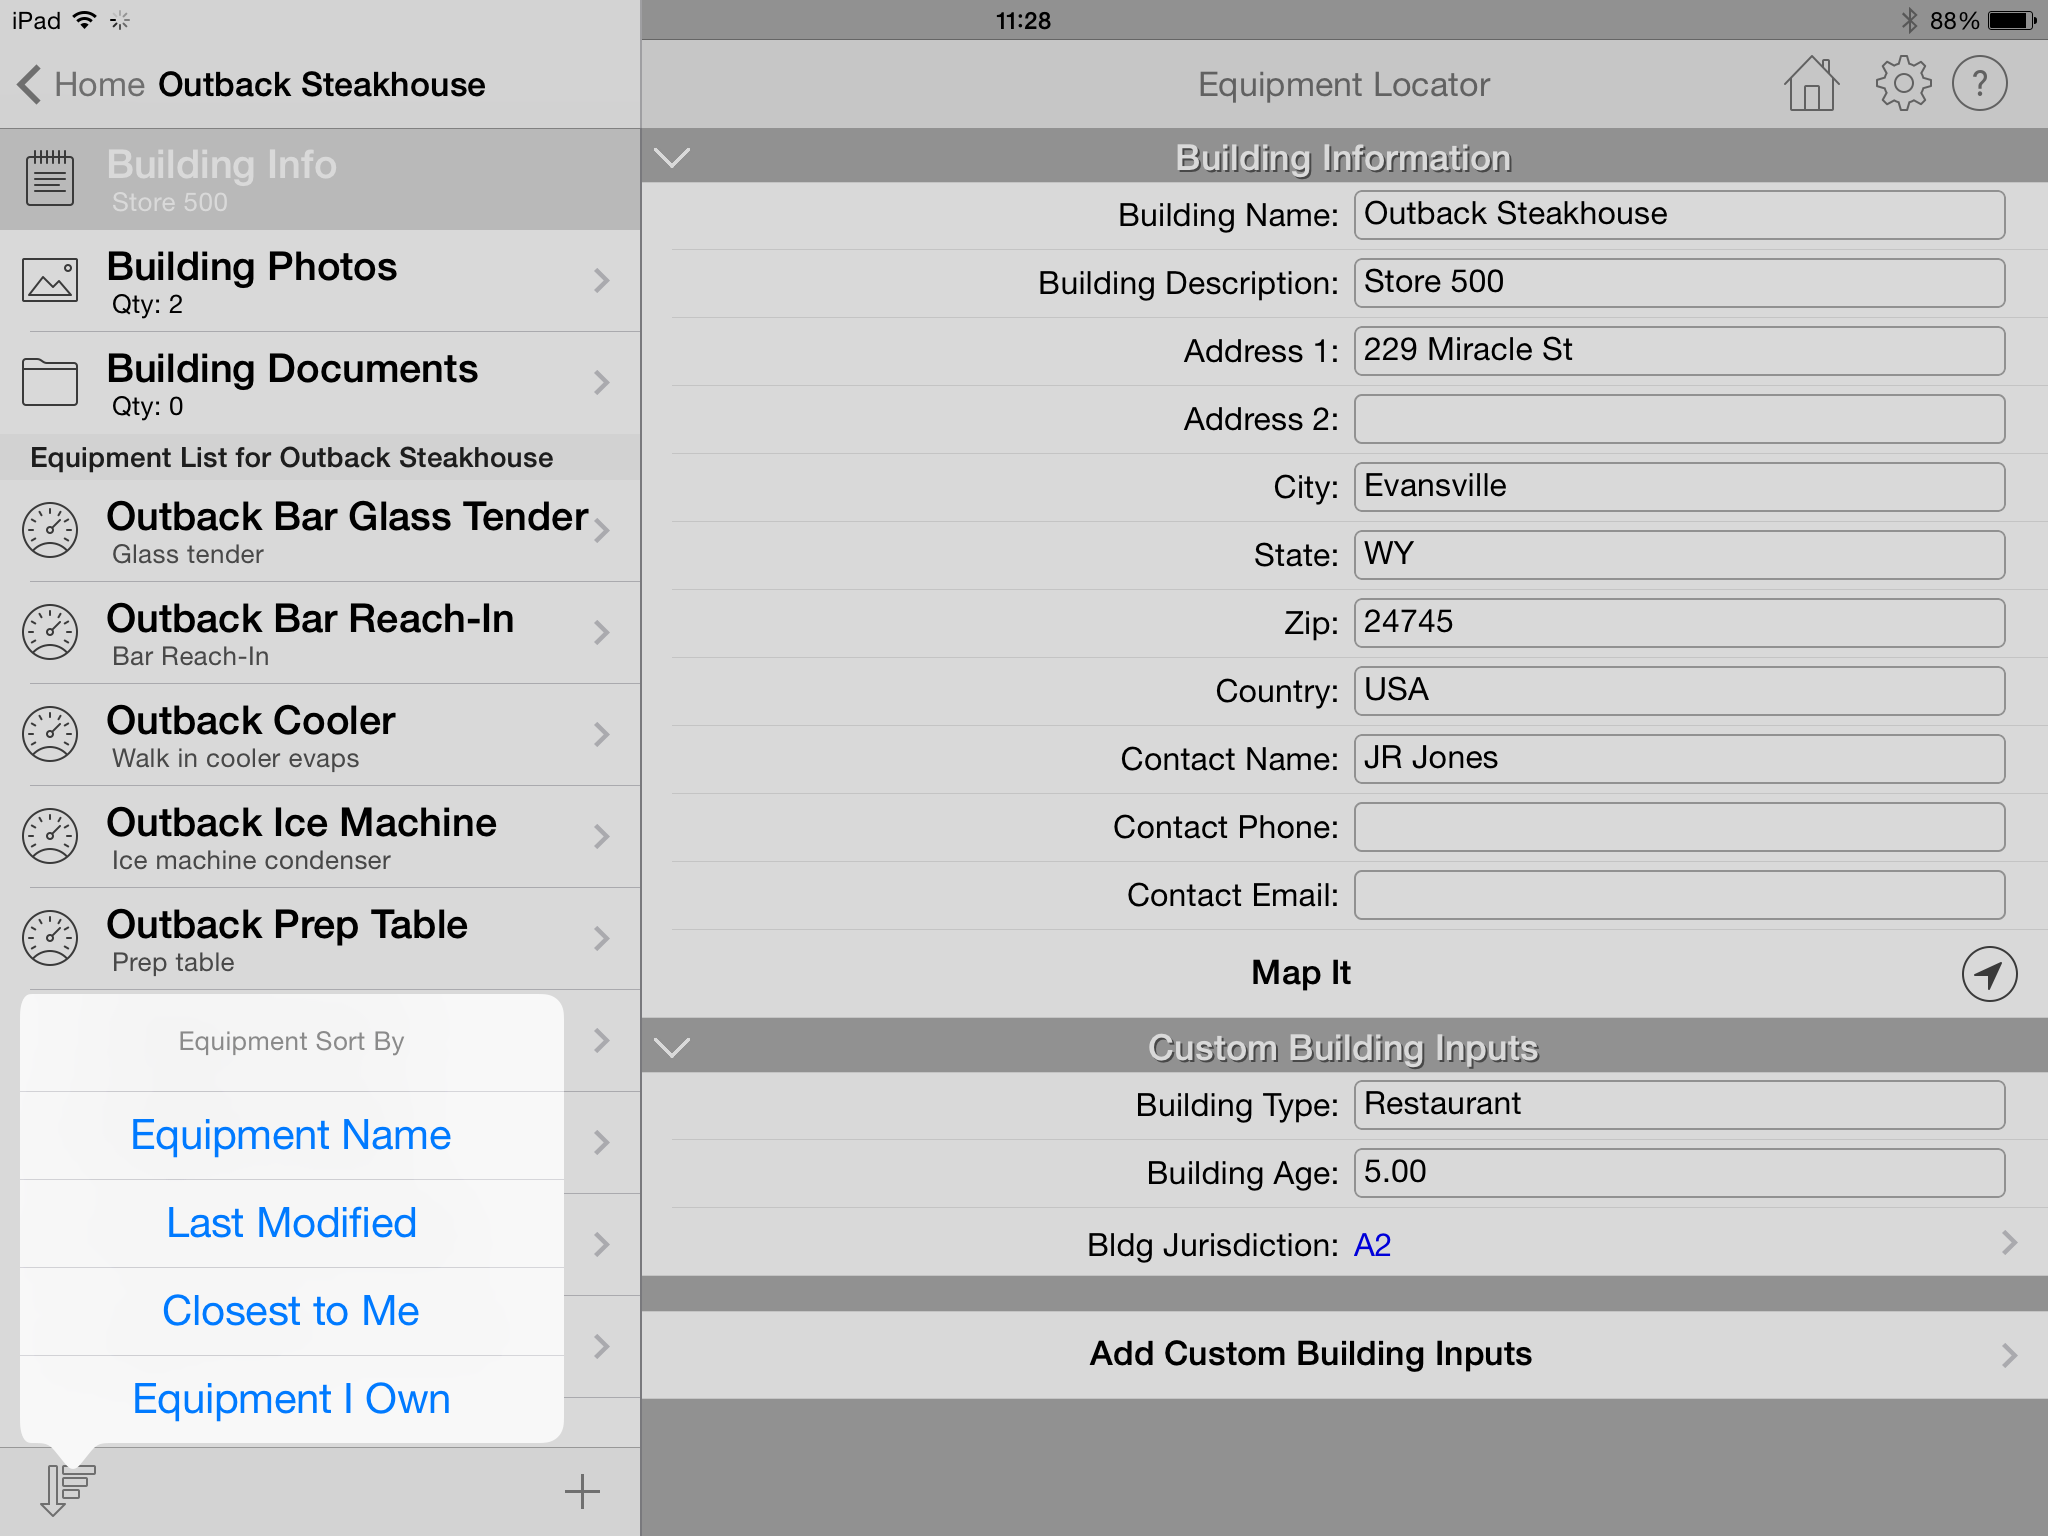
With the list of buildings displayed, you can sort the list in four different ways by pressing the icon in the upper left-hand corner:
- Building Name: Sorts by the building name.
- Last Modified: Sorts by the date and time the building information was last modified on the device.
- Closest to Me: Sorts by the building that is closest to where you are currently located. This is based upon where you positioned the building in the "Map It" part of the building inputs. You may be asked for permission by the app to determine your GPS coordinates.
- Buildings I Own: Sorts by buildings that you "own" versus buildings that you do not own. Within the list of buildings that you own or do not own, it will do a 2nd sort by building name. For the definition of "ownership", see above.
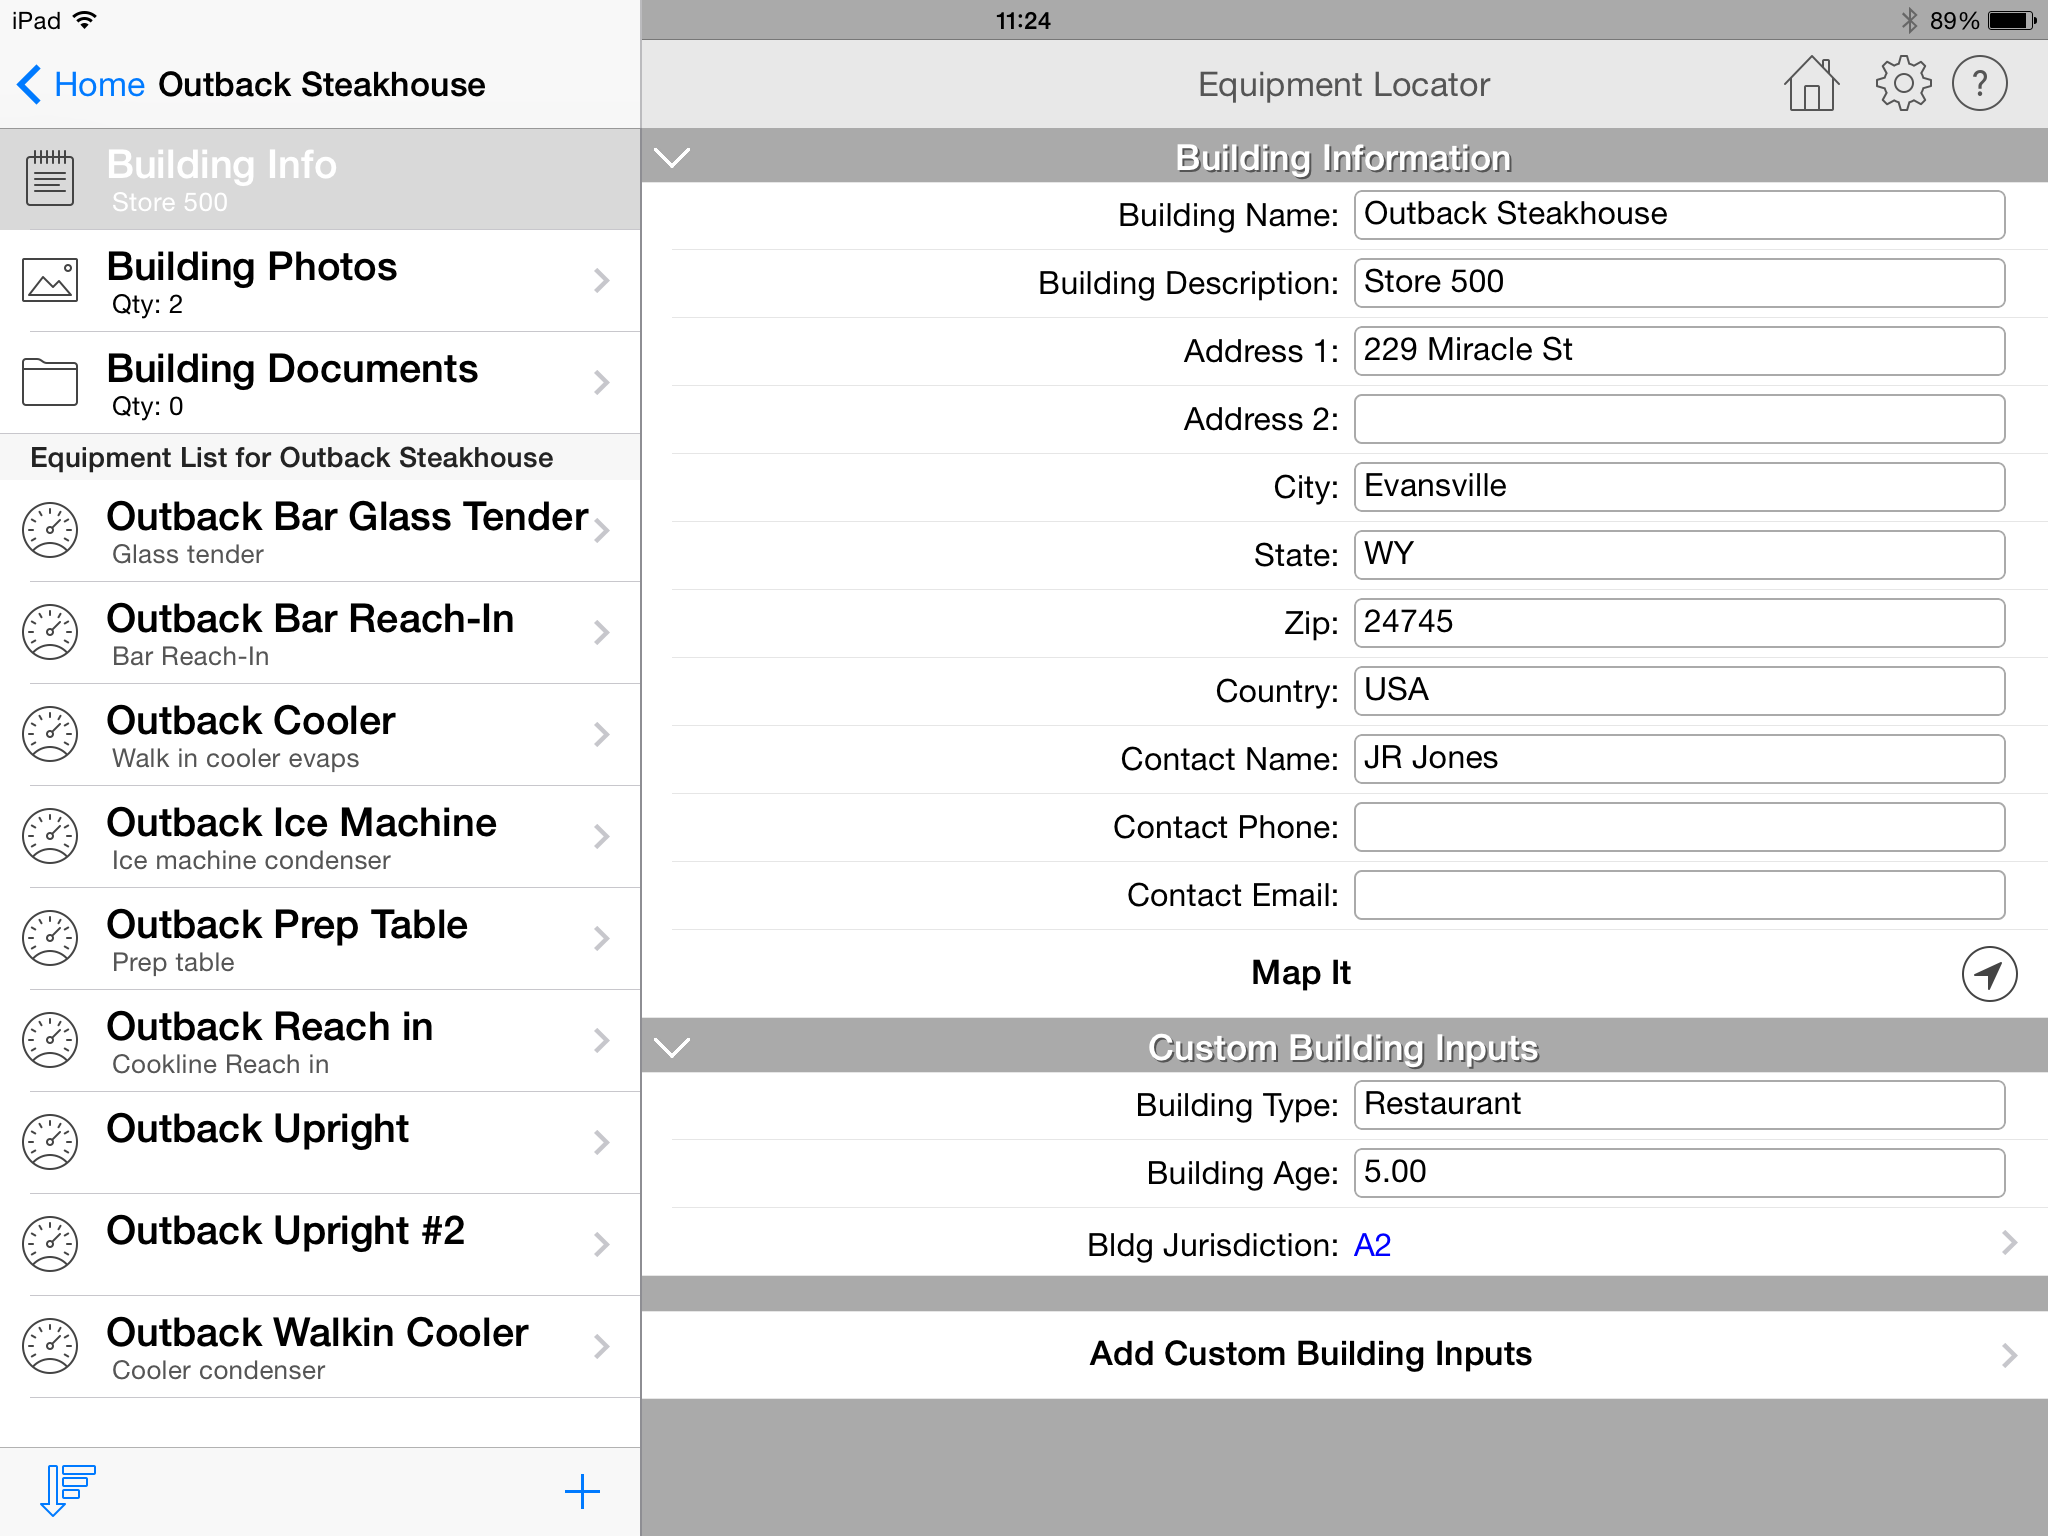
Building Info
The following describes the building information that appears when you select the "Building Info" option: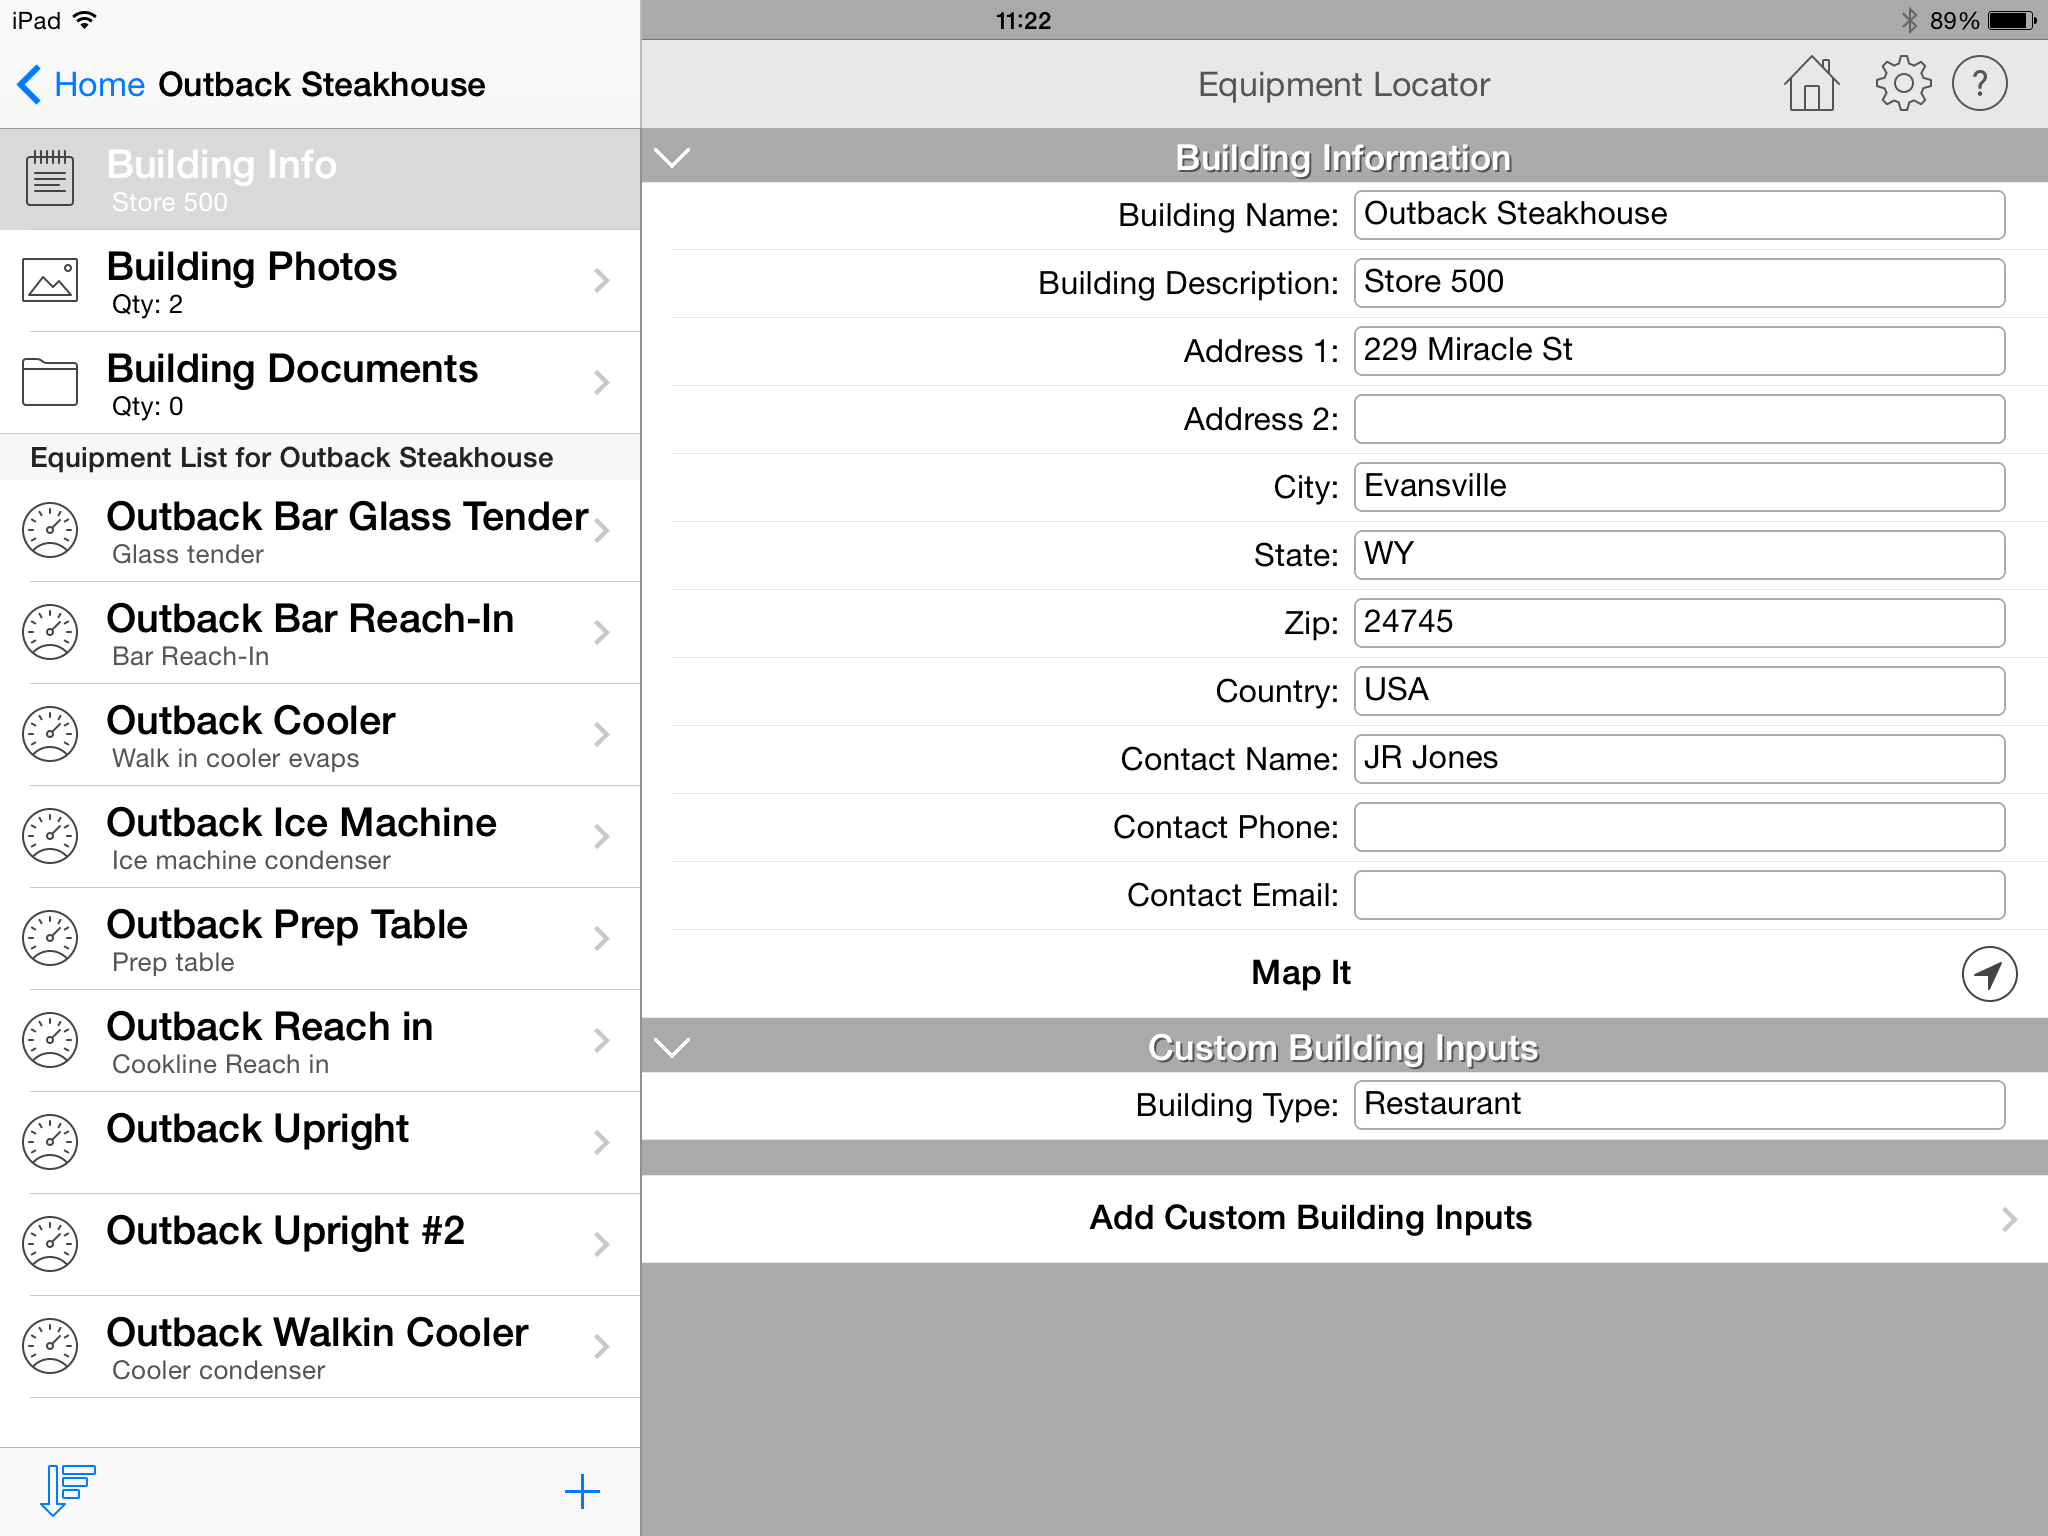
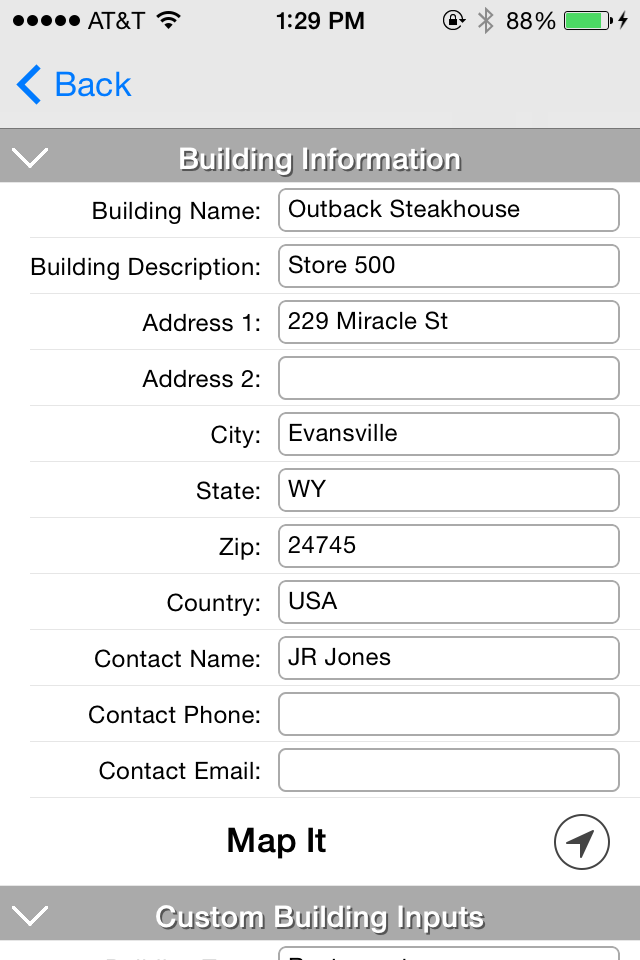
- Building name: This is the name that you originally inputted when you created the building. You can change the building name in this text box. To do so, tap your finger within the text box and the standard iPhone/iPad keyboard will pop up allowing you to type in a new name. This keyboard will appear anytime you tap your finger within any of the textboxes in this app.
- Building Description: Input a general description of the building. This text is displayed in small font below the building name in the list of buildings.
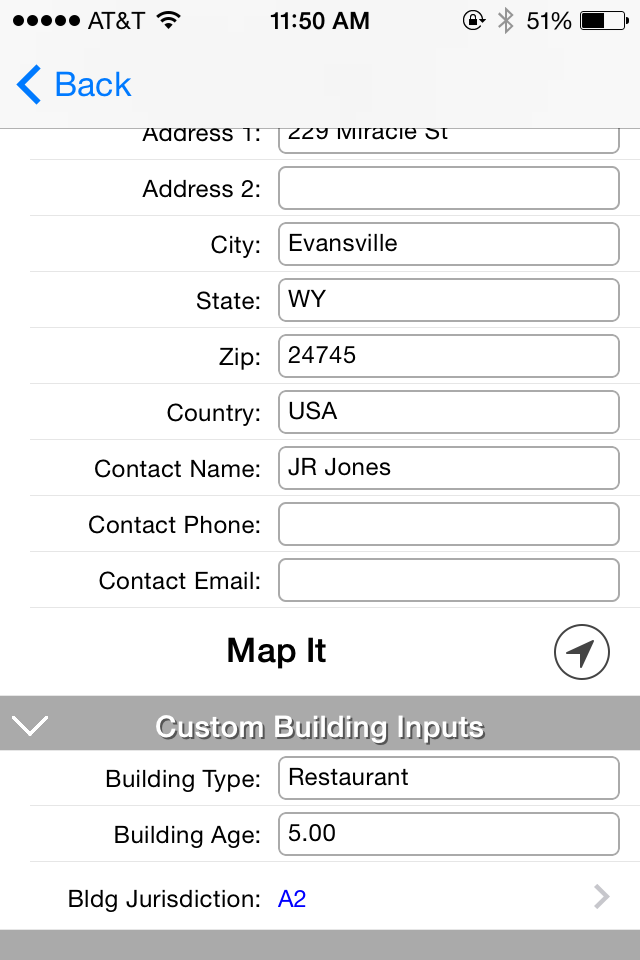
- Address 1: Input the building street address
- Address 2: Input an additional building street address
- City: Input the building city
- State: Input the building state
- Zip: Input the building zip code
- Country: Input the building country
- Contact Name: Input a contact name for the building
- Contact Phone: Input a contact phone number for the building
- Contact Email: Input a contact email address for the building
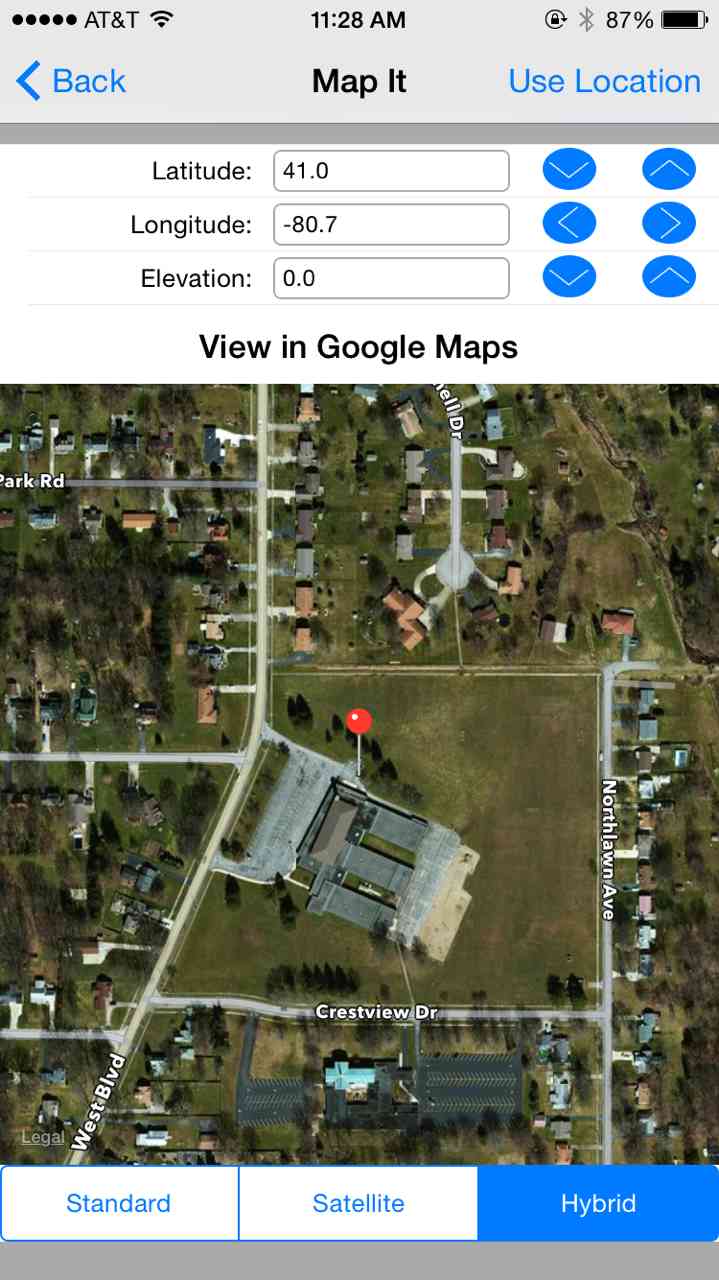
- Map It: Select the button located on the right-hand side of this cell to display the Map It screen. This
screen displays a map and allows you to pinpoint the current location of the building.
Click the "Use Location" link in the upper right-hand portion of this
screen to display 2 options:
- Current Location: Select this option to zoom in on your current location based upon the GPS coordinates of your device.
- Building Address: Select this option if you inputted a valid building address in the building address 1, city, state, and zip inputs above. It will zoom in on the location of that inputted address.
Below the Elevation input is the "View in Google Maps" button. Press it to display the current position in Google Maps (either the web or app version if it is installed).
You can zoom into your exact location by pinching the map with your fingers. In addition, you can select either "Standard", "Satellite", or "Hybrid" map views. Once you have retrieved your GPS coordinates, press the button in the upper left-hand corner of the form to return to the previous screen.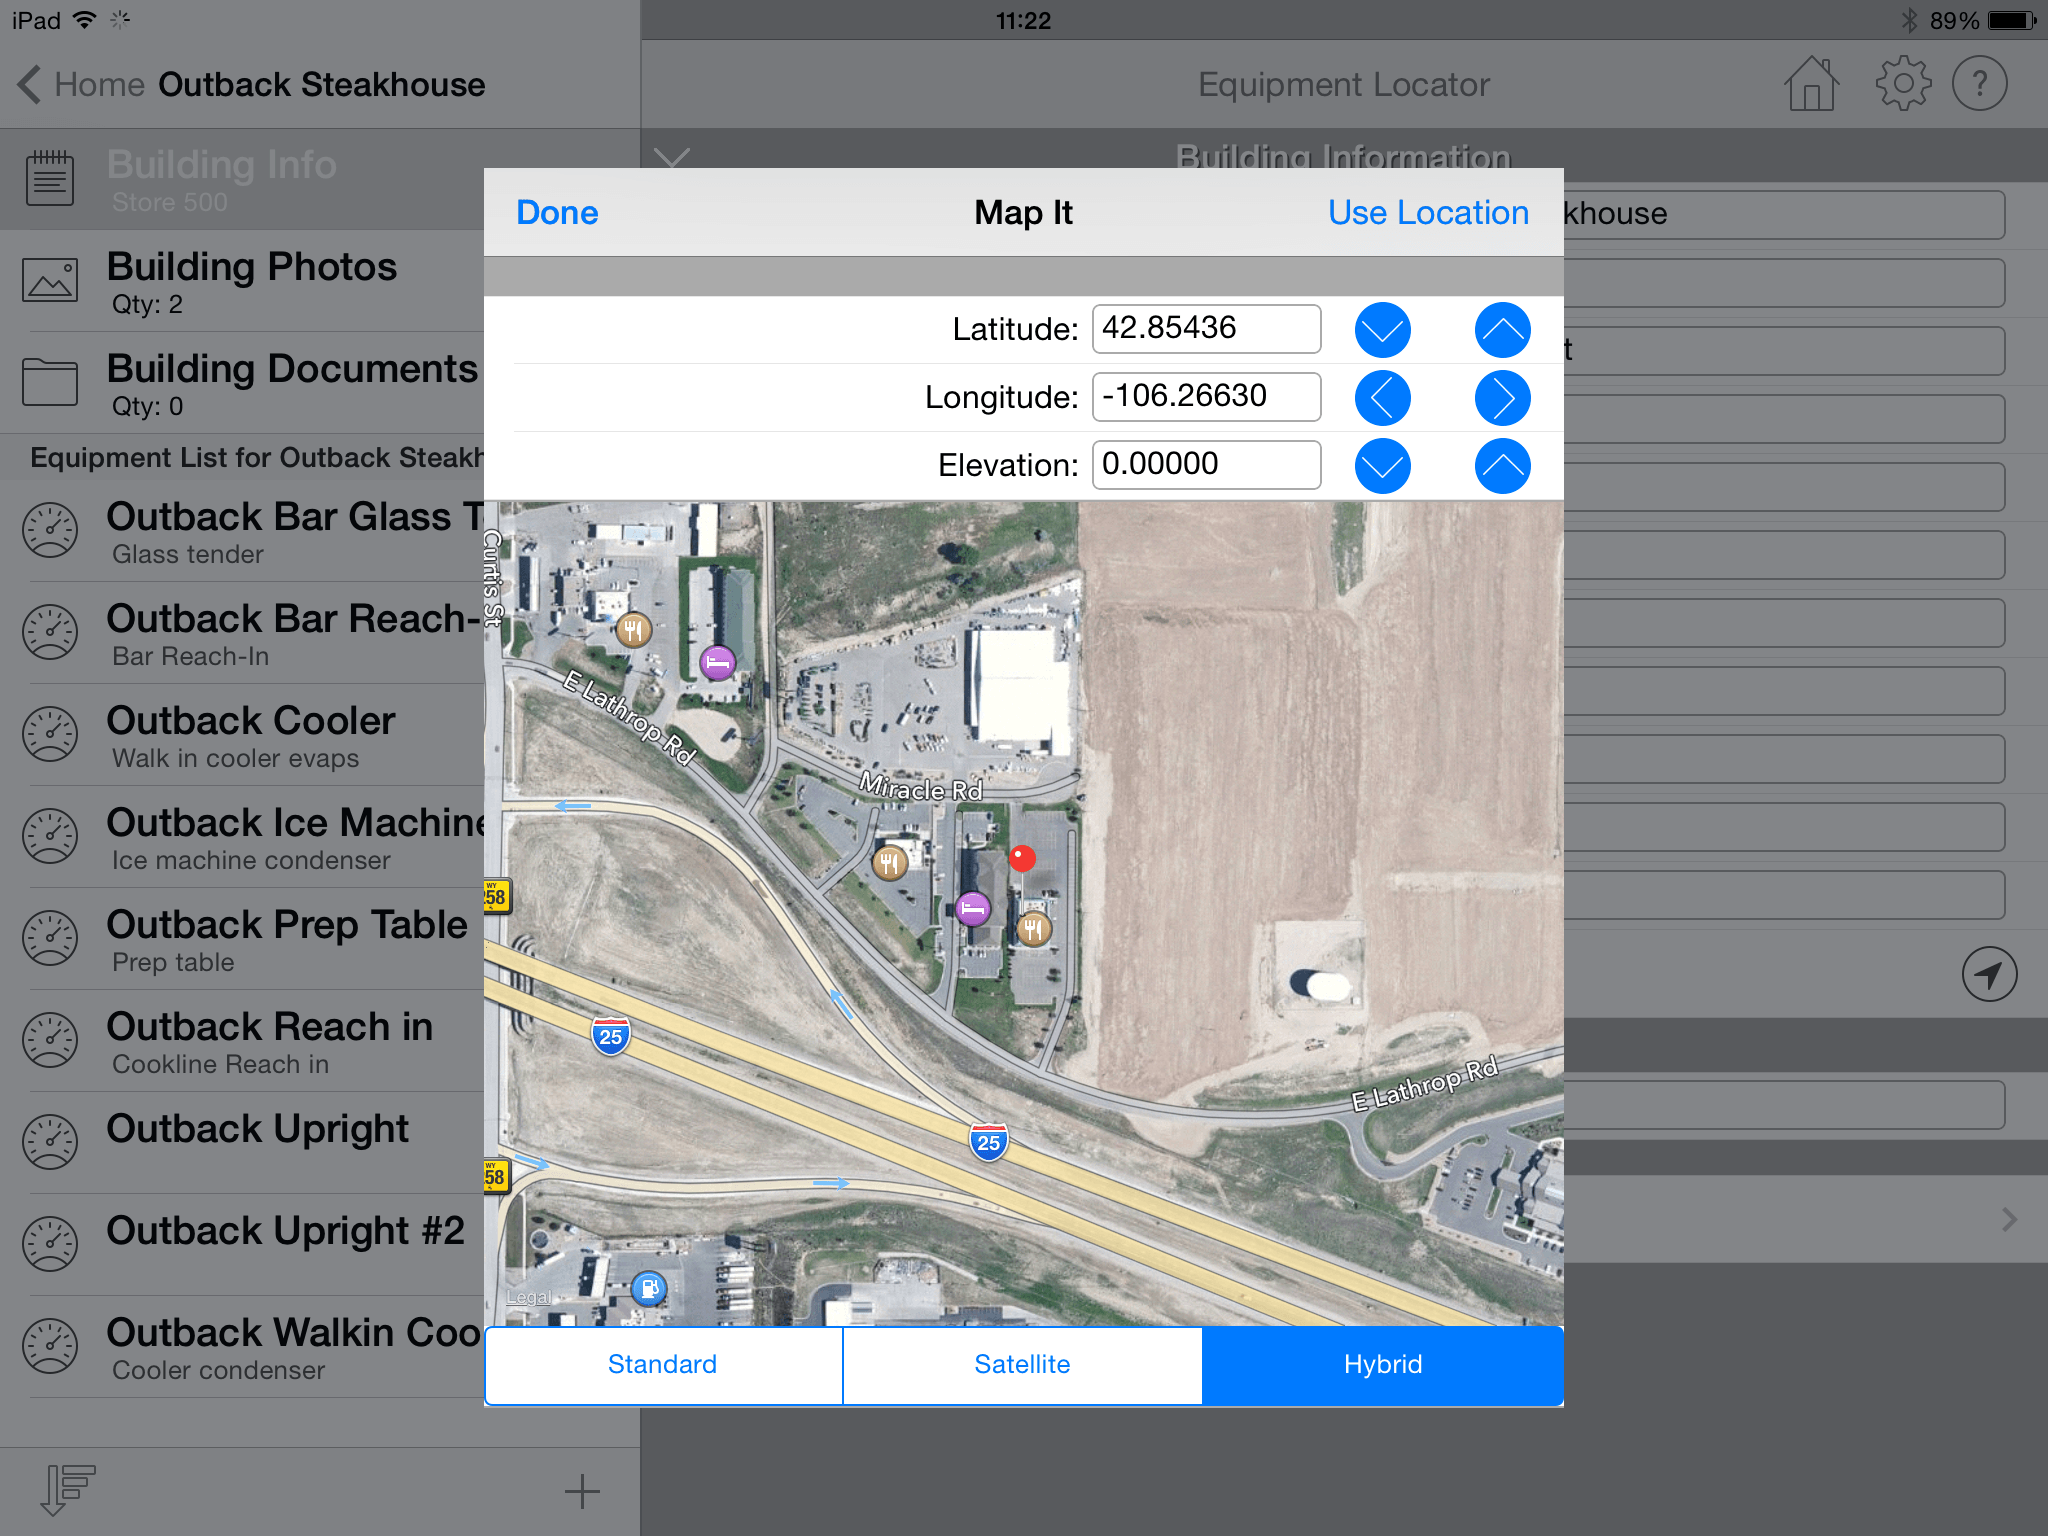
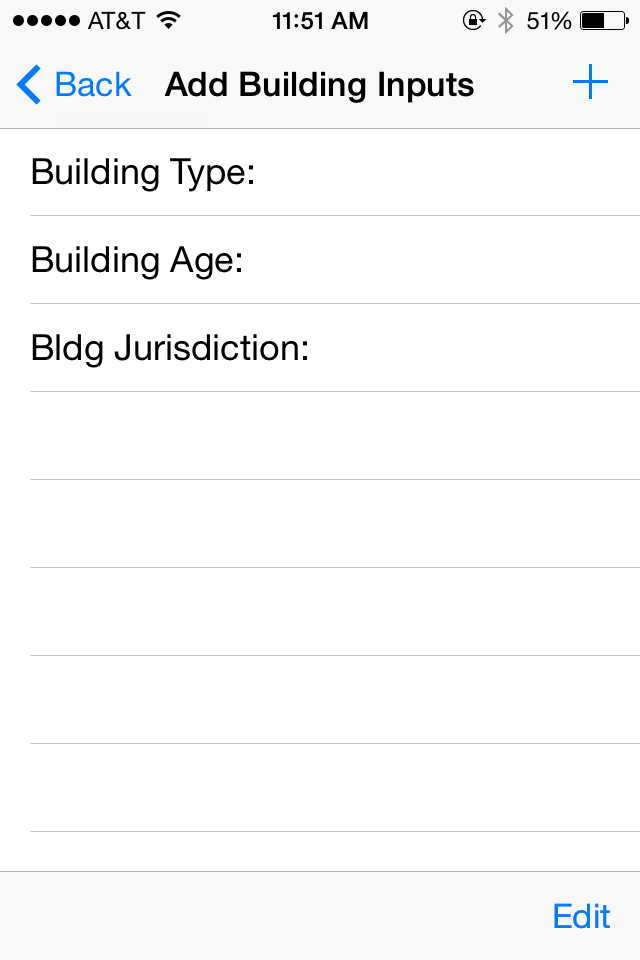
- Add Custom Building Inputs: Click this cell at the bottom of the screen
to begin adding custom inputs to the building information screen. This option is only available if
you have made the one-time in-app purchase for the Equipment Locator premium features. If you have not made the in-app purchase yet,
a screen will appear allowing you to do so. After making the in-app purchase, the following screen will be available:
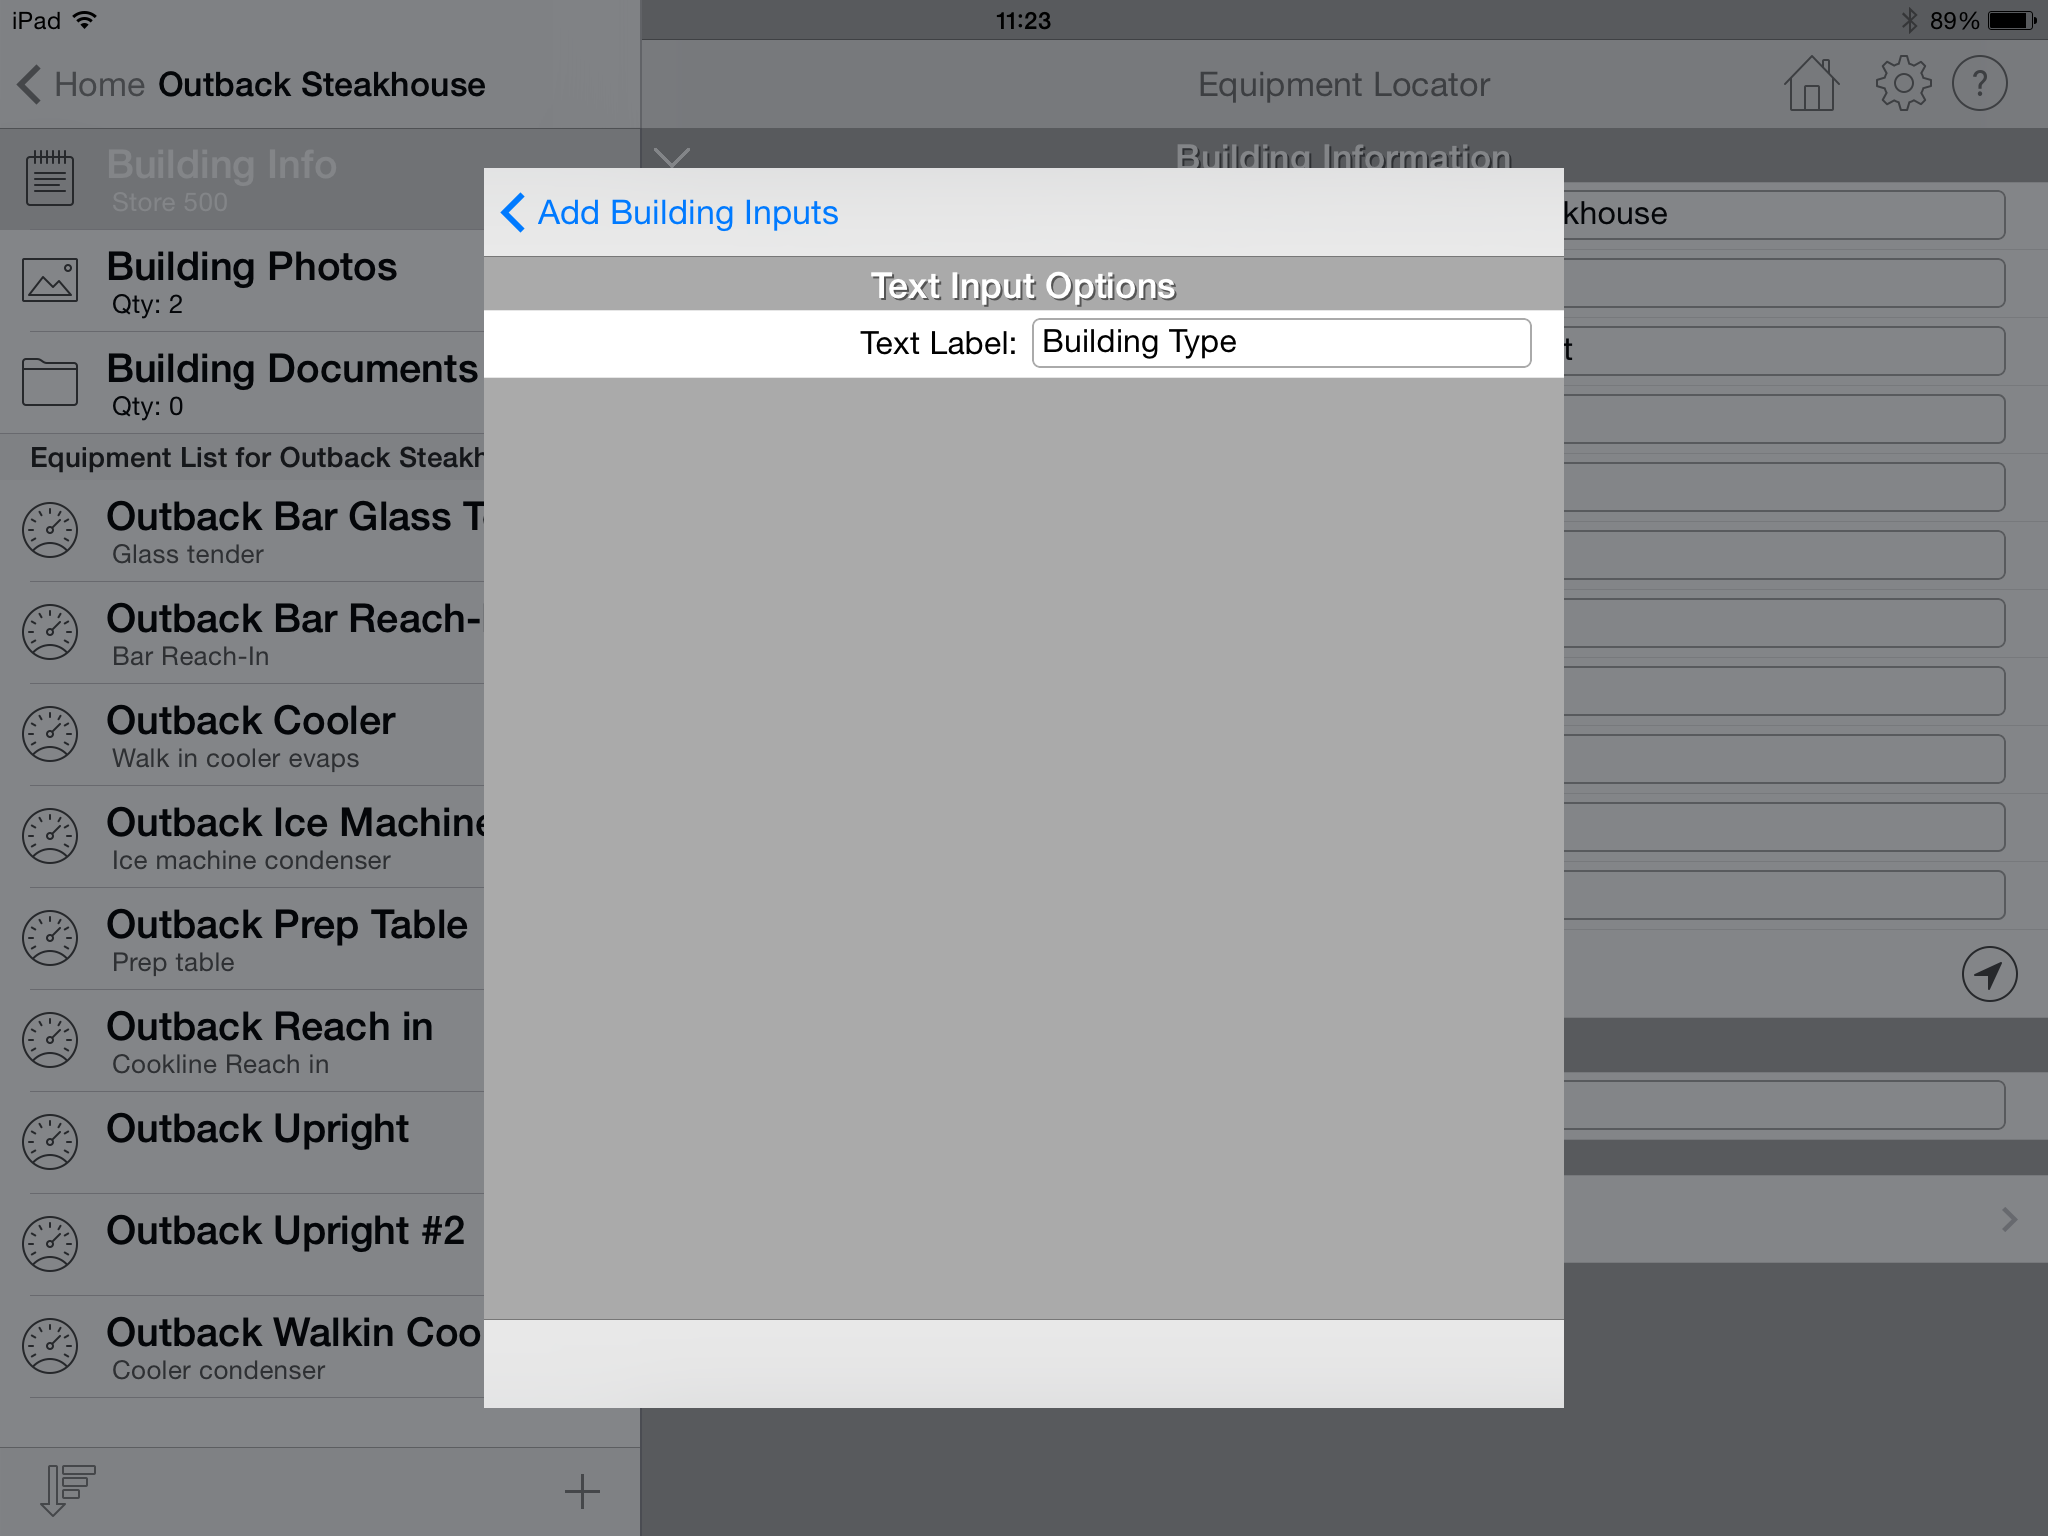
- Text: Select "Text" to add an alphanumeric type input box that allows you to enter letters and numbers. For example, select this
input type for a
contact name or address input. After selecting "Text", a new screen will appear allowing you to input the label that will appear to the
left of the text box. Please note: You do not need to add a colon (":") after the label since the app will automatically add one
for you when it displays the label on the input screen.

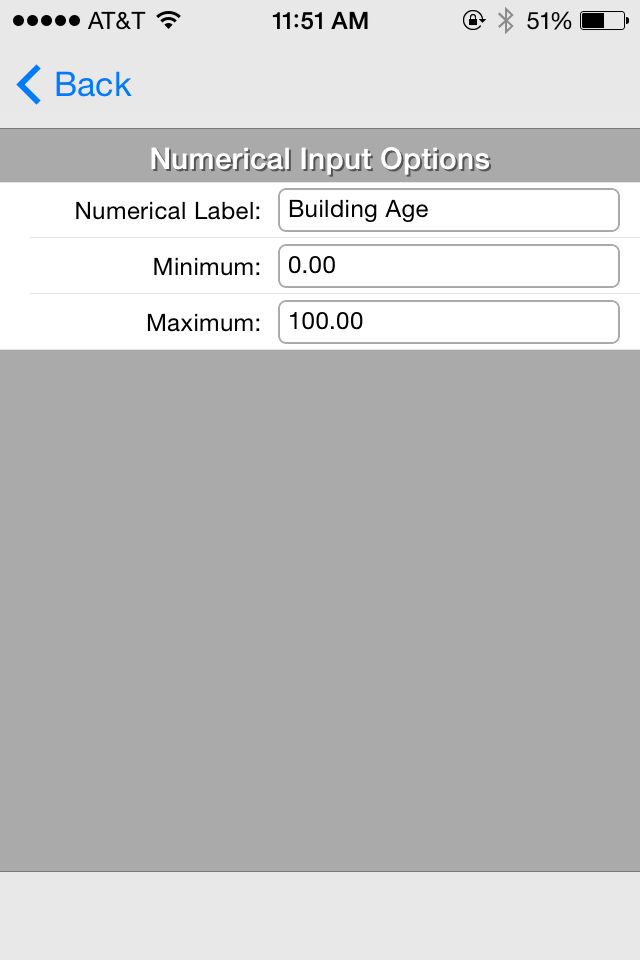
- Number: Select "Number" to add a numeric type input box that allows you to enter only numerical values.
For example, select this input type for a
voltage or other quantity value. After selecting "Number", a new screen will appear allowing you to input the label that will appear to the
left of the text box on the input screen. In addition, you can input minimum and maximum allowable values for the custom numerical input.
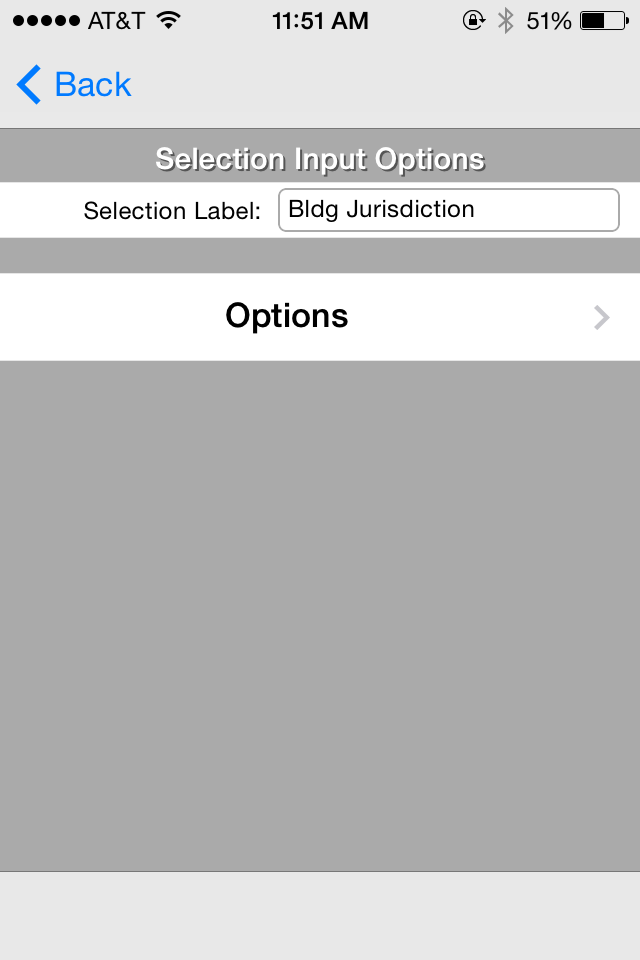
- Selection: Select "Selection" to add a dropdown (or picker) control that allows you to select from a static list of items.
For example, select this input type for a refrigerant list.
After selecting "Selection", a new screen will appear allowing you to input the label that will appear to the
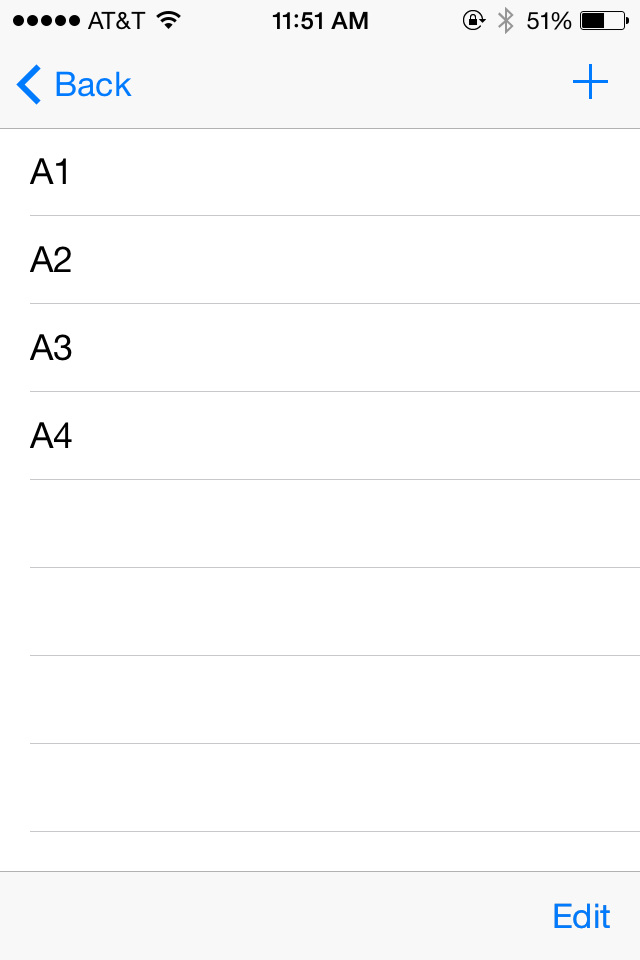
left of the selector control. Also, an "Options" cell takes you to a new screen that allows you to add 1 or more items (options)
to the picker control. Click the "+" button in the upper right-hand corner to display a popup that allows you to add the "option" text. After entering more than
one option, you can click the "Edit" link in the lower right-hand corner to change the order of the options or delete any options.
When you return to the building information screen, the new custom inputs will appear at the bottom. You can begin entering information about the current building into those custom inputs. At any time, you can add additional custom inputs and also edit or delete the them. The next time the app syncs, all of the custom inputs and their values will appear on the Locator web site and also on any users' devices whom you have shared the building data with.
- Text: Select "Text" to add an alphanumeric type input box that allows you to enter letters and numbers. For example, select this
input type for a
contact name or address input. After selecting "Text", a new screen will appear allowing you to input the label that will appear to the
left of the text box. Please note: You do not need to add a colon (":") after the label since the app will automatically add one
for you when it displays the label on the input screen.
Building Photos
Select the "Building Photos" option to add 1 or more photos associated with the building. The following screen will appear:
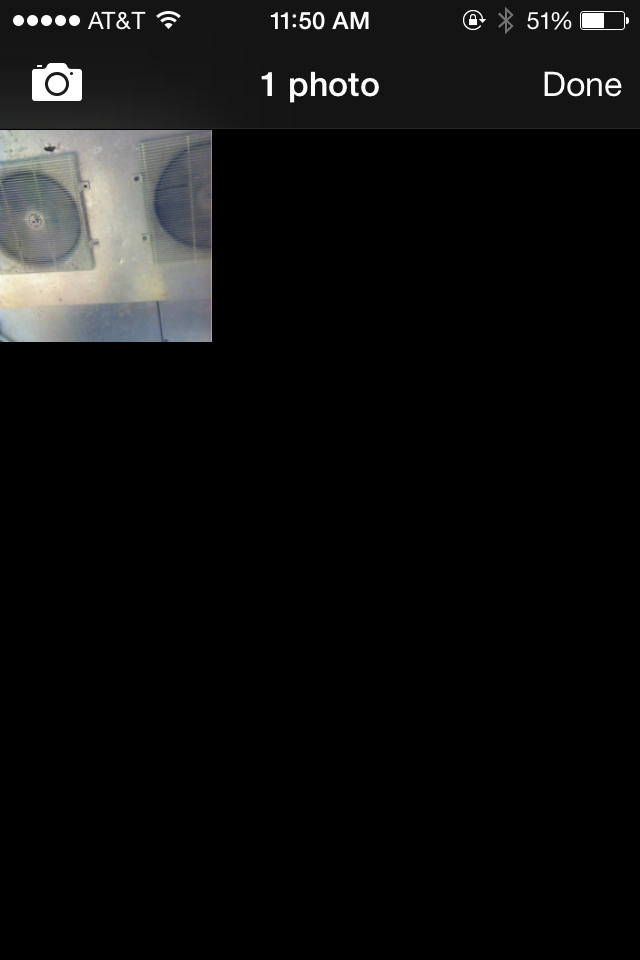
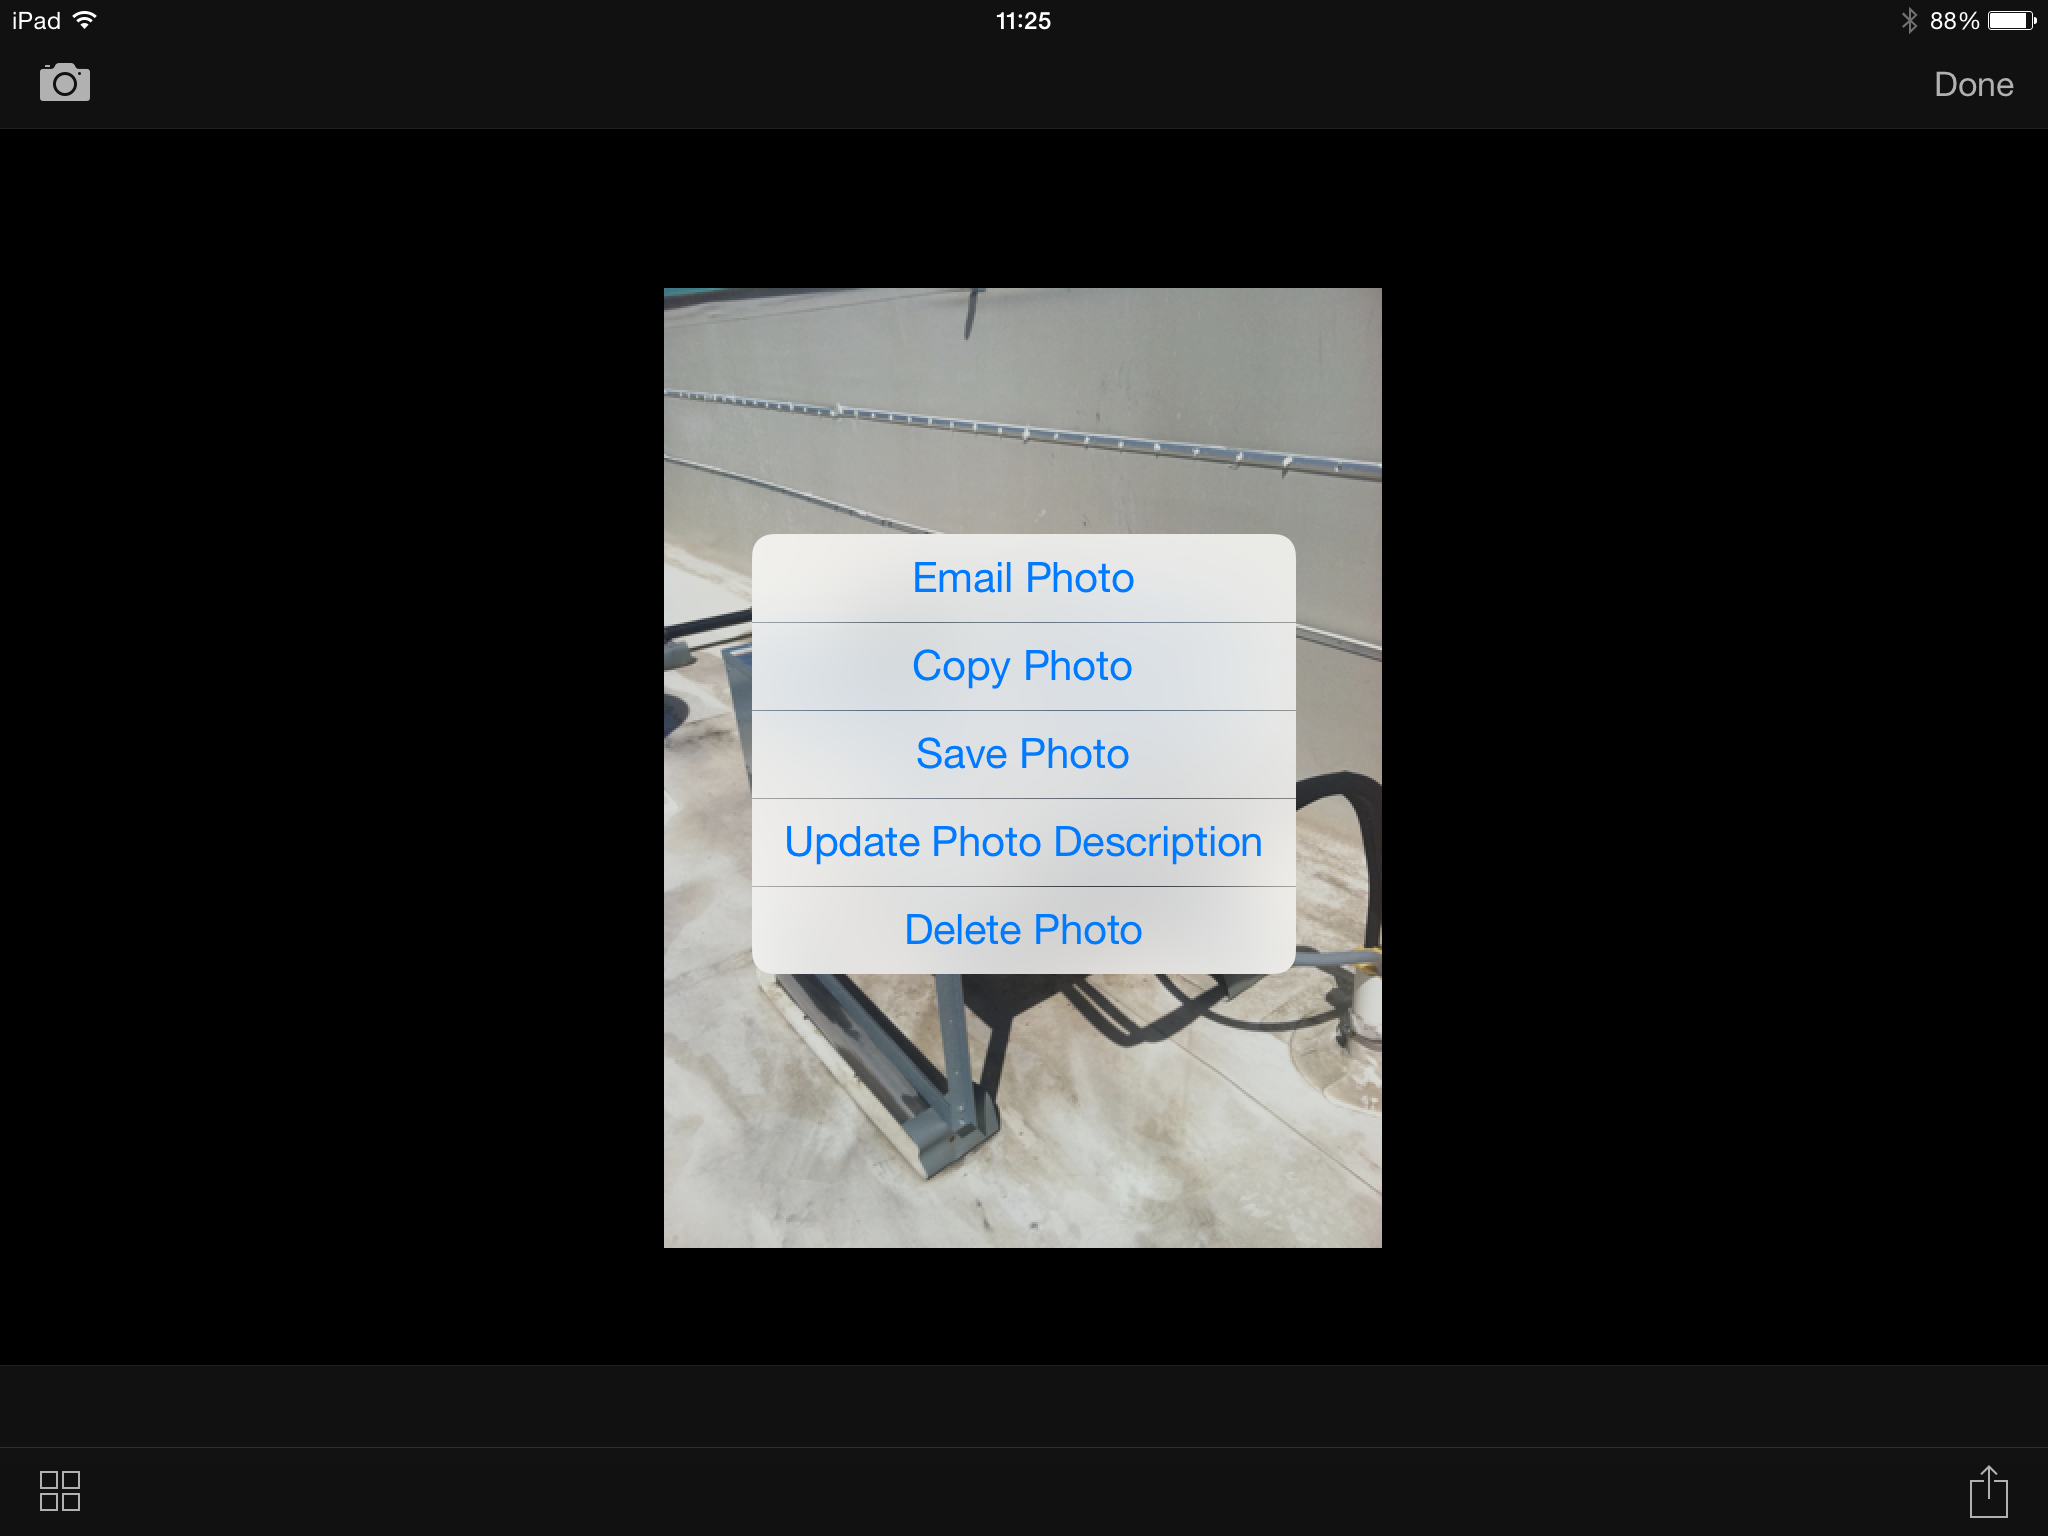
Select the thumbnail image, and it will display a larger version of it. Click the icon in the lower right-hand corner of the screen and a menu appears. This menu includes the following options:
- Email Photo: Allows you to email the photo using your device email client
- Copy Photo: Allows you to copy the photo to the device clipboard then paste it elsewhere
- Save Photo: Allows you to save the phot to your photo to your camera roll
- Update Photo Description: Allows you to enter a brief description of the photo
- Delete Photo: Allows you to delete the photo from the building
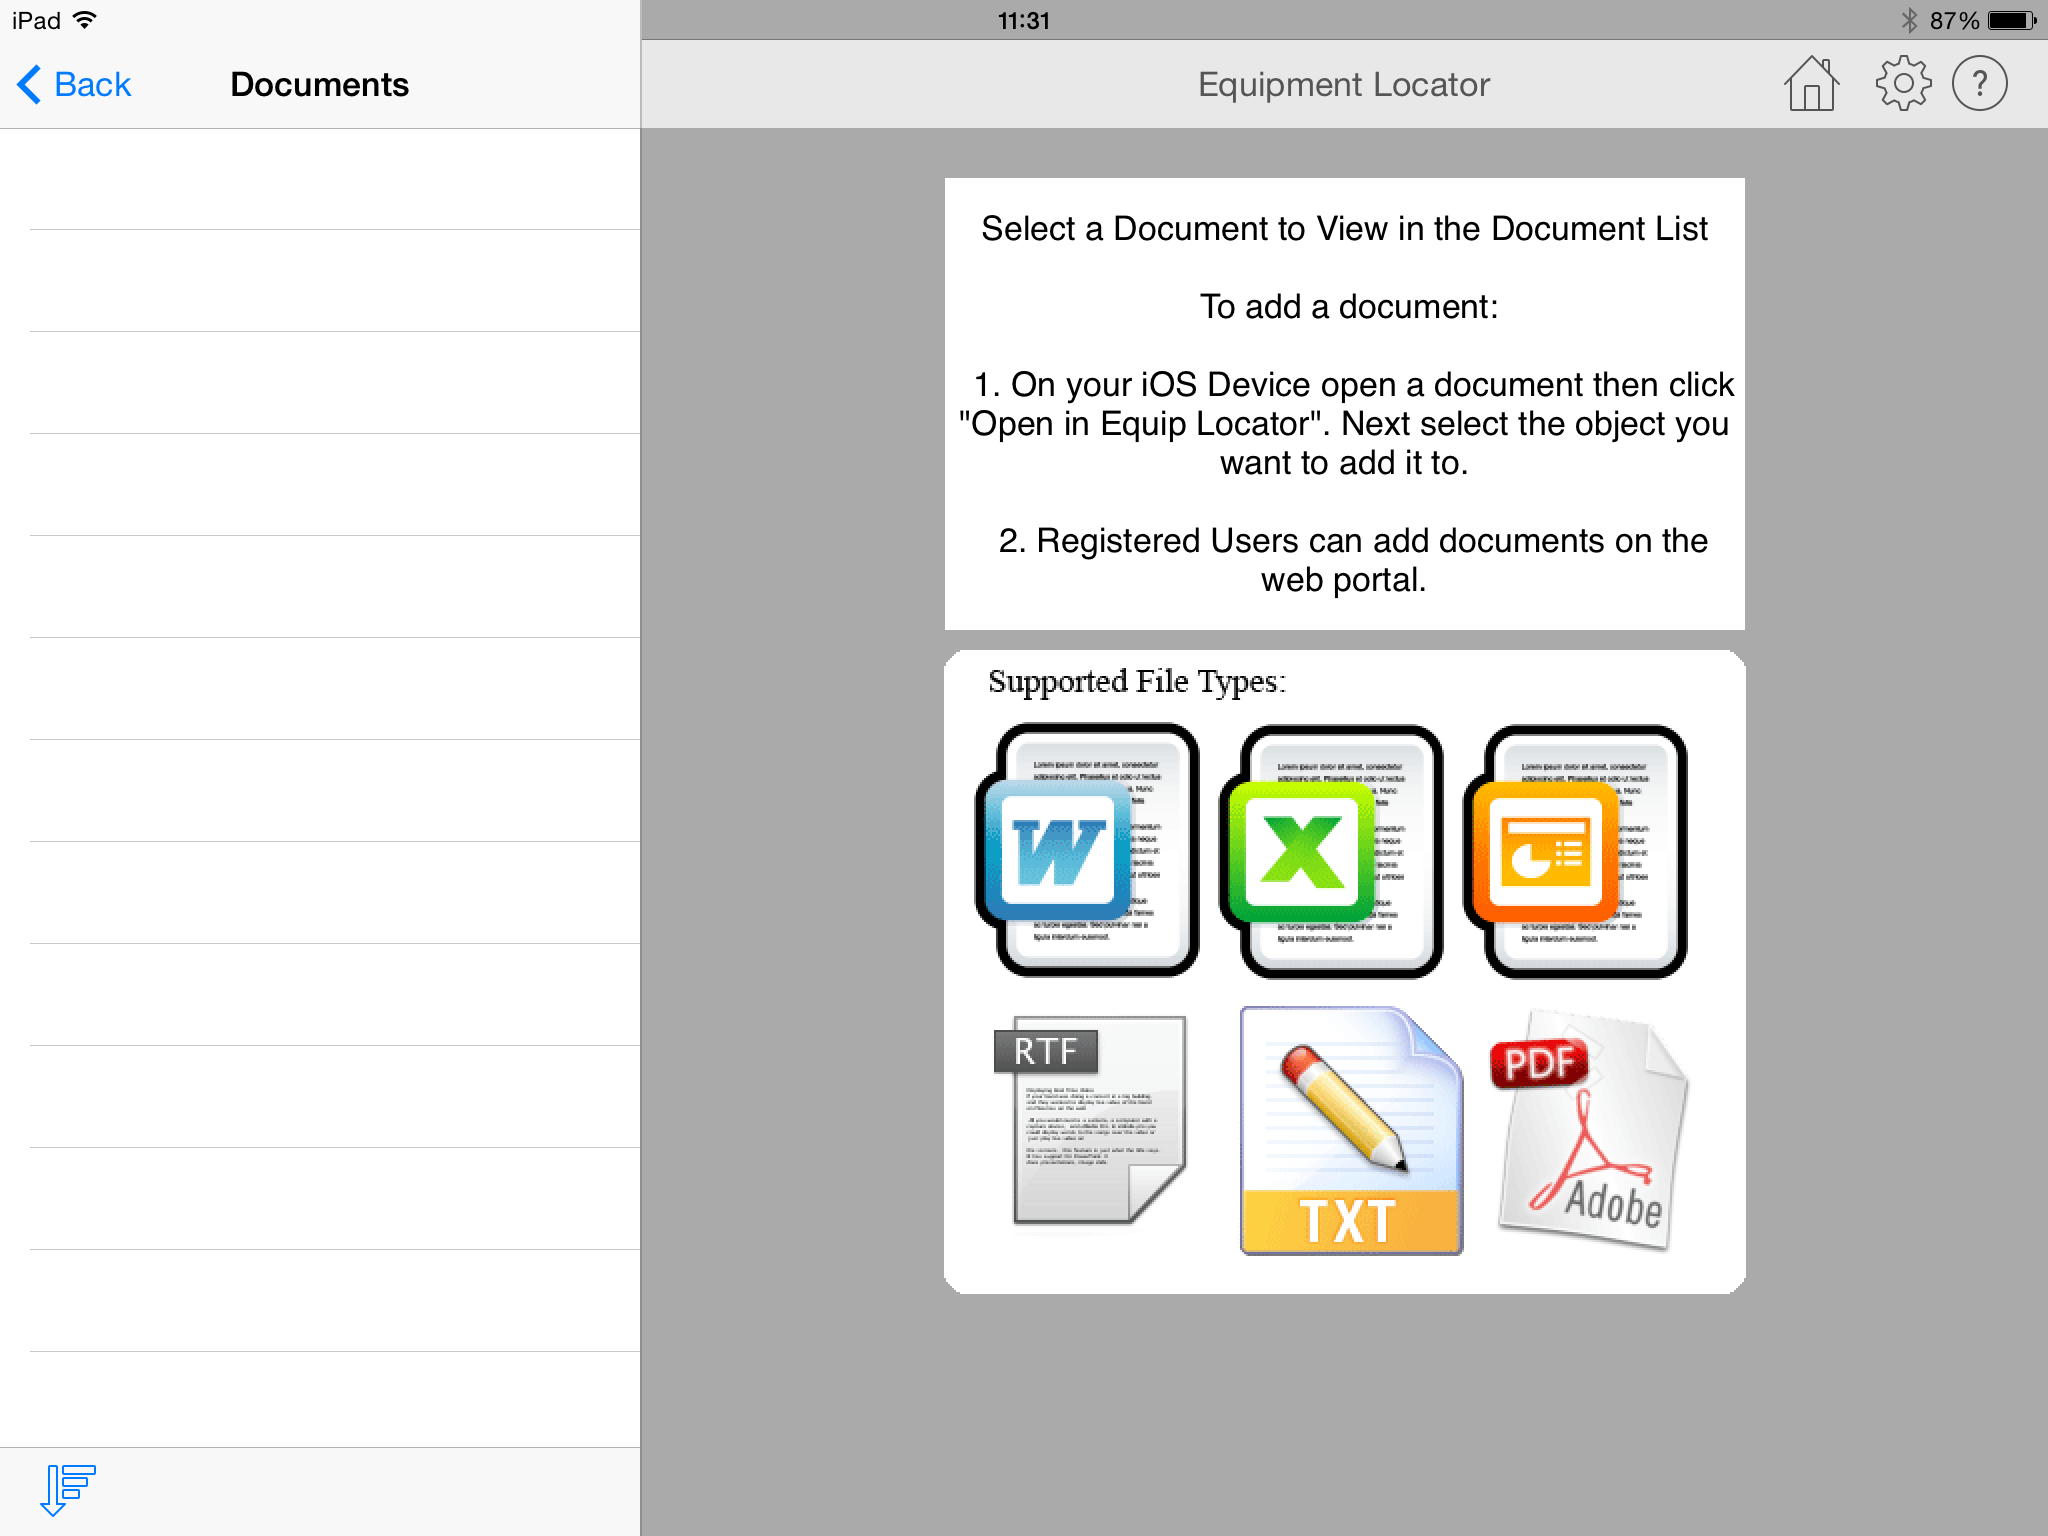
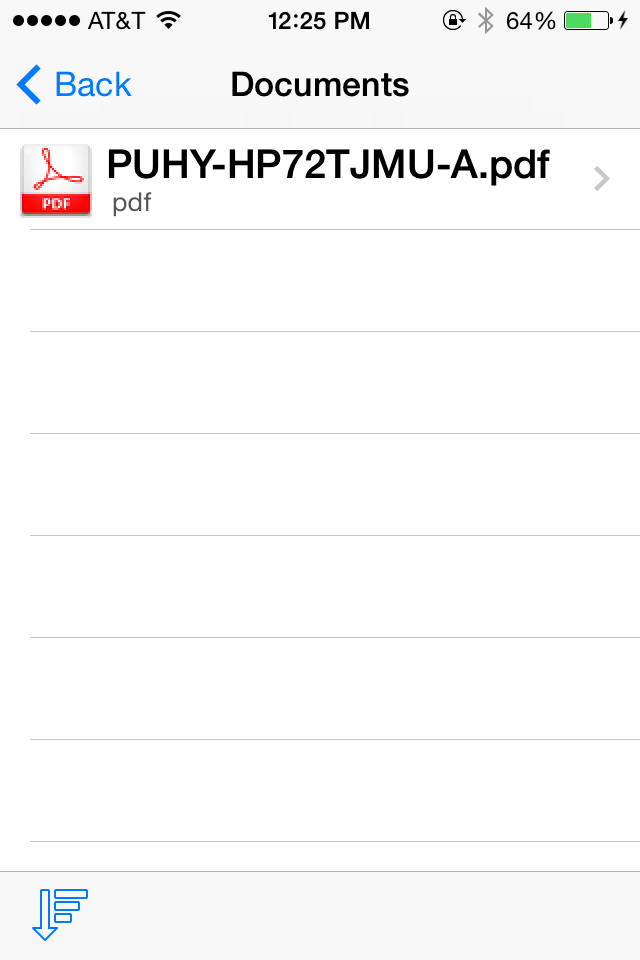
Building Documents
Select "Building Documents" to display a list of 1 or more documents associated with the building. A document can be a PDF, Word, Excel, text, or any other file type that is viewable on the mobile device. You cannot add documents within this screen, only view them. However, there are 2 ways to associate a document with a building:- Using the Equipment Locator Cloud website on your laptop or desktop, login and select the building then upload any file where prompted. After it is uploaded, it will automatically sync to the device.
- Within your mobile device, open an email with a document attachement. Select that document and a popup menu will appear. One of the options within that popup menu should be the Equipment Locator app. Select that option and you will be directed to add it to the building of your choice.
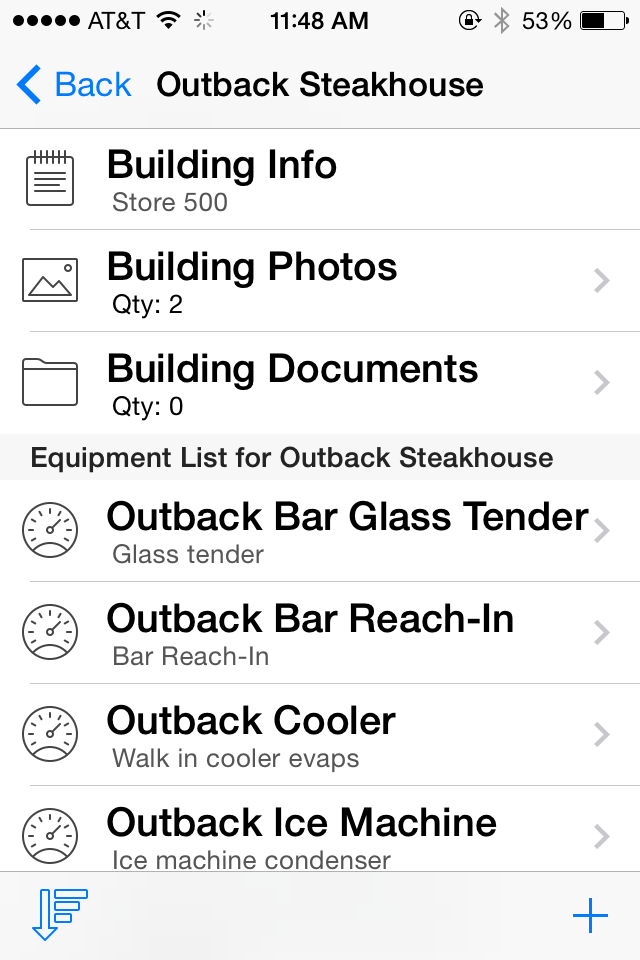
Equipment List for Building
Below the building info, photos, and documents options, the app displays a list of the equipment associated with the building. You can begin adding equipment by pressing the "+" button located in the lower right-hand corner of the screen.
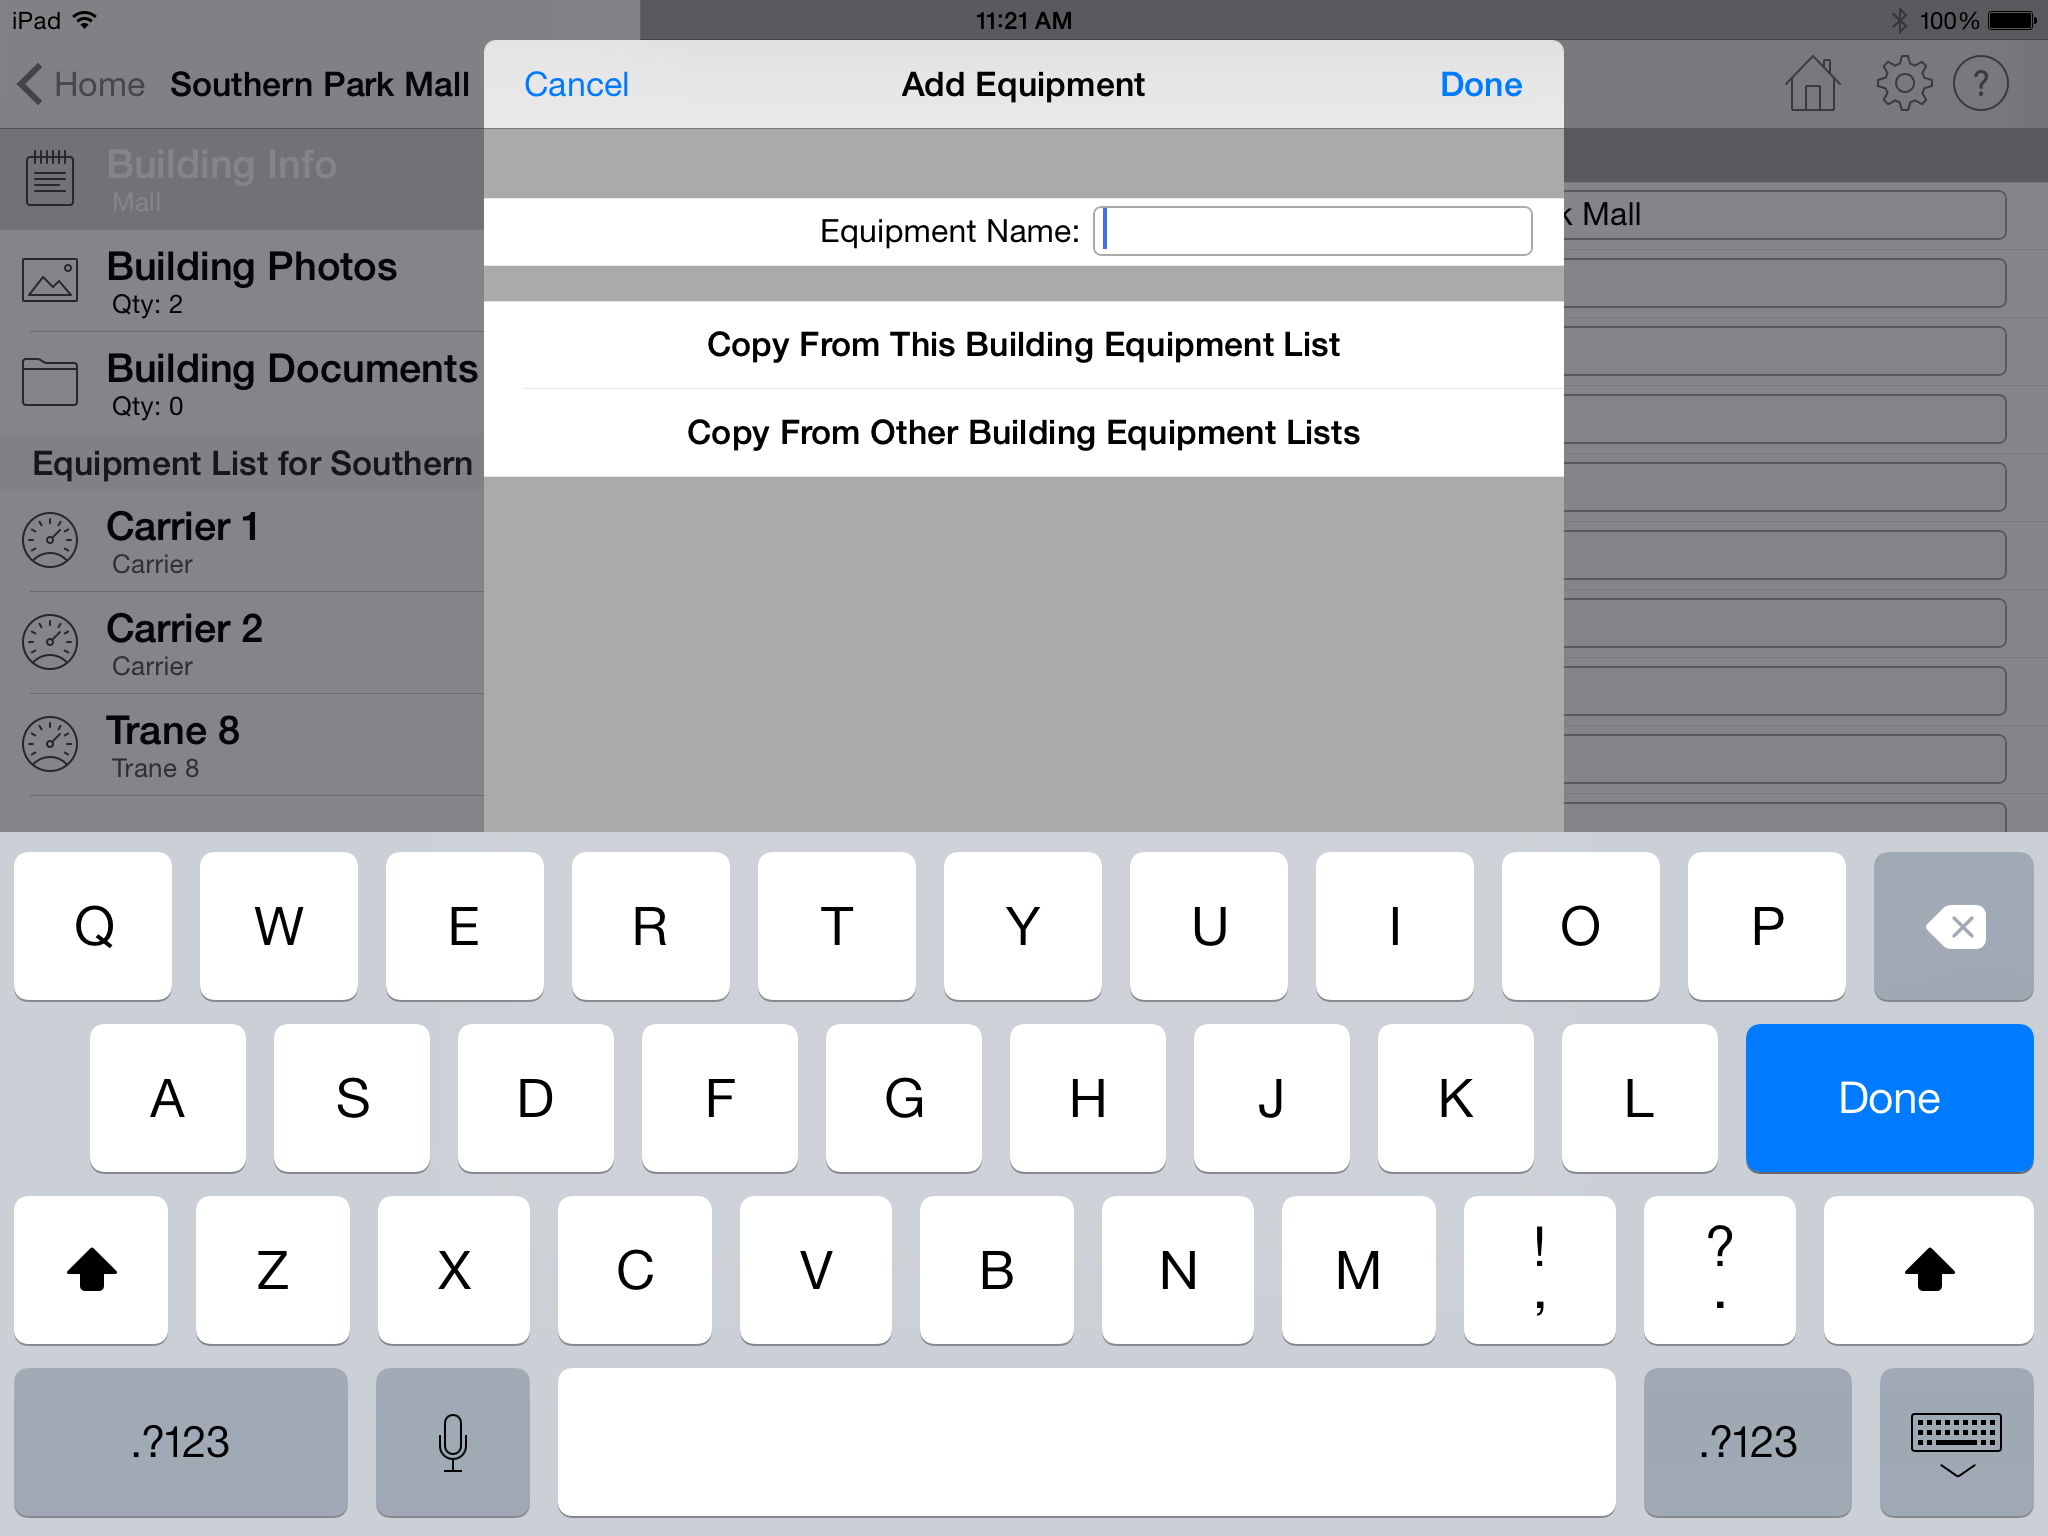
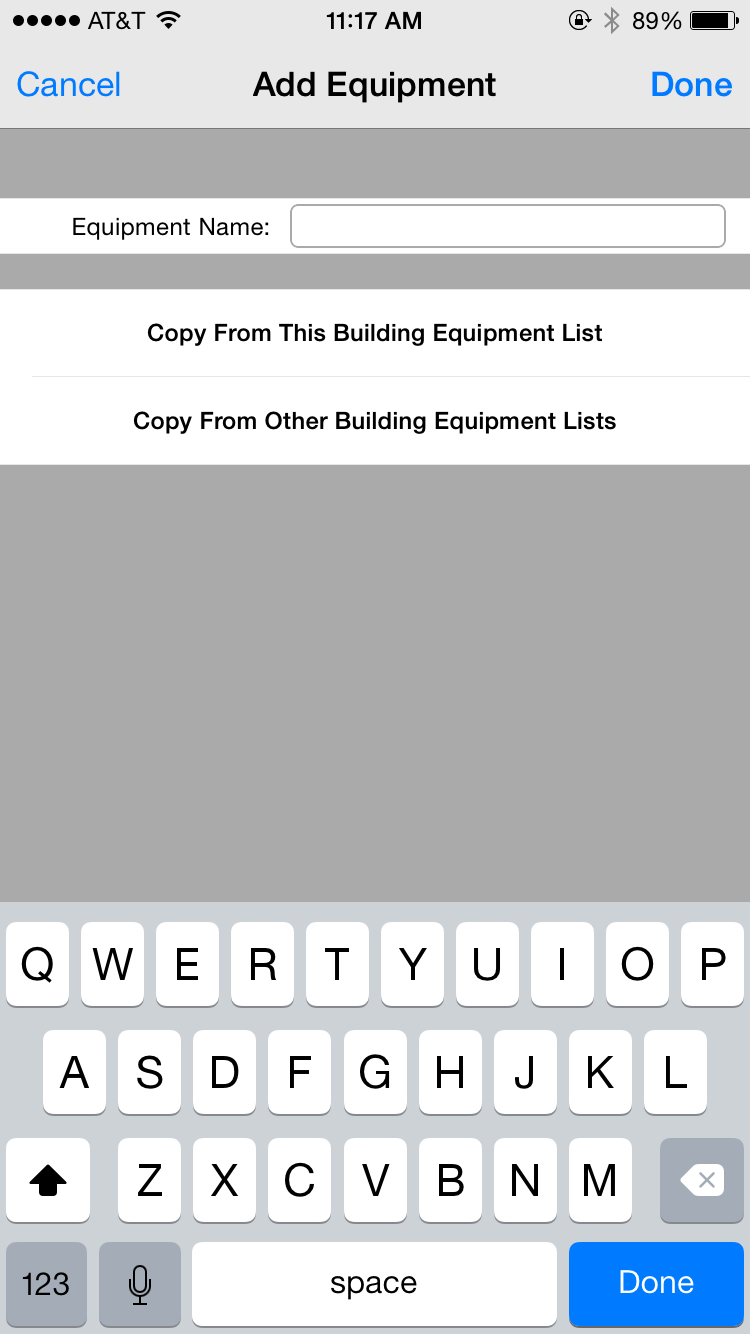
- Create New Equipment: To create new equipment,
click the "+" button located in the lower right-hand corner of the screen. A
new screen will appear allowing you to enter a new equipment name.
The "_Default Equipment" within the "_Default Building" is always used as the basis for creating new equipment.
The new equipment will include
any of the data entered in the "_Default Equipment" including any custom inputs.
Also, you can copy all information (including custom inputs) from an existing piece of equipment within the same building or equipment
from other buildings (as of the mid-2015 version of Locator)
by pressing either the
button labelled "Copy From This Building Equipment List" or "Copy From Other Building Equipment Lists". If you select the first button,
a list of all existing equipment within the same building
will appear allowing you to select from one. If you select the second button, a list of all existing equipment from all other buildings within
your account will appear allowing you to select from one.
When
you return to the "Add Equipment" screen, the new equipment name will be the same as the one you copied from plus the word " Copy" appended to it.
You can change this name by selecting the "Equipment Info" option and changing the "Equipment Name" property.
When you copy from an existing equipment, none of the
maintenance information, equipment photos, and equipment documents are copied, only the equipment information.
- Edit Existing Equipment: To edit existing equipment,
select the equipment name with your finger and the equipment information screen will appear.
- Delete Existing Equipment: Swipe your finger across the name of the equipment that you wish to delete. A "delete" button will appear.
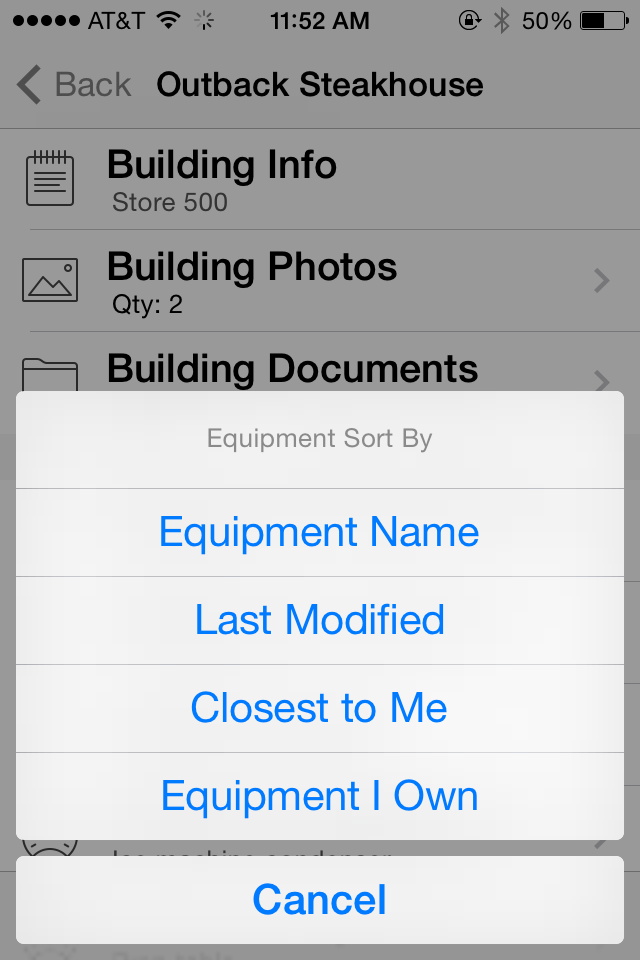
Below the list of equipment is an icon in the lower left-hand side that allows you to sort the list of equipment in four different ways:
- Equipment Name: This option sorts by the equipment name.
- Last Modified: This option sorts by the date and time the equipment information was last modified on the device.
- Closest to Me: This option sorts by the equipment that is closest to where you are currently located. This is based upon where you positioned the building in the "Map It" part of the equipment inputs. You may be asked for permission by the app to determine your GPS coordinates.
- Equipment I Own: This option sorts by equipment that you "own" versus equipment that you do not own. For the definition of "ownership", see above.
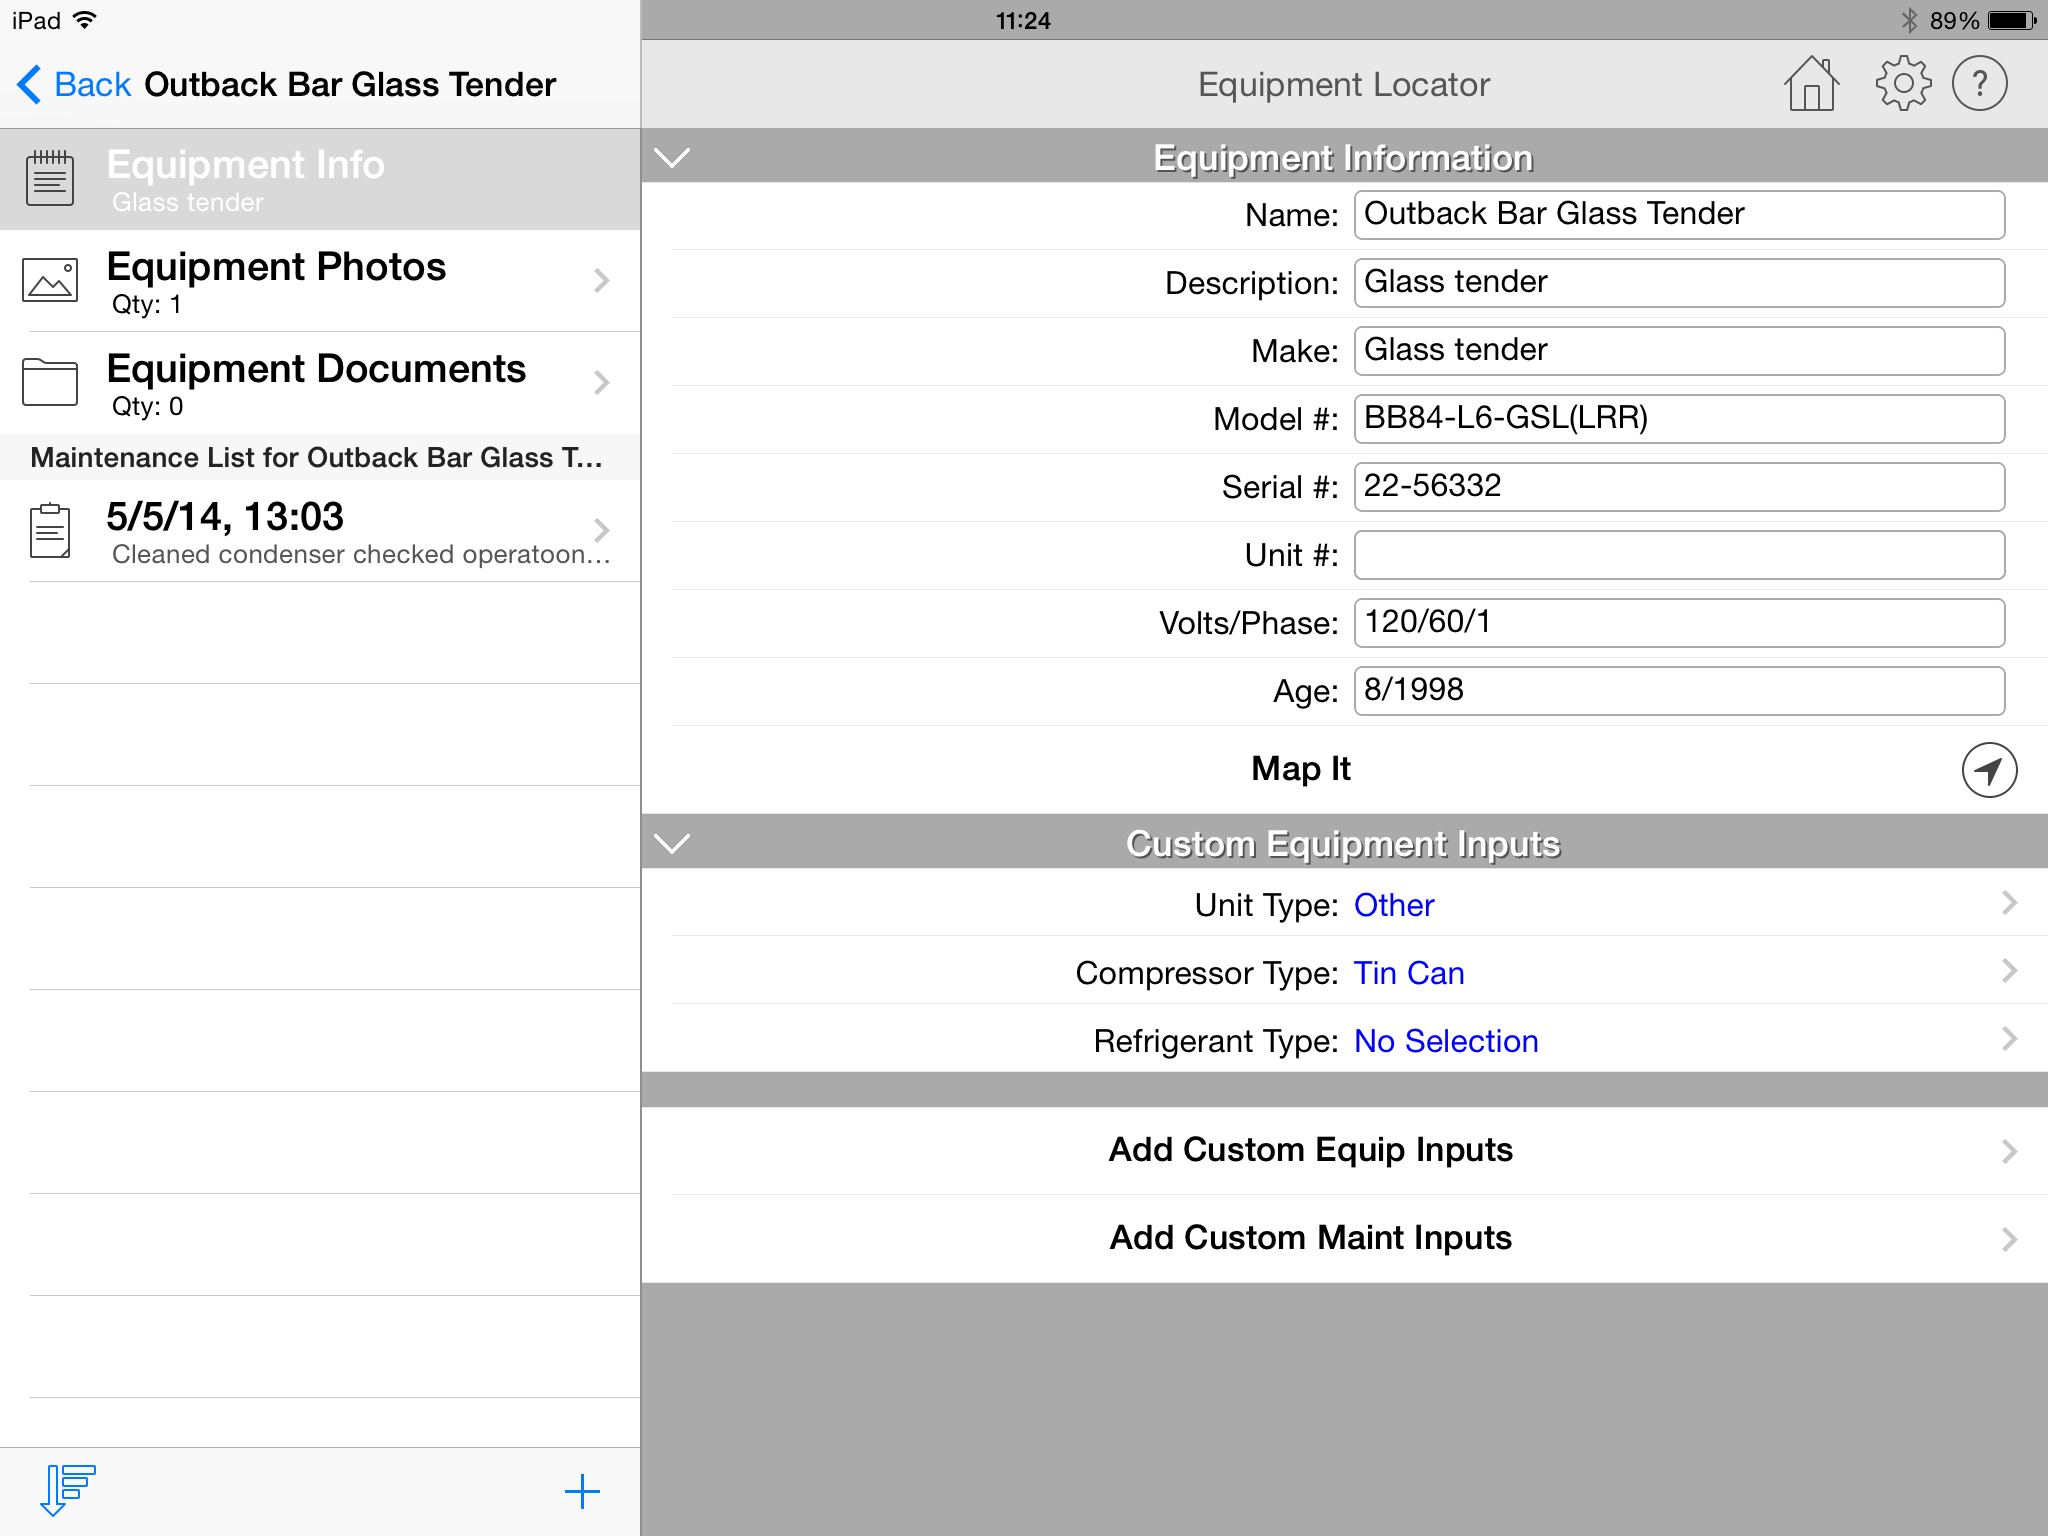
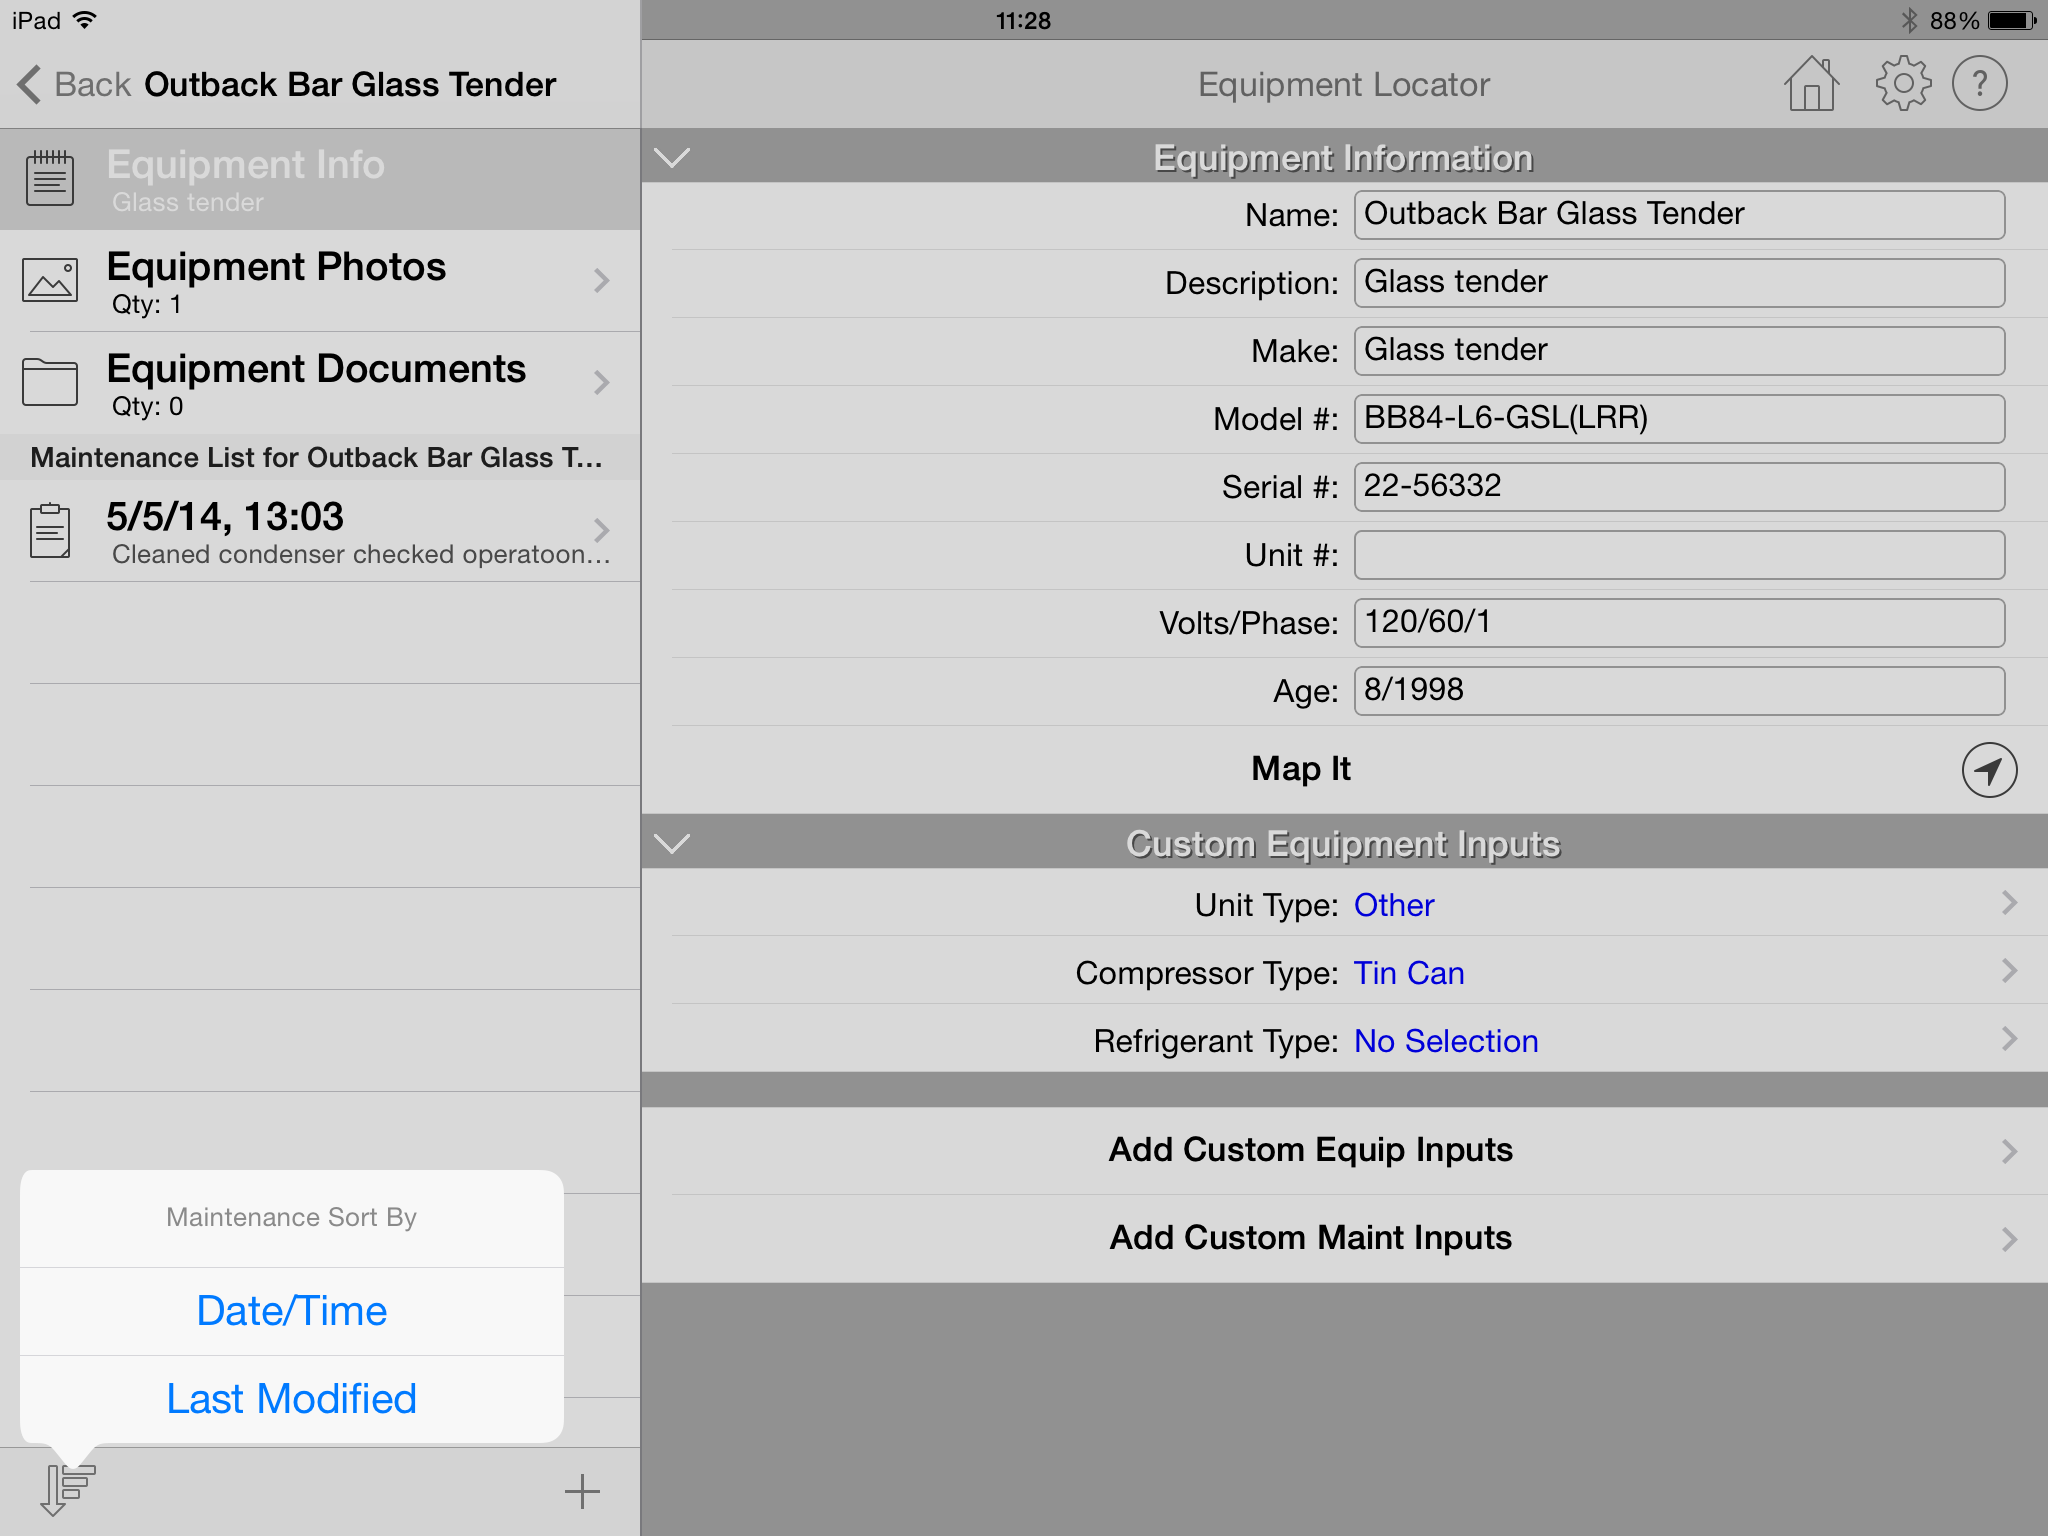
Equipment Info
After creating the new equipment, a screen will appear allowing you to input information about the equipment. The following describes the equipment information that appears when you select the "Equipment Info" option:
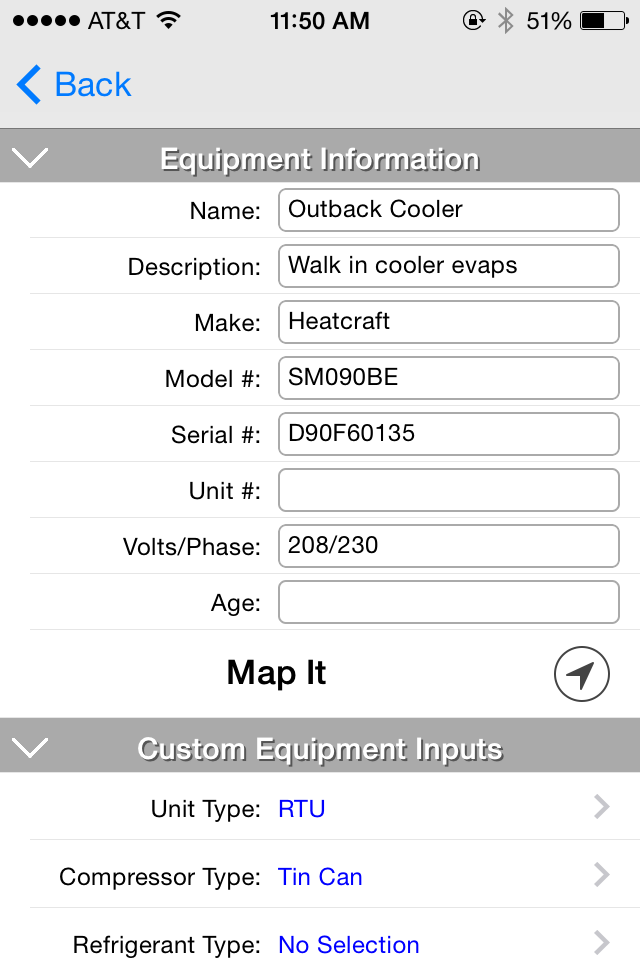
- Equipment Name: This is the name that you originally inputted when you created the equipment. You can change the equipment name in this text box.
- Equipment Description: Input a general description of the equipment. This text is displayed in small font below the equipment name in the list of equipment.
- Make: Input the name of the equipment manufacturer (i.e. - Carrier, Trane, York, etc.)
- Model #: Input the model number of the equipment
- Serial #: Input an alphanumeric serial number of the equpiment
- Unit #: Input the assigned unit number, if any
- Volts/Phase: Input the number of volts and phase for the equipment
- Age: Input the age of the equipment
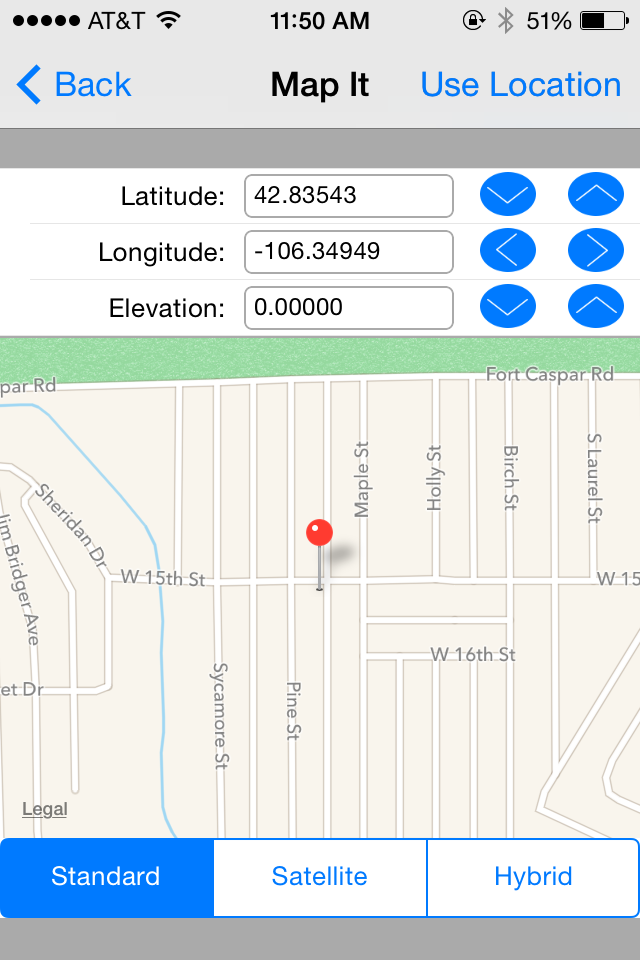
- Map It: Select the button located on the right-hand side of this cell to display the Map It screen. This
screen is similar to the one displayed under the Building Information screen. It also
displays a map and allows you to pinpoint the current location of the equipment.
Click the "Use Location" link in the upper right-hand portion of the
screen to display 2 options:
- Current Location: Select this option to zoom in on your current location based upon the GPS coordinates of your device.
- Building Address: Select this option if you have inputted a valid building address in the building information screen. It will zoom in on the location at that inputted address.
Below the Elevation input is the "View in Google Maps" button. Press it to display the current position in Google Maps (either the web or app version if it is installed).
You can zoom into your exact location by pinching the map with your fingers. In addition, you can select either "Standard", "Satellite", or "Hybrid" map views. Once you have completed retrieving your GPS coordinates, press the button in the upper left-hand corner of the screen to return to the previous screen.
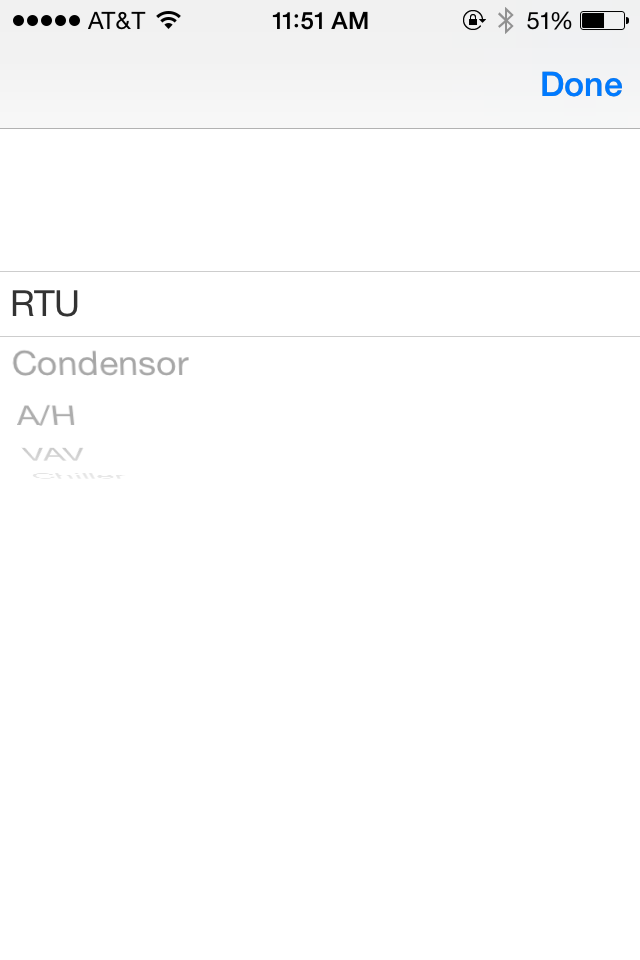
- Unit type: Select the button on the far right of this input to display a picker control listing different unit types including RTU, condensor, A/H (for air handler), VAV, and other.
- Compressor type: Select the button on the far right of this input to display a picker control listing different compressor types including tin can, cast iron, and other.
- Refrigerant type: Select the button on the far right of this input to display a picker control listing different refrigerant types.
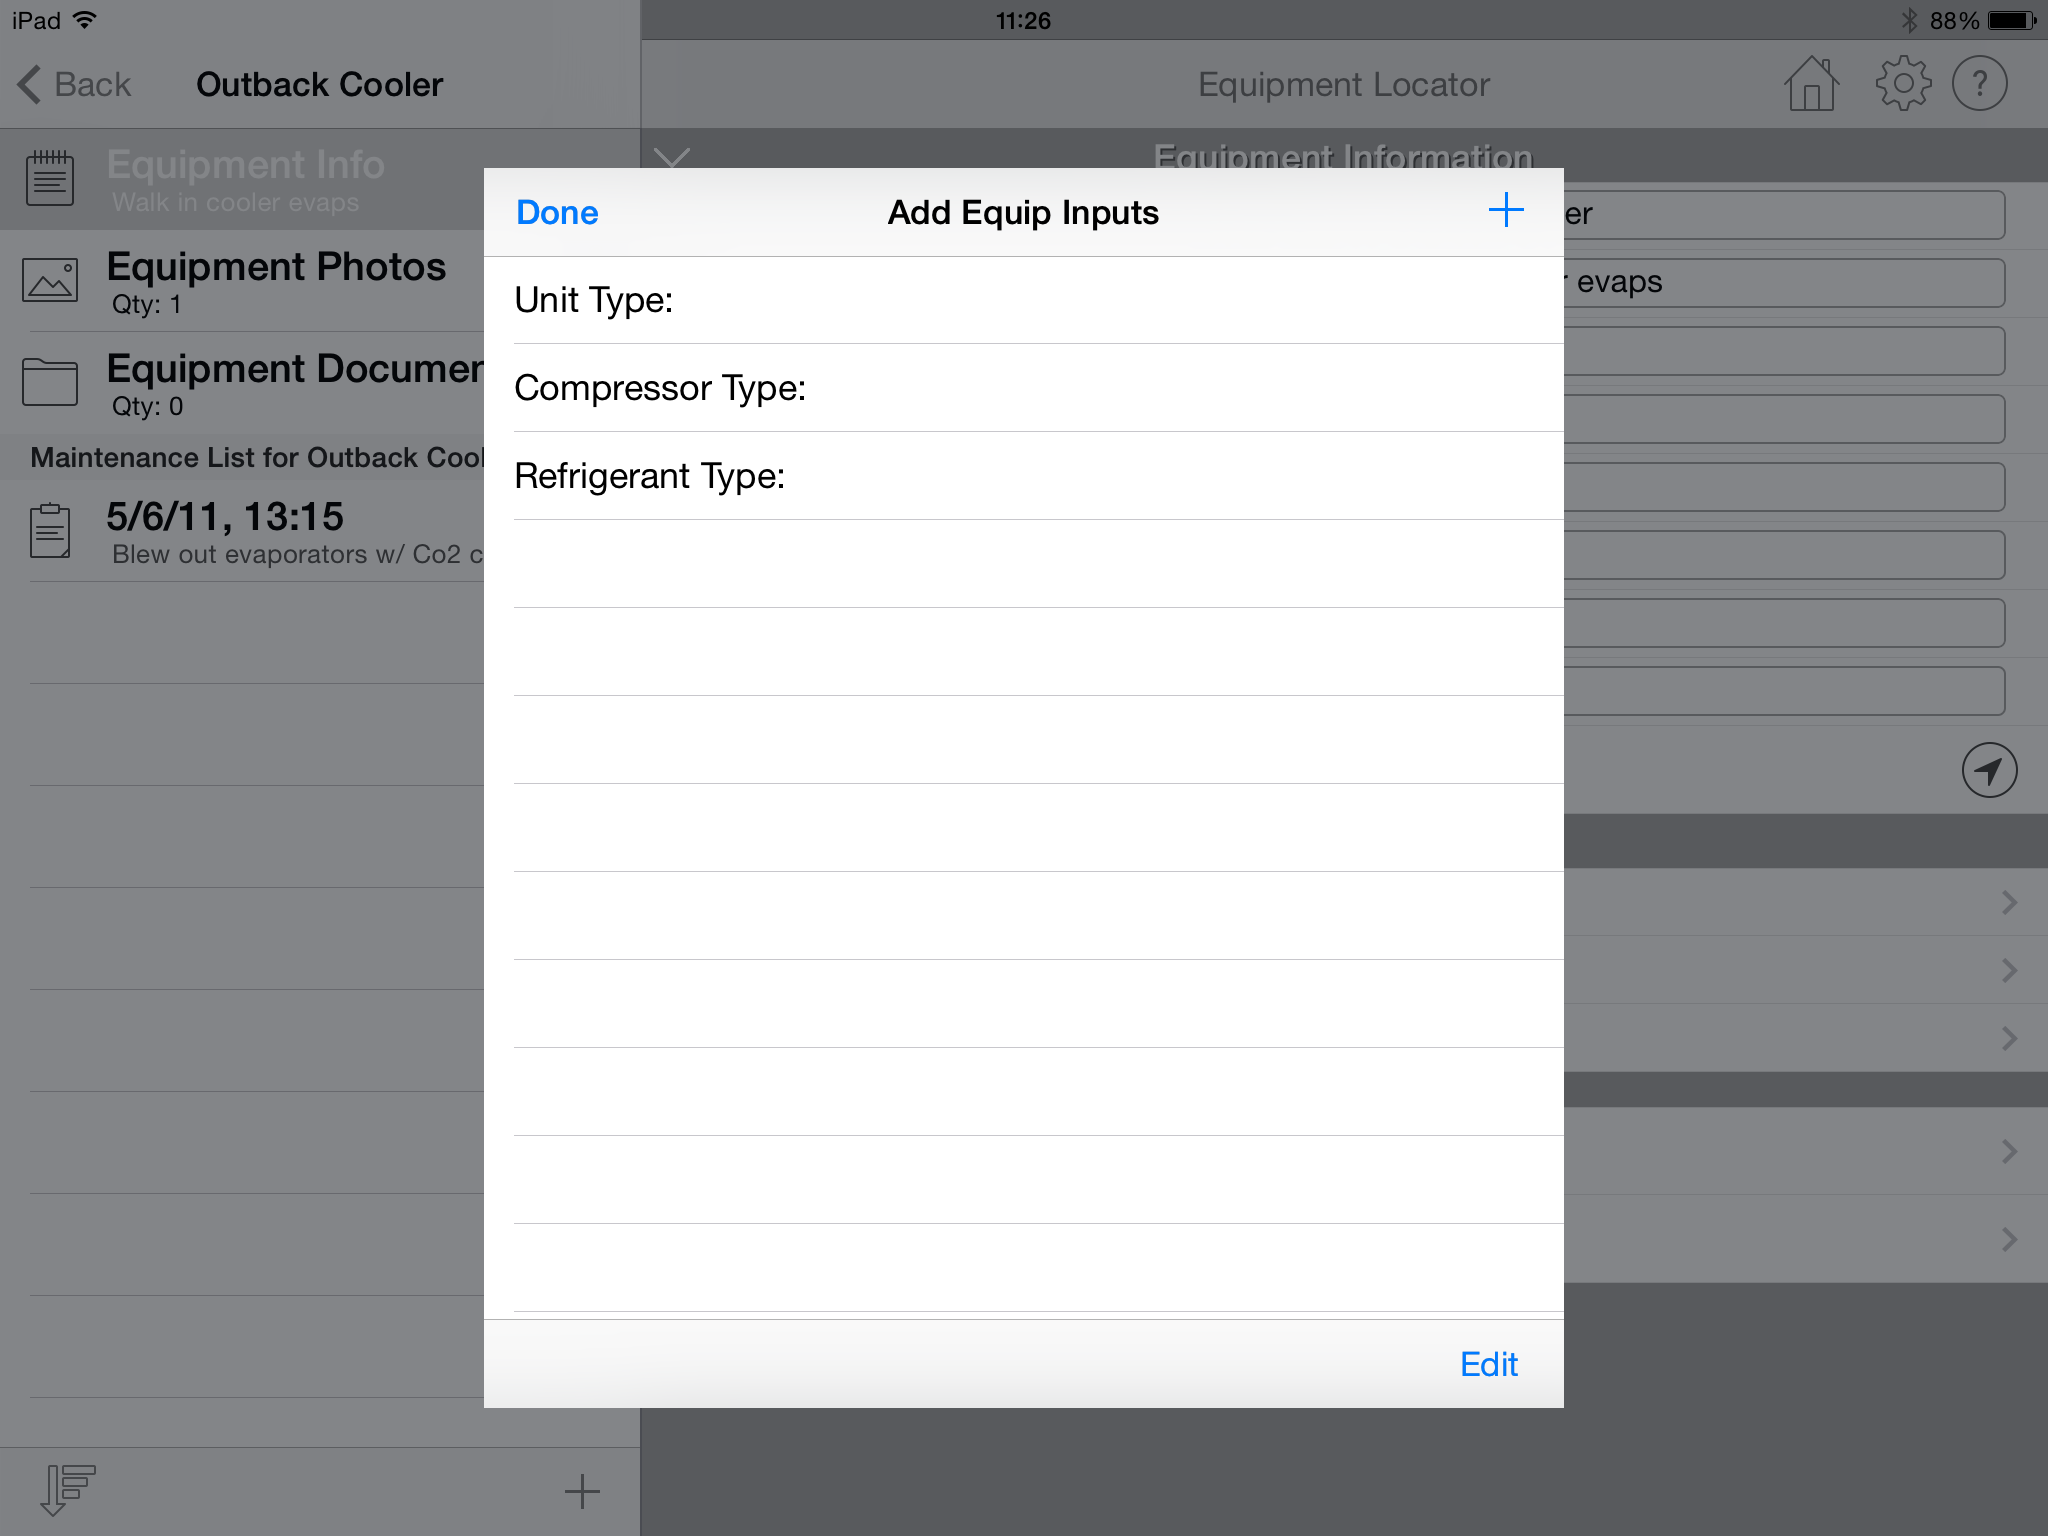
- Add Custom Equip Inputs: Click this cell to begin adding custom inputs to the
equipment info screen (similar to what
you did for the building info screen). The explanation above of how to add custom inputs to the building info screen is the same as for
the equipment info screen. You can create as many custom input controls as you want, then copy this piece of equipment to a new piece of equipment
and replicate the custom controls over and over. Or, you can create different custom controls for each piece of equipment. It is entirely up to you.
- Add Custom Maint Inputs: Click this cell to begin adding custom inputs to the maintenance info screen (described below). The explanation of how to add custom inputs to the building info screen is the same as for the maintenance info screen. The reason this option is located in the equipment input screen and not the maintenance input screen is that all maintenance events for a piece of equipment will have the same custom inputs. There is no need to vary the custom input types for maintenance events for the same piece of equipment.
Equipment Photos
Select the "Equipment Photos" option to add 1 or more photos associated with the equipment. The following screen will appear:
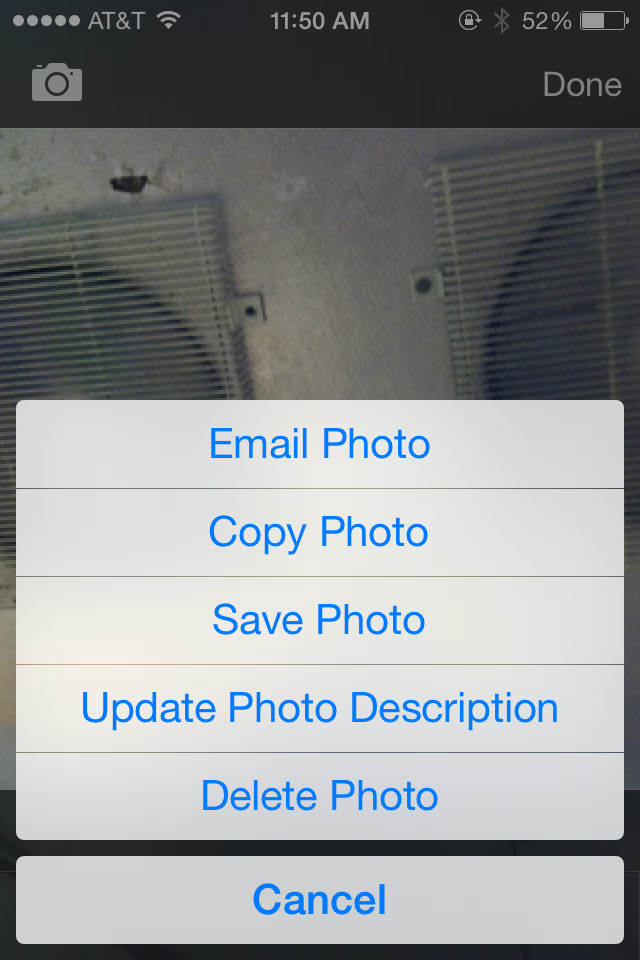
Select the thumbnail image, and it will display a larger version of it. Click the icon in the lower right-hand corner of the screen and a menu appears. This menu includes the following options:
- Email Photo: Allows you to email the photo using your device email client
- Copy Photo: Allows you to copy the photo to the device clipboard then paste it elsewhere
- Save Photo: Allows you to save the phot to your photo to your camera roll
- Update Photo Description: Allows you to enter a brief description of the photo
- Delete Photo: Allows you to delete the photo from the building
Equipment Documents
Select "Equipment Documents" to display a list of 1 or more documents associated with the equipment. A document can be a PDF, Word, Excel, text, or any other file type that is viewable on the mobile device. You cannot add documents within this screen, only view them. There are 2 ways to associate a document with a piece of equipment:- Using the Equipment Locator Cloud website on your computer, login and select the equipment then upload a file type. After it is uploaded, it will automatically sync to the device.
- Within your mobile device, open an email with a document attachement. Select that document and a popup menu will appear. One of the options within that popup menu should be the Equipment Locator app. Select that option and you will be directed to add it to the equipment of your choice.
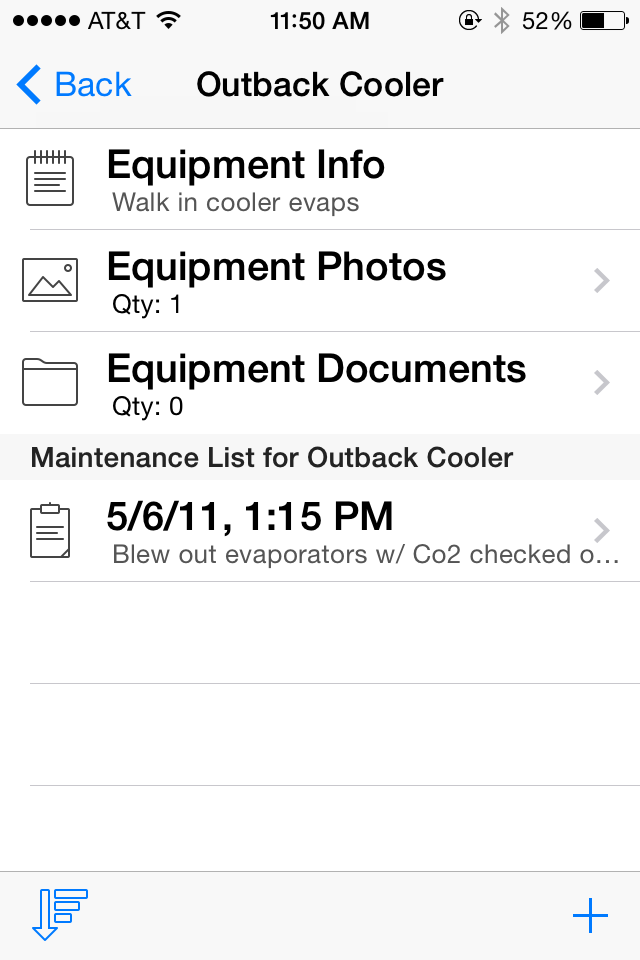
Maintenance List for Equipment
Below the equipment info, photos, and documents options, the app displays a list of the maintenance events associated with the equipment. You can begin adding maintenance events by pressing the "+" button located in the lower right-hand corner of the screen.
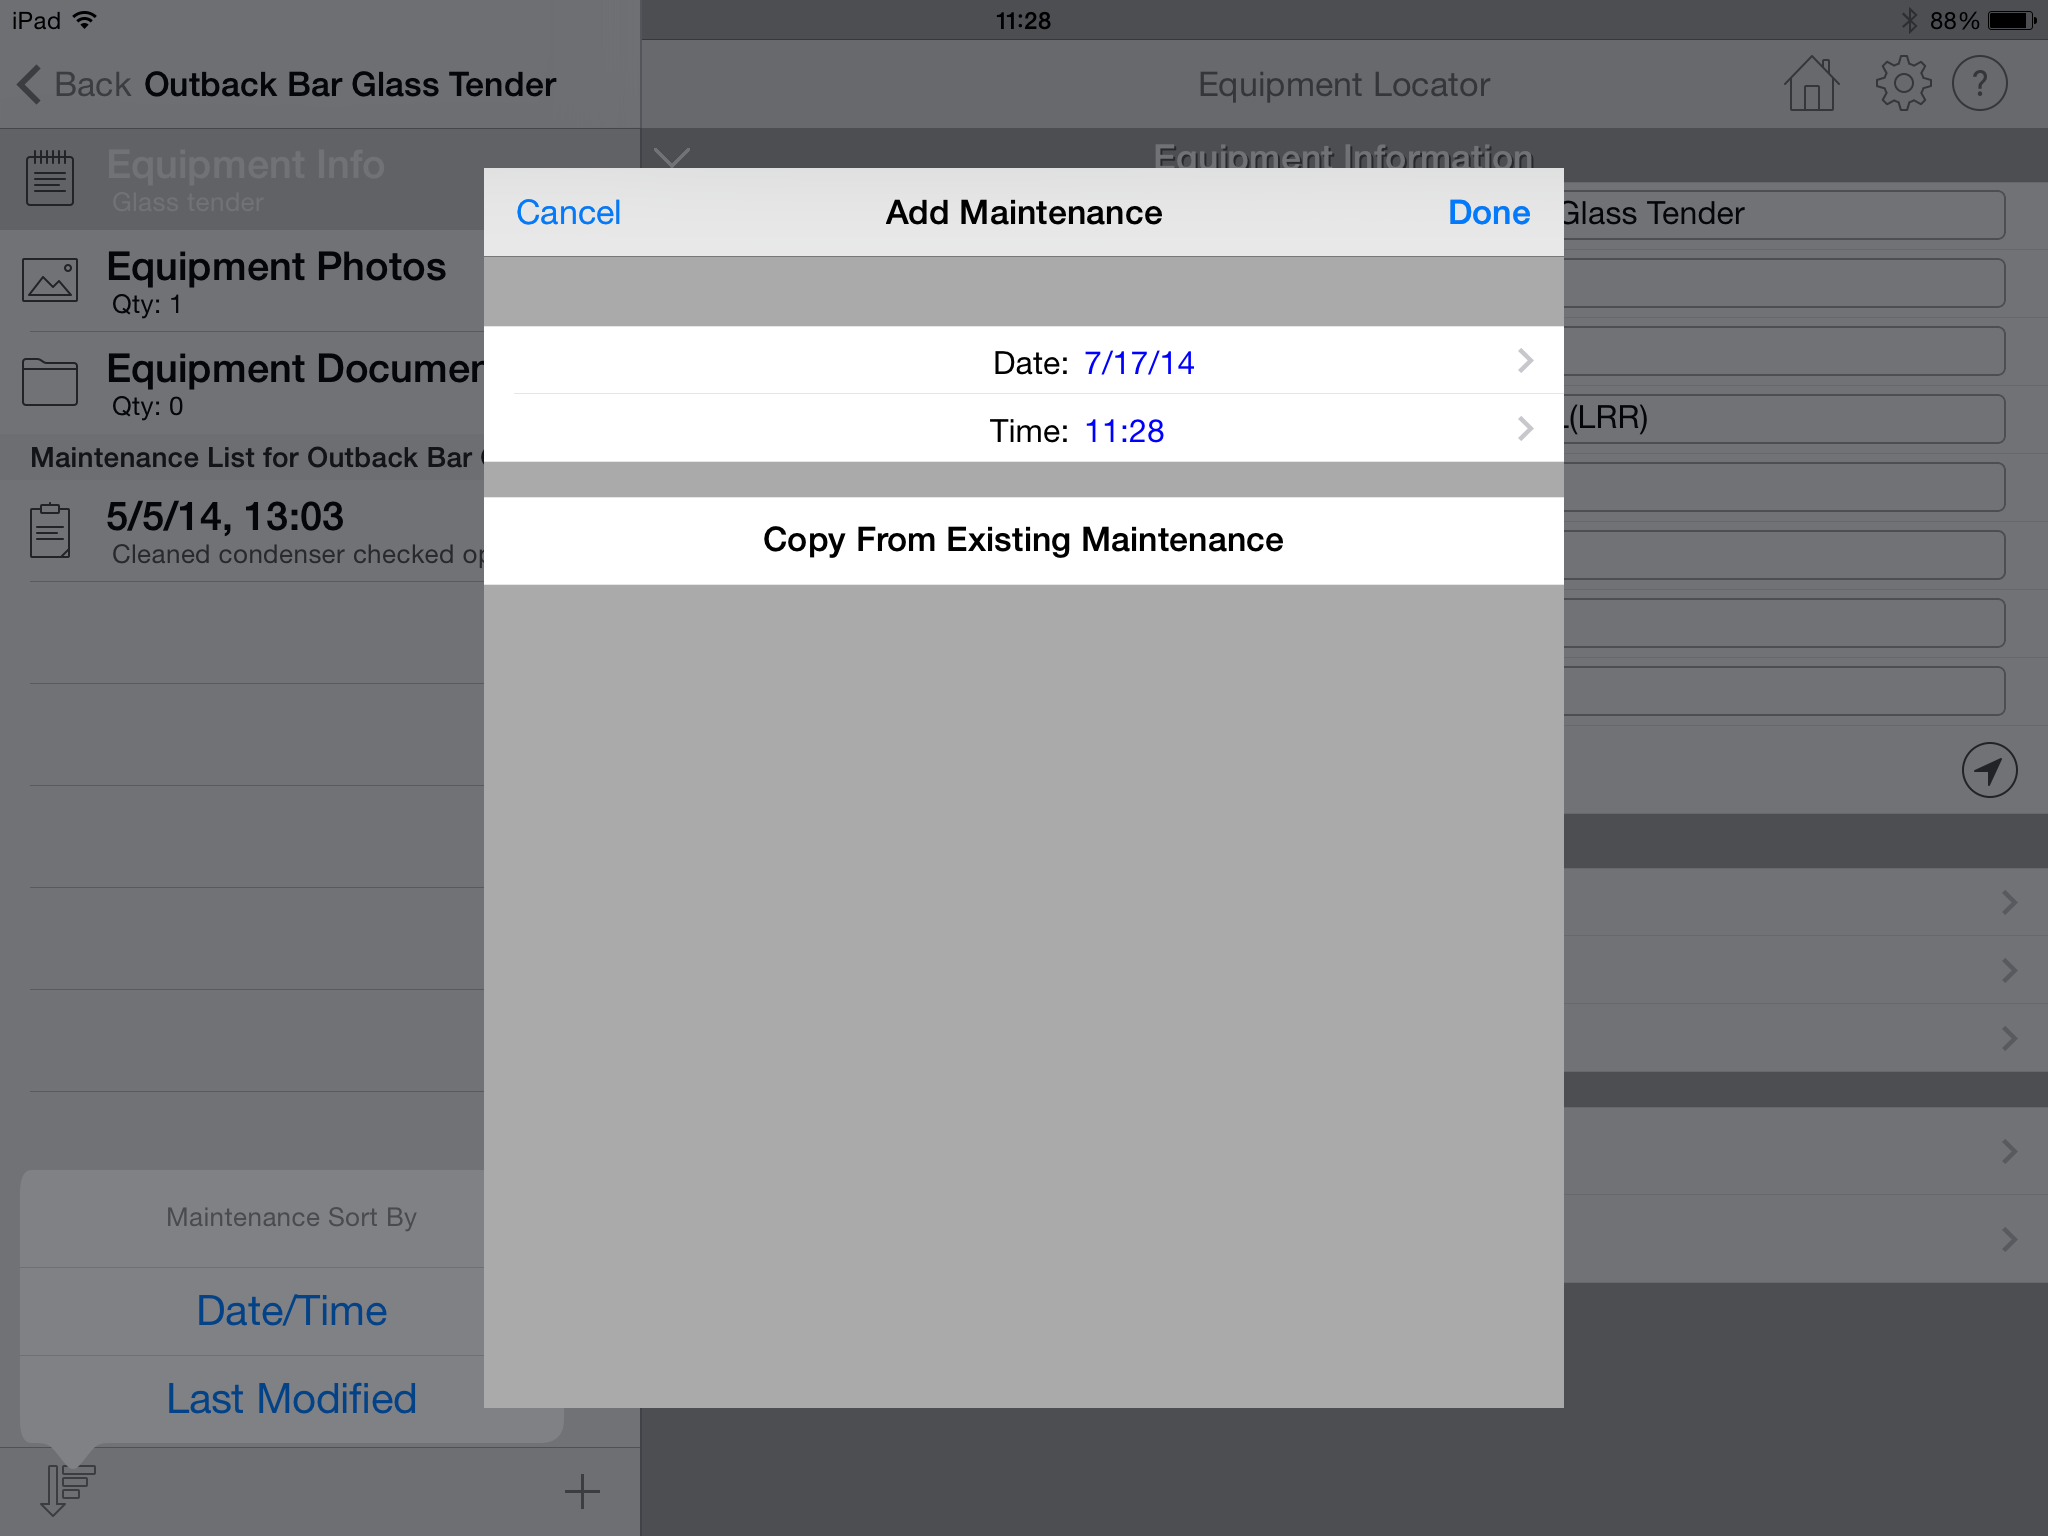
- Create New Maintenance: To create new maintenance event,
click the "+" button located in the lower right-hand corner of the screen. A
new screen will appear that includes the current date and time (This is how maintenance events are "named".
The "_Default Maintenance" within the "_Default Building" is always used as the basis for creating new maintenance events.
The new maintenance event will include
any of the data entered in the "_Default Maintenance" including any custom inputs.
Also, you can copy all information (including custom inputs) from an existing maintenance event within the same equipment by pressing the
button labelled "Copy from Existing Maintenance". A list of all existing maintenance events within the same equipment
will appear allowing you to select from one.

- Edit Existing Maintenance Event: To edit an existing maintenance event,
select the maintenance event with your finger and the maintenance information screen will appear.
- Delete Existing Maintenance Event: Swipe your finger across the name of the maintenance event that you wish to delete. A "delete" button will appear.
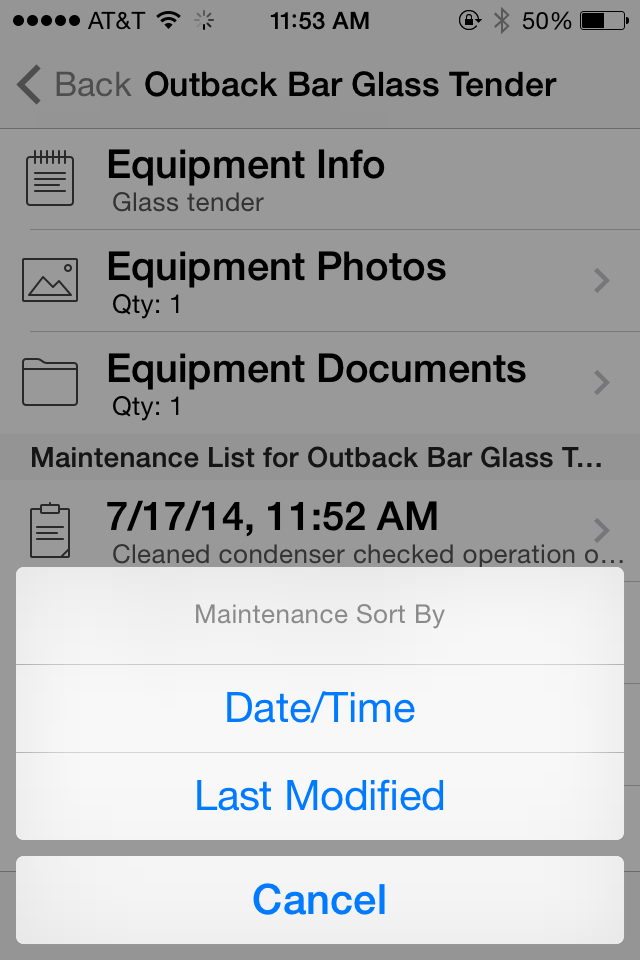
Below the list of maintenance events is an icon in the lower left-hand side that allows you to sort the list of maintenance events in two different ways:
- Date/Time: This option sorts by the maintenance date and time.
- Last Modified: This option sorts by the date and time the maintenance information was last modified on the device.
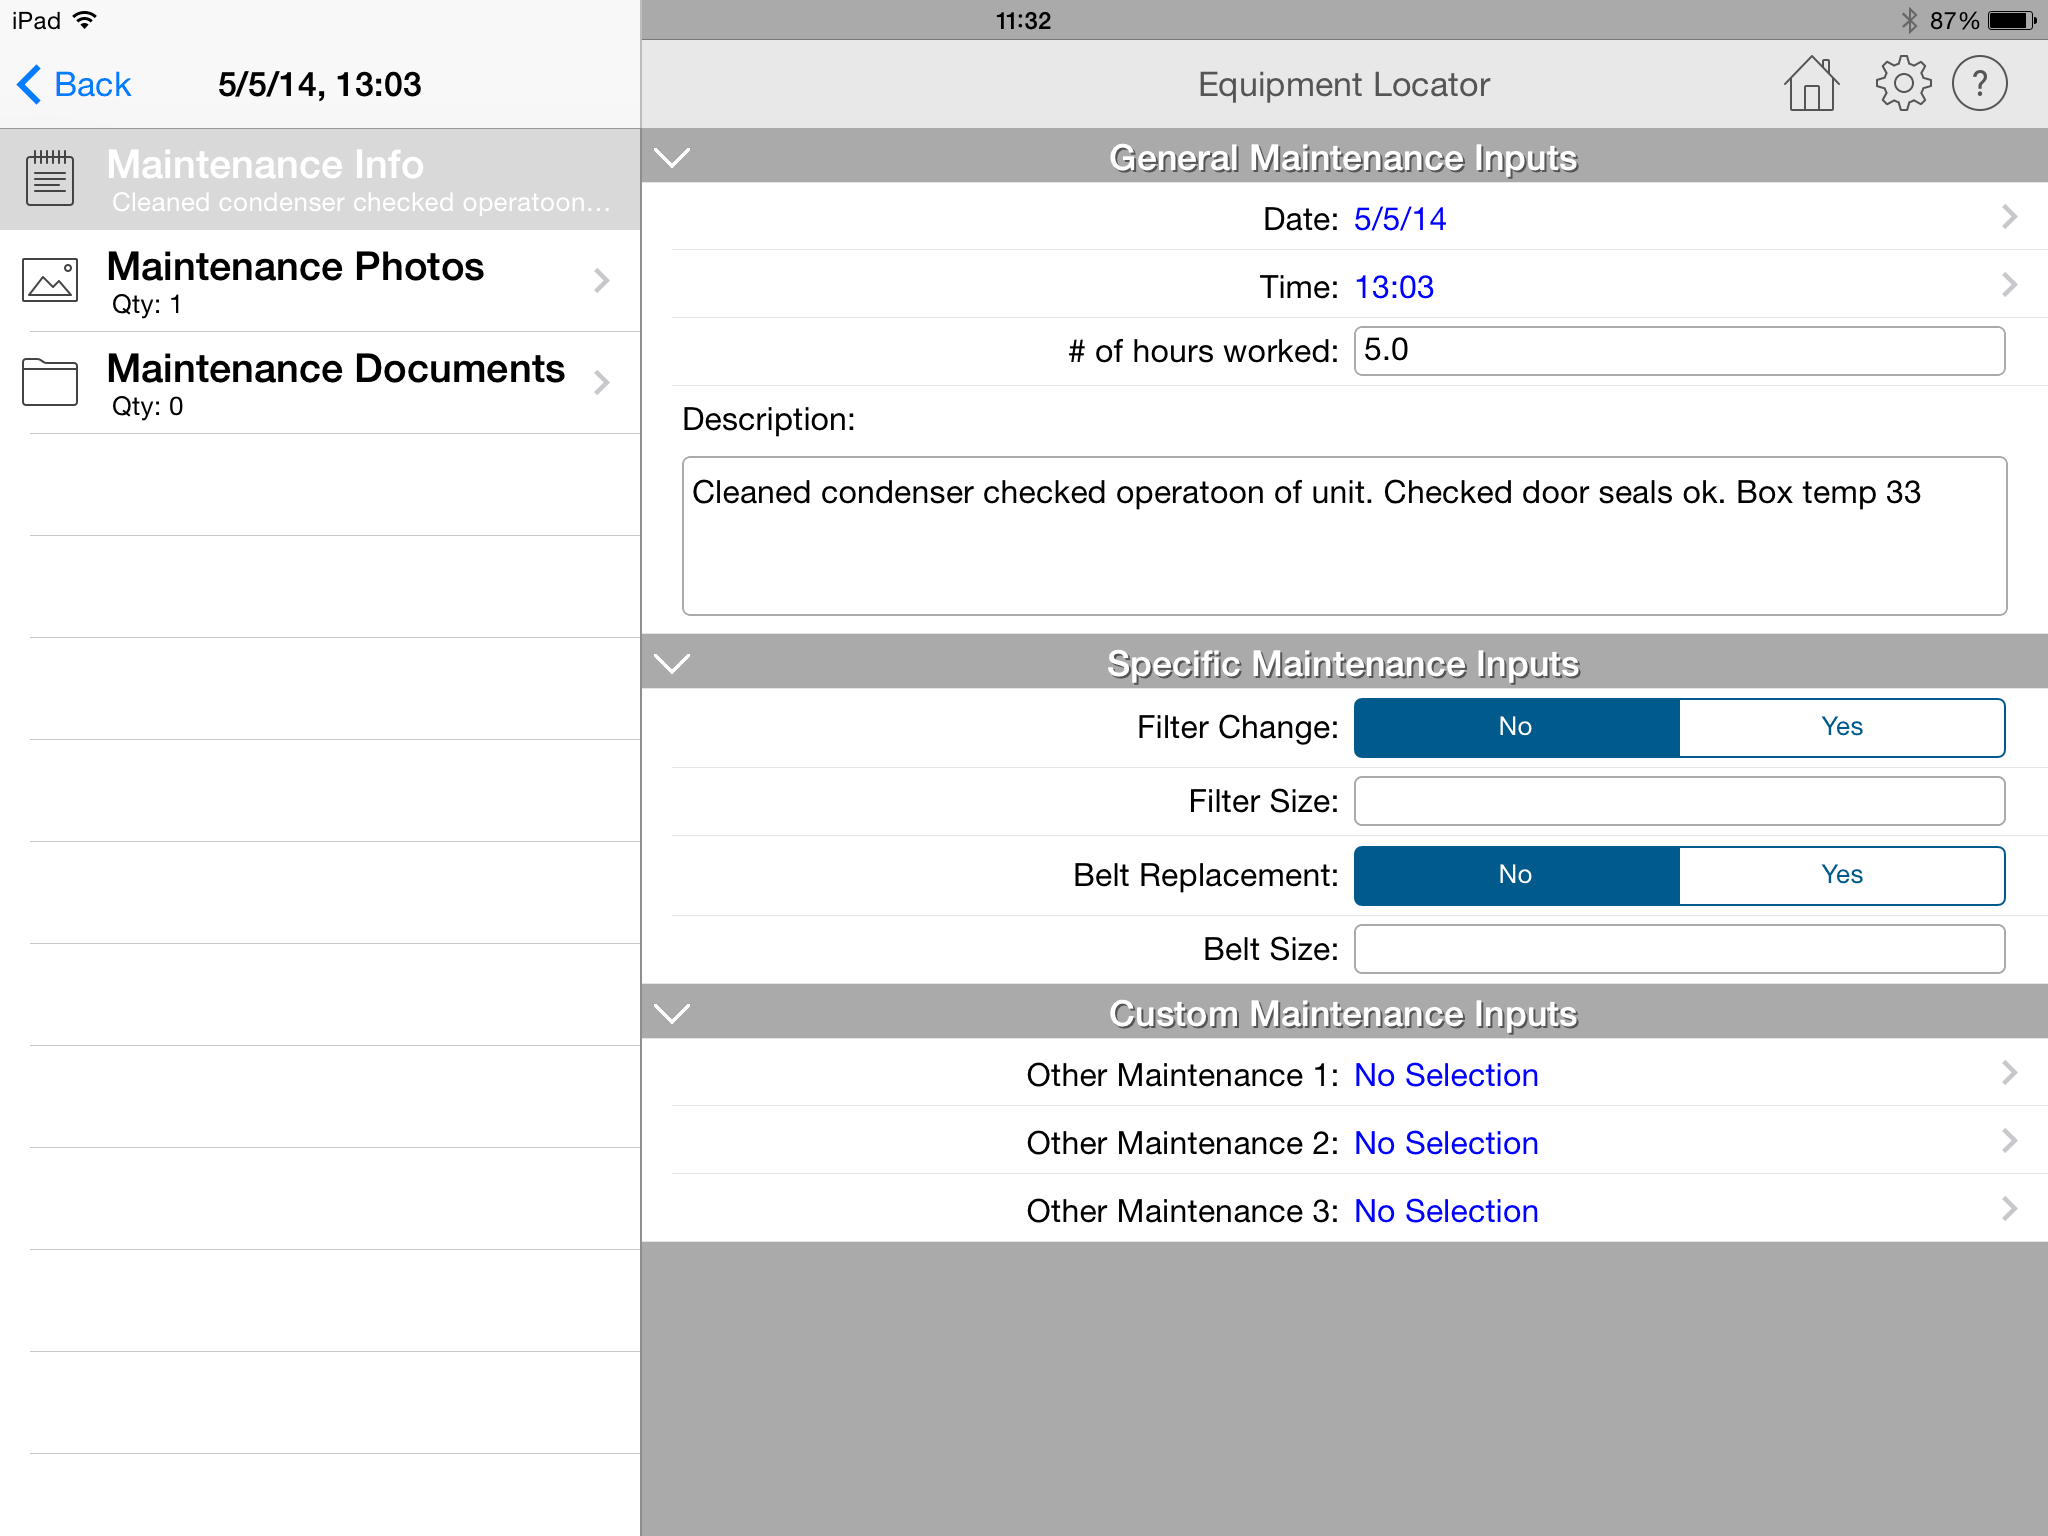
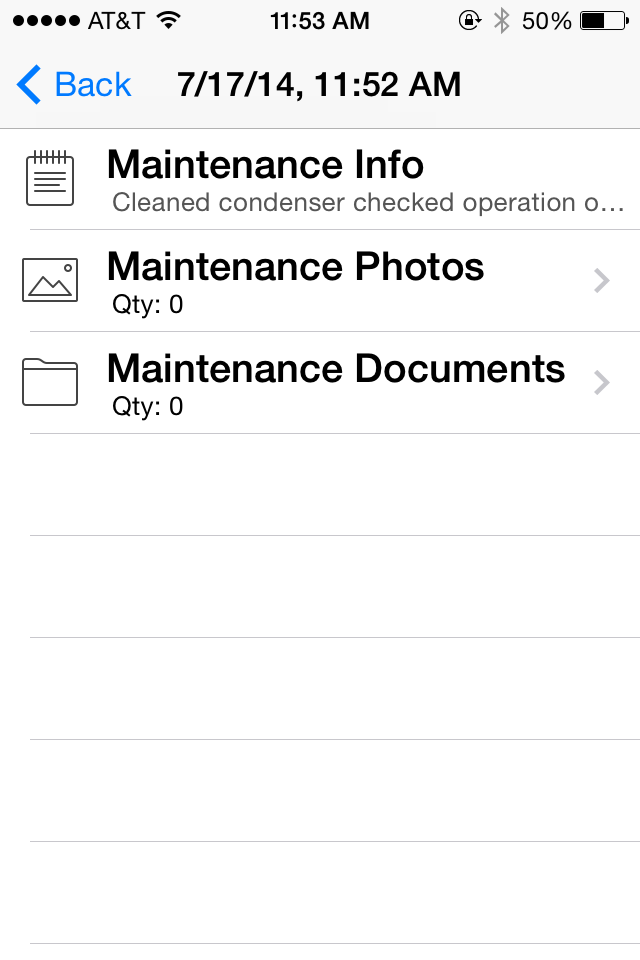
Maintenance Info
After creating the new maintenance event, a screen will appear allowing you to input information about it. The following describes the maintenance information that appears when you select the "Maintenance Info" option: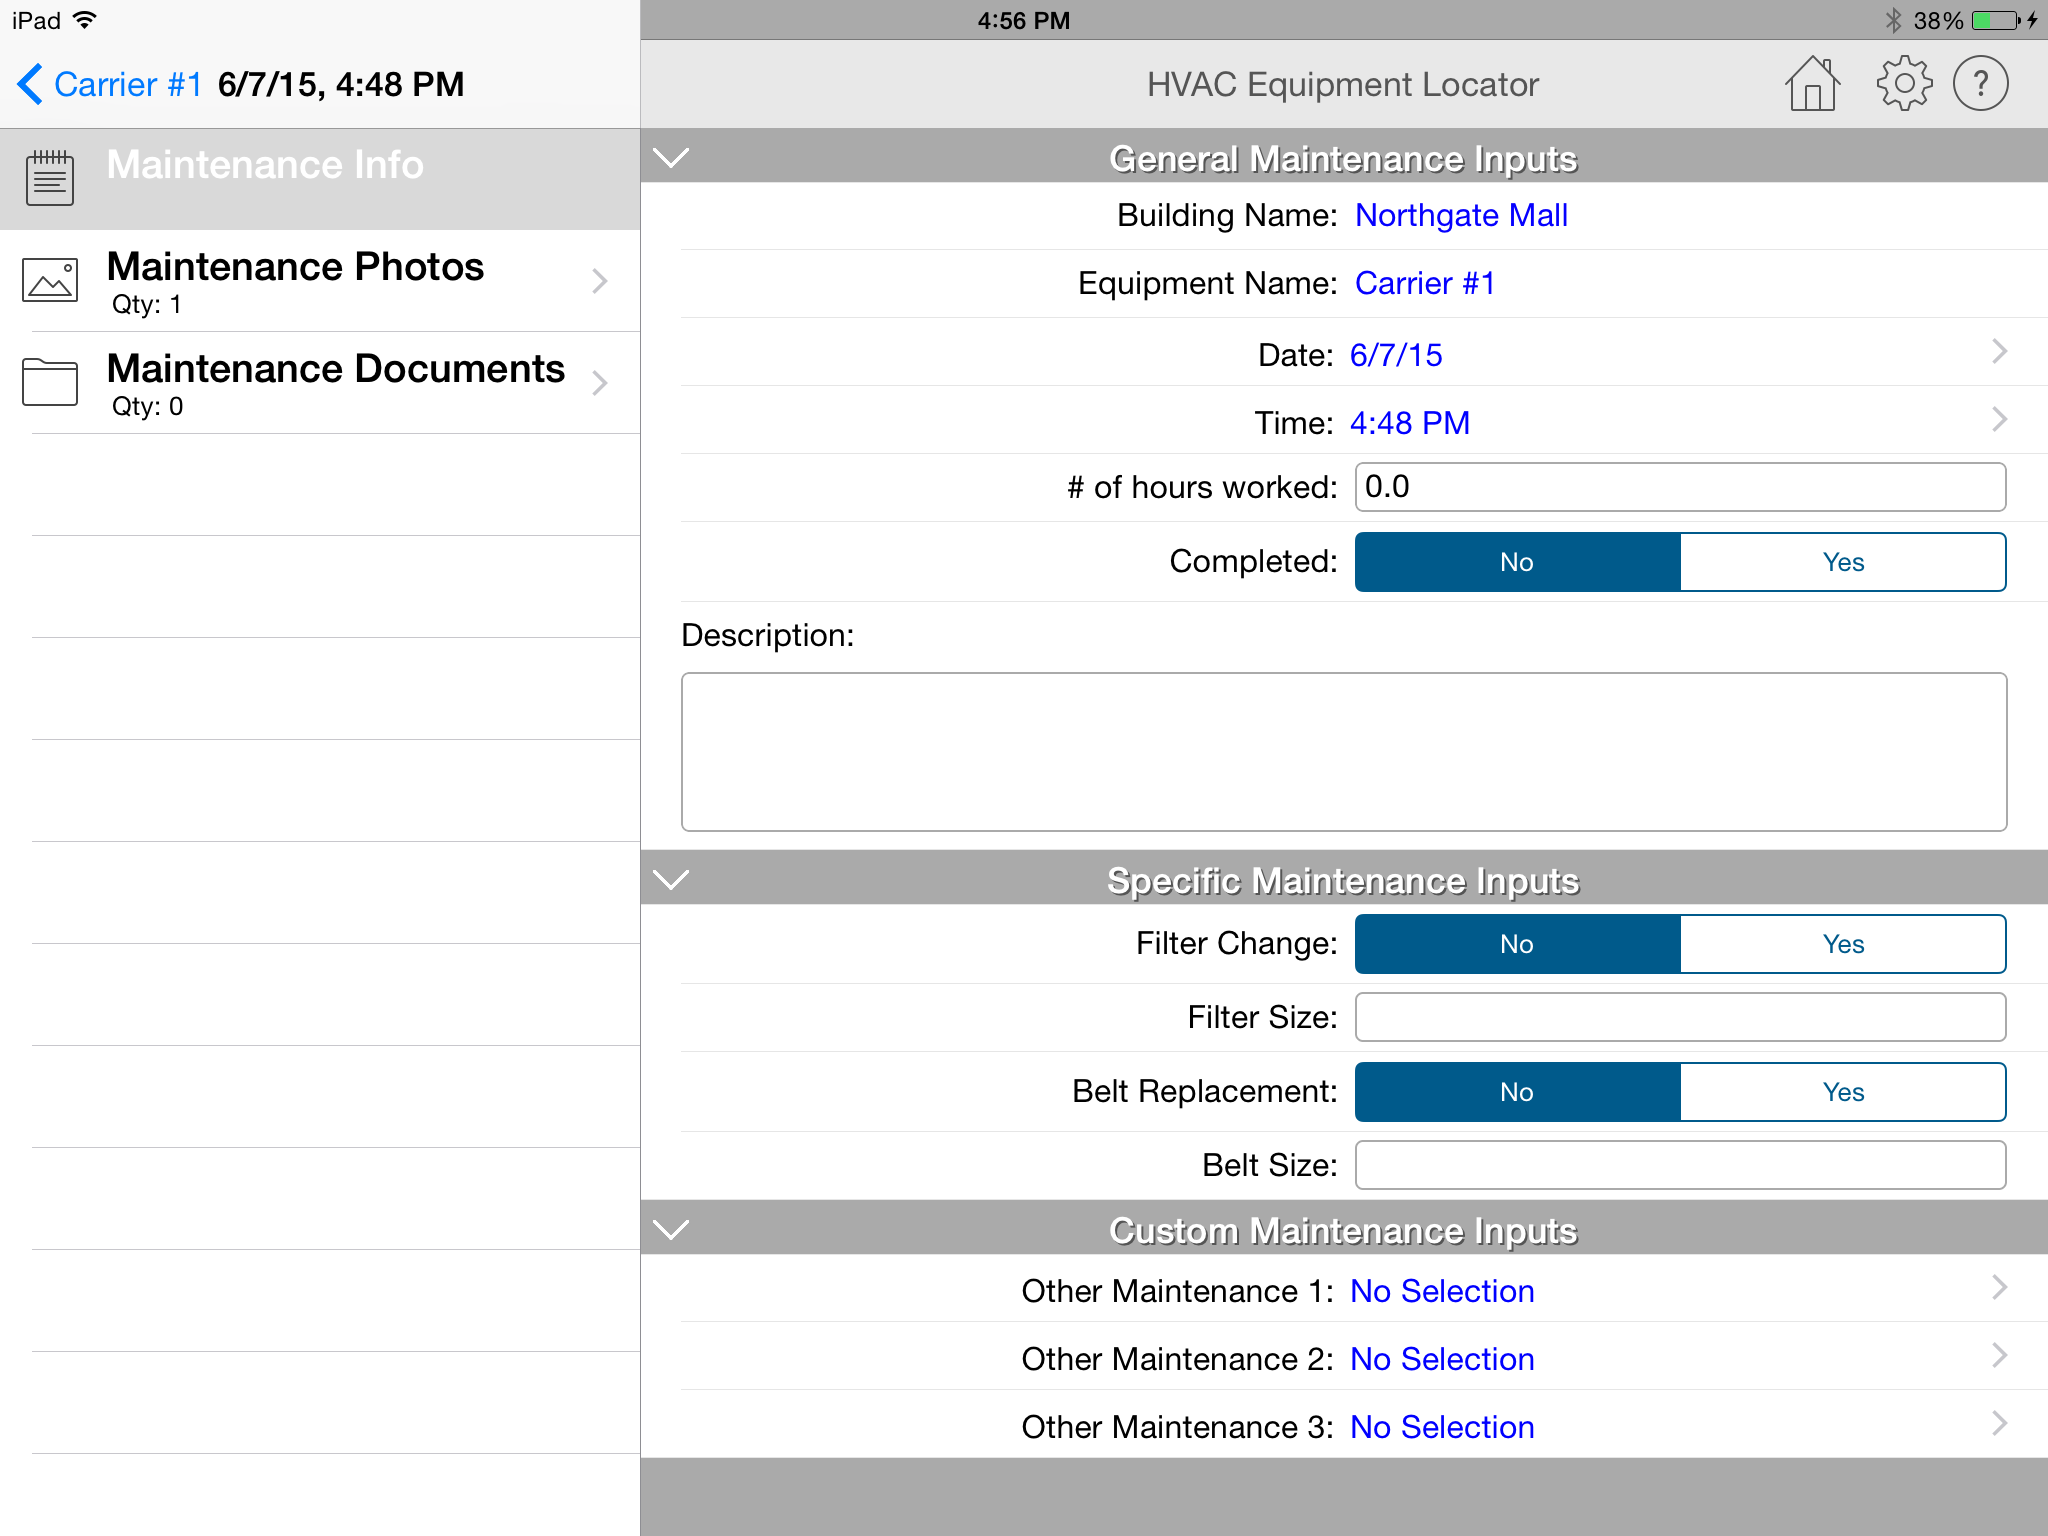
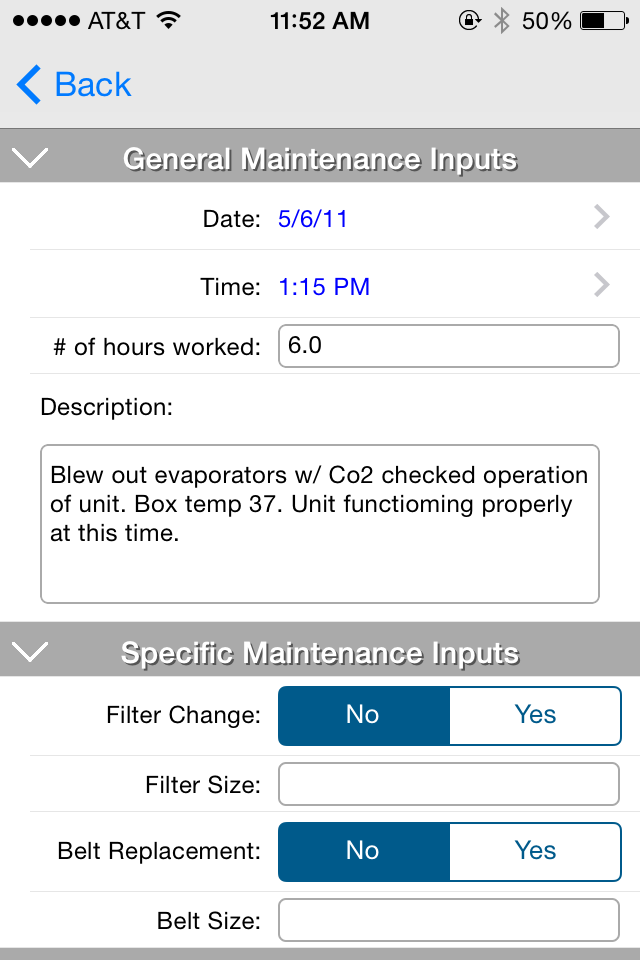
- Date: This is the date of the maintenance event. This date was automatically set to the current date that the maintenance event was created. If you wish to override this date, press the button located in the input cell and a picker control will appear allowing you to select another date.
- Time: This is the time of the maintenance event. This time was automatically set to the current time that the maintenance event was created. If you wish to override this time, press the button located in the input cell and a picker control will appear allowing you to select another time.
- Number of hours worked: Input the total number of hours worked on this maintenance event.
- Completed: Specify whether this maintenance event has been completed or not. If it has been completed, select "Yes". The maintenance event will no longer appear in the "Upcoming Maintenance" list described below.
- Description: Input a description of the work performed during this maintenance event. This text is displayed in small font below the maintenance event date in the list of maintenance events.
- Filter Change: Select whether a filter change is required.
- Filter Size: If a filter change is required, enter a filter size value (numerical or otherwise).
- Belt Replacement: Select whether a belt replacement is required.
- Belt Size: If a belt replacement is required, enter a belt size value (numerical or otherwise).
The following three inputs are default "custom" inputs that are preloaded with the app. You can update these custom inputs by going to the "Add Custom Maintenance Inputs" section described above under the equipment inputs section:
- Other Maintenance 1: Click the button to display a picker control that allows you to select from a list of standard HVAC maintenance events.
- Other Maintenance 2: Click the button to display a picker control that allows you to select from a list of standard HVAC maintenance events.
- Other Maintenance 3: Click the button to display a picker control that allows you to select from a list of standard HVAC maintenance events.
Maintenance Photos
Select the "Maintenance Photos" option to add 1 or more photos associated with the maintenance event. The following screen will appear:
Select the thumbnail image, and it will display a larger version of it. Click the icon in the lower right-hand corner of the screen and a menu appears. This menu includes the following options:
- Email Photo: Allows you to email the photo using your device email client
- Copy Photo: Allows you to copy the photo to the device clipboard then paste it elsewhere
- Save Photo: Allows you to save the phot to your photo to your camera roll
- Update Photo Description: Allows you to enter a brief description of the photo
- Delete Photo: Allows you to delete the photo from the building
Maintenance Documents
Select "Maintenance Documents" to display a list of 1 or more documents associated with the maintenance event. A document can be a PDF, Word, Excel, text, or any other file type that is viewable on the mobile device. You cannot add documents within this screen, only view them. There are 2 ways to associate a document with a piece of equipment:- Using the Equipment Locator Cloud website on your computer, login and select the equipment then upload a file type. After it is uploaded, it will automatically sync to the device.
- Within your mobile device, open an email with a document attachement. Select that document and a popup menu will appear. One of the options within that popup menu should be the Equipment Locator app. Select that option and you will be directed to add it to the maintenance event of your choice.
Upcoming Maintenance
On the Building List form, there is an option at the top of the list called "Upcoming Maintenance".
This option lists all of maintenance events that will occur within a specified time period. The list displays the building name, equipment name, and the maintenance date. By selecting the maintenance event that you want to see, it will direct you to the Equipment Info page, and it will display the selected maintenance event as first in the list on this page. By selecting the desired date, it will direct you to the Maintenance Info page where you can input information about the maintenance event. When you back out, it will return you to the Upcoming Maintenance list.
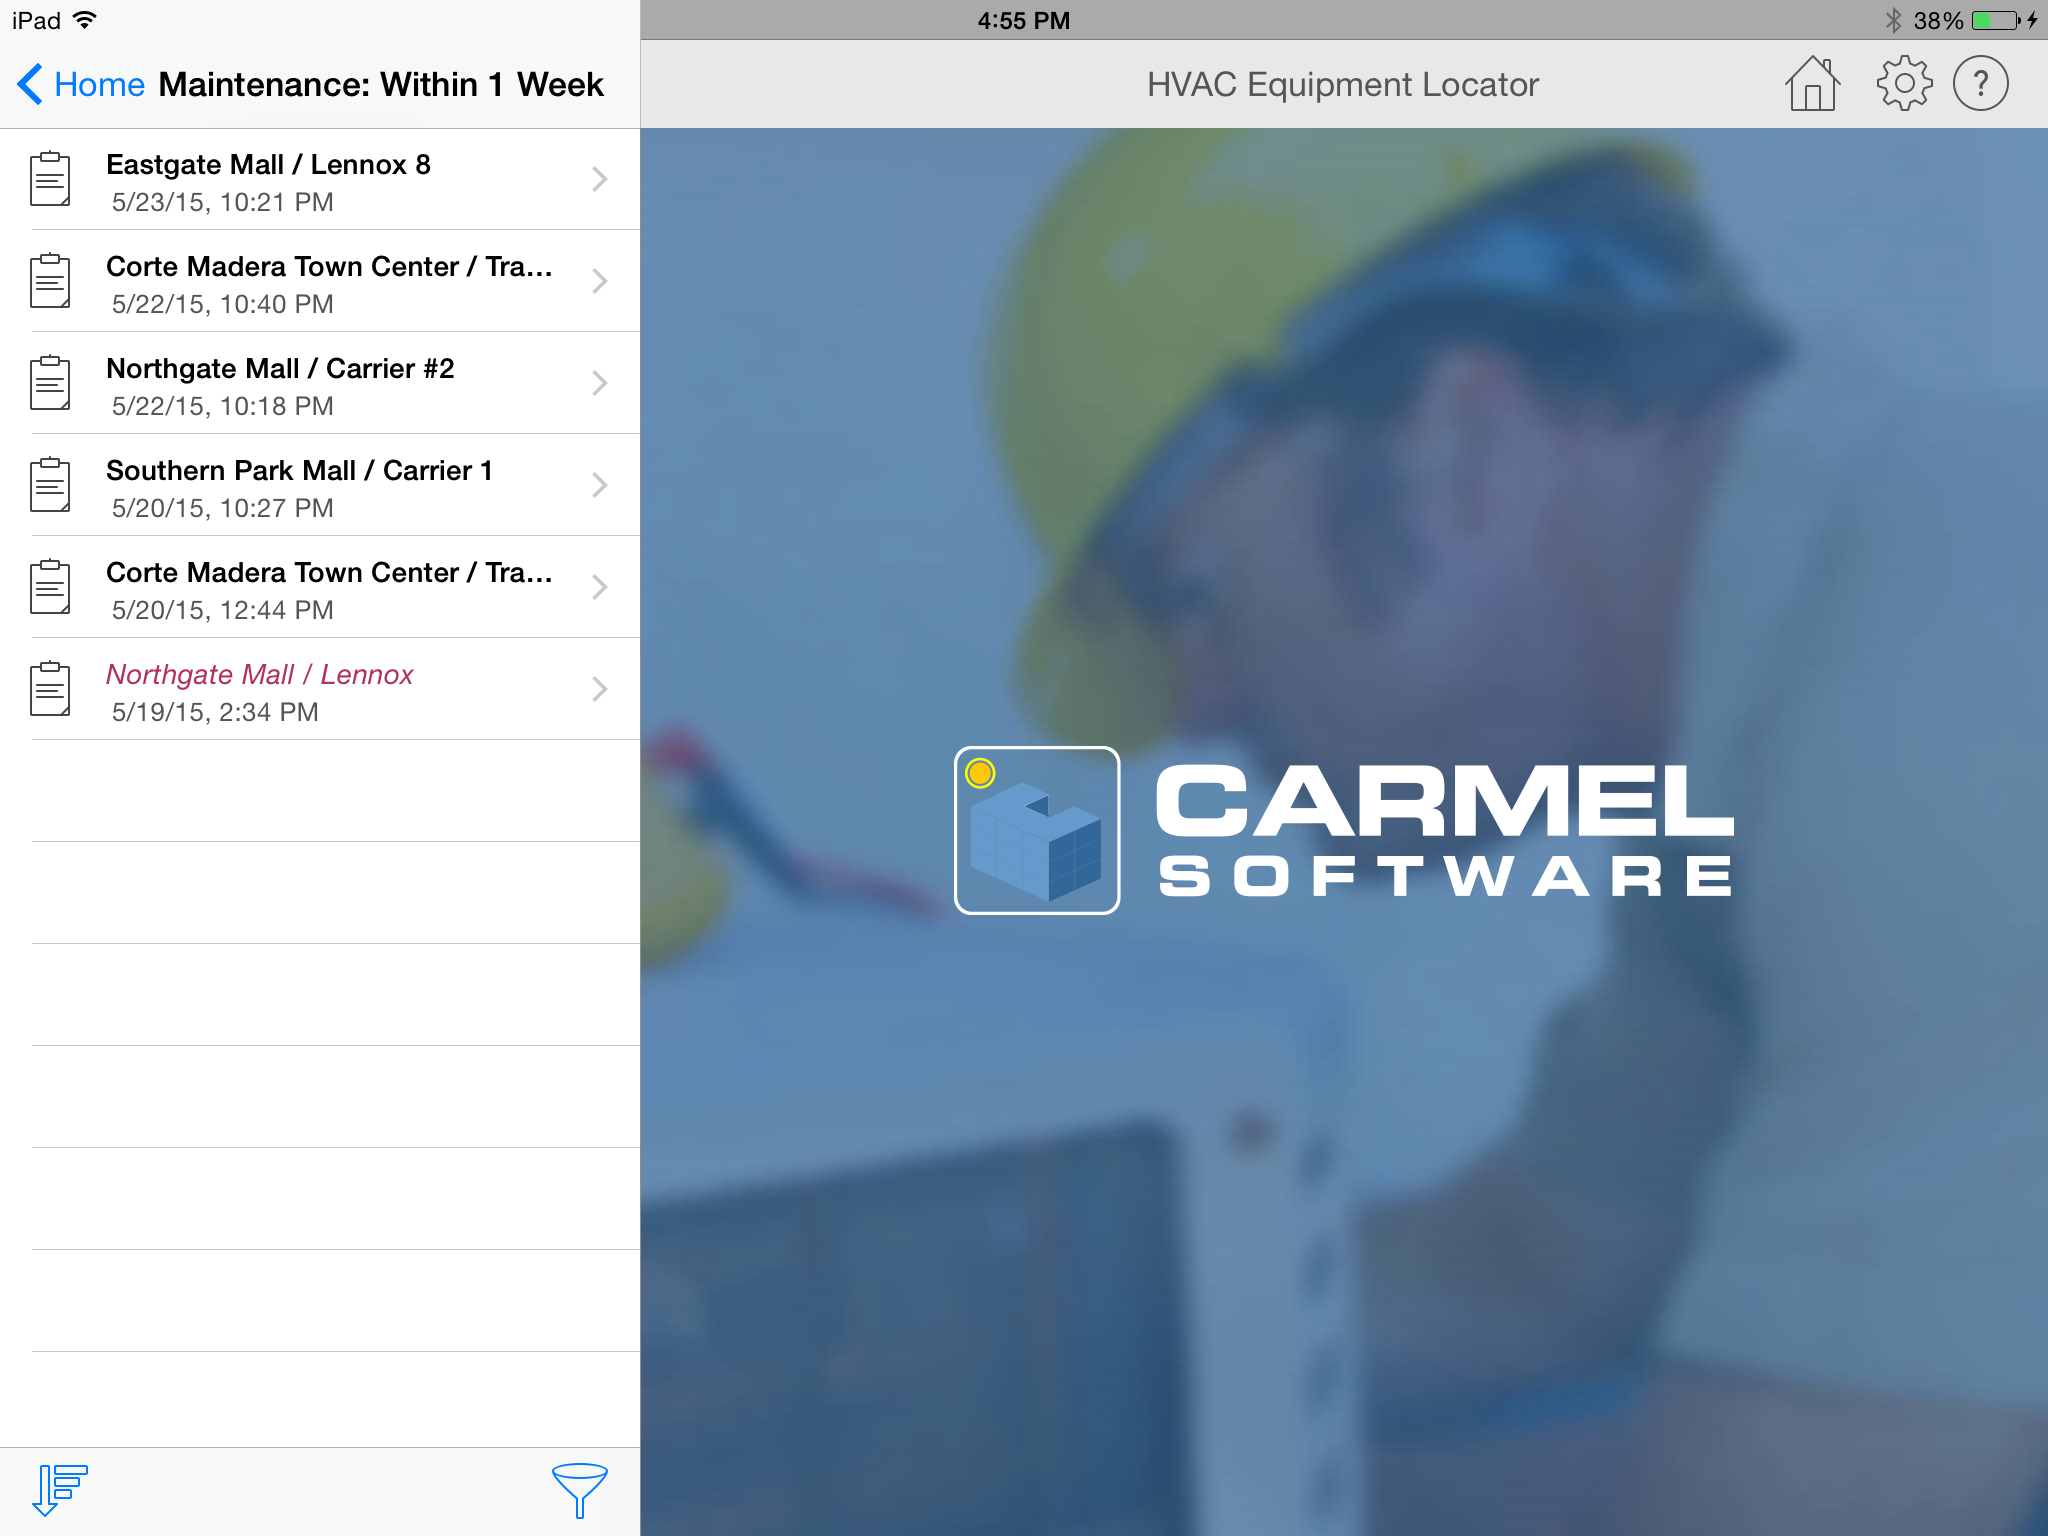
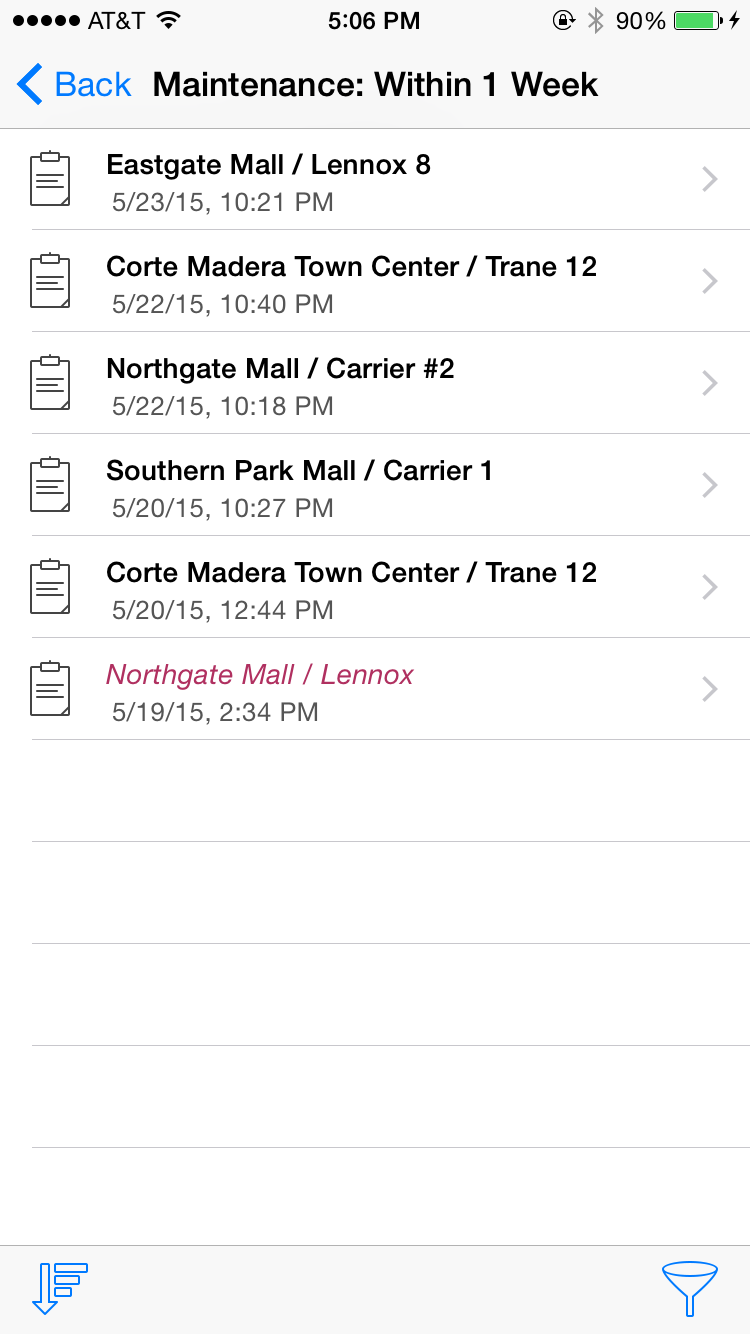
The Upcoming Maintenance list can be sorted by "Date/Time" of the maintenance event and "Closest to Me", based upon the GPS coordinates of the equipment. This list can also be filtered by different time periods including: "Within 1 Week" (default), "Within 1 Month", "Within 1 Year", "Today", and all "Previous" open maintenance events.

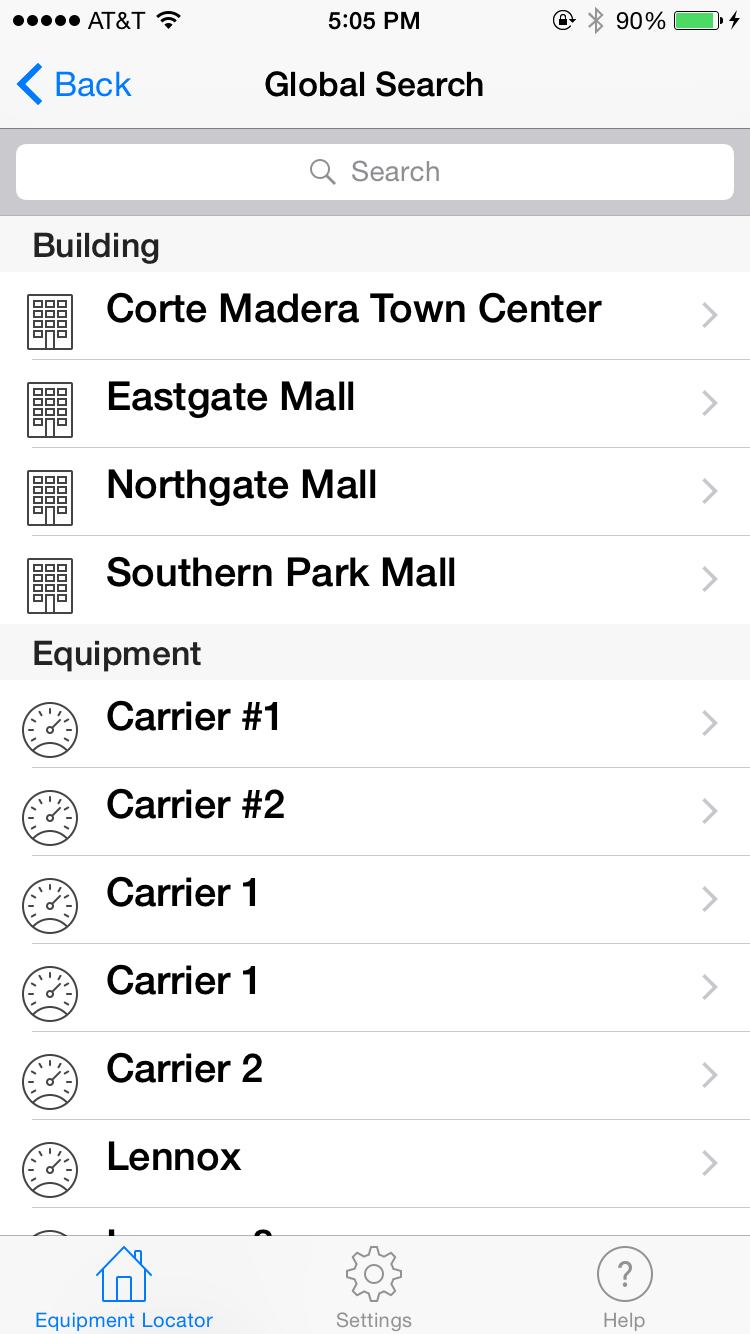
Global Search
On the Building List form, there is an option at the top of the list called "Global Search". This option allows you to do a global text search of all standard data fields for all the buildings, equipment, and maintenance events. When you first select this option, all of the building, equipment, and maintenance event names are displayed. As you type text into the search field, this list will filter by which items contain the text that you are typing. By selecting the building, equipment, or maintenance item, it will direct you to that item.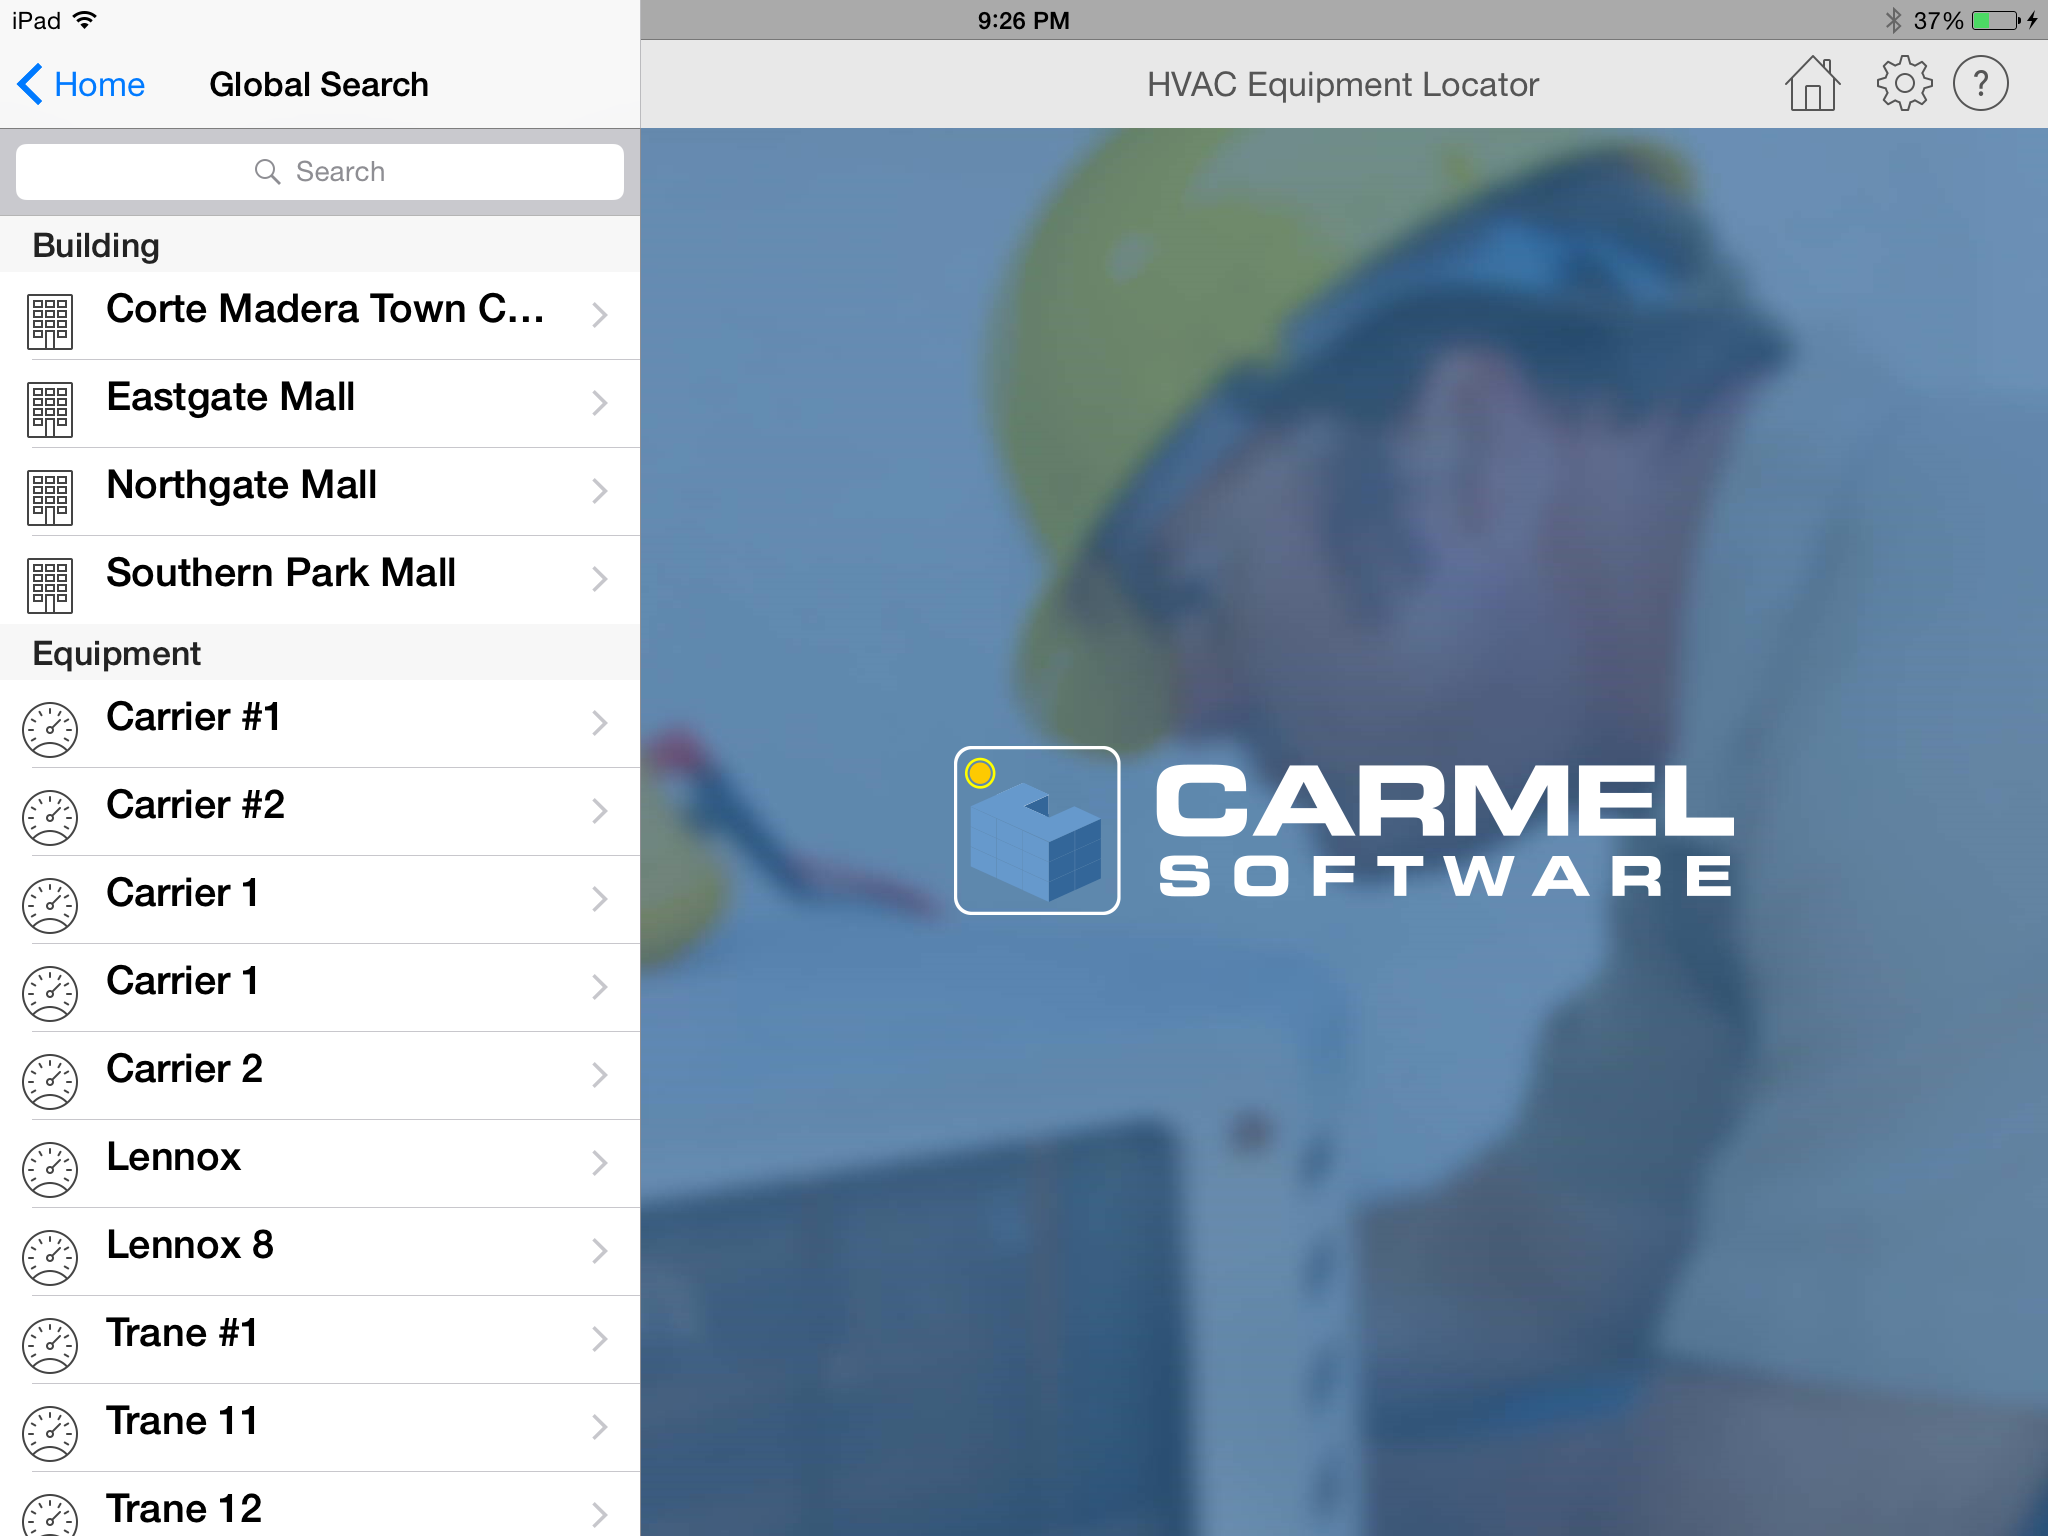
Synchronization
The Equipment Locator app automatically synchronizes all of your information to the Equipment Locator Cloud (assuming you are a registered user). By default, syncing occurs every 30 seconds or so. You can change the sync frequency by going to the Settings form and selecting another sync time interval under the "Sync Options" section (discussed below).When you synchronize for the first time and there is a large amount of data (including photos and documents) to sync from the Cloud to the device, it may take a while for the sync to complete. You should not use the app until the sync is complete so there is no risk of data over-write.
Settings
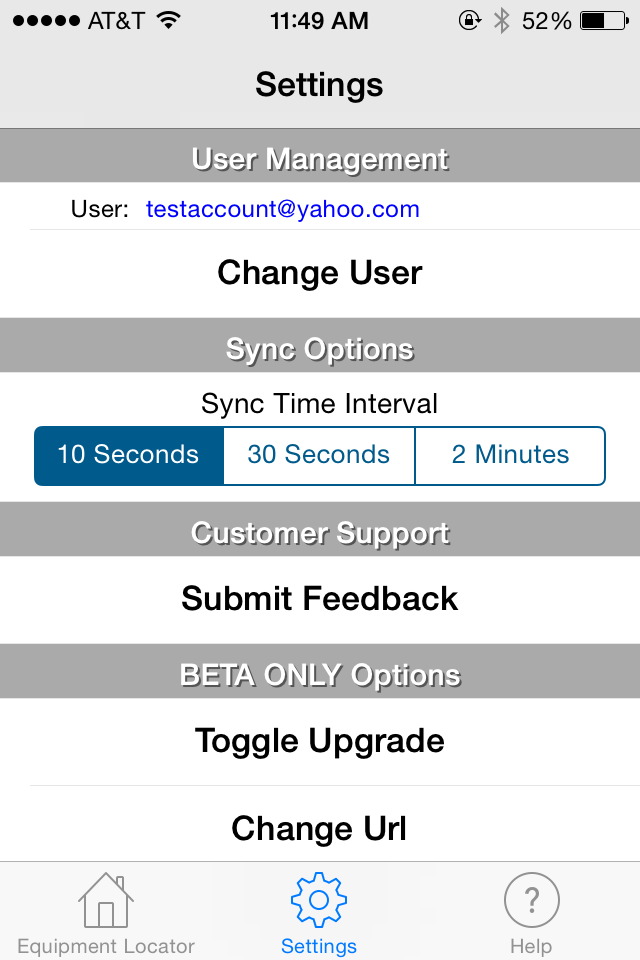
iPhone VersionClick the "Settings" tab to specify settings for the HVAC Equipment Locator App.
Click the "Settings" button in the upper right-hand corner to specify global settings for the HVAC Equipment Locator App.
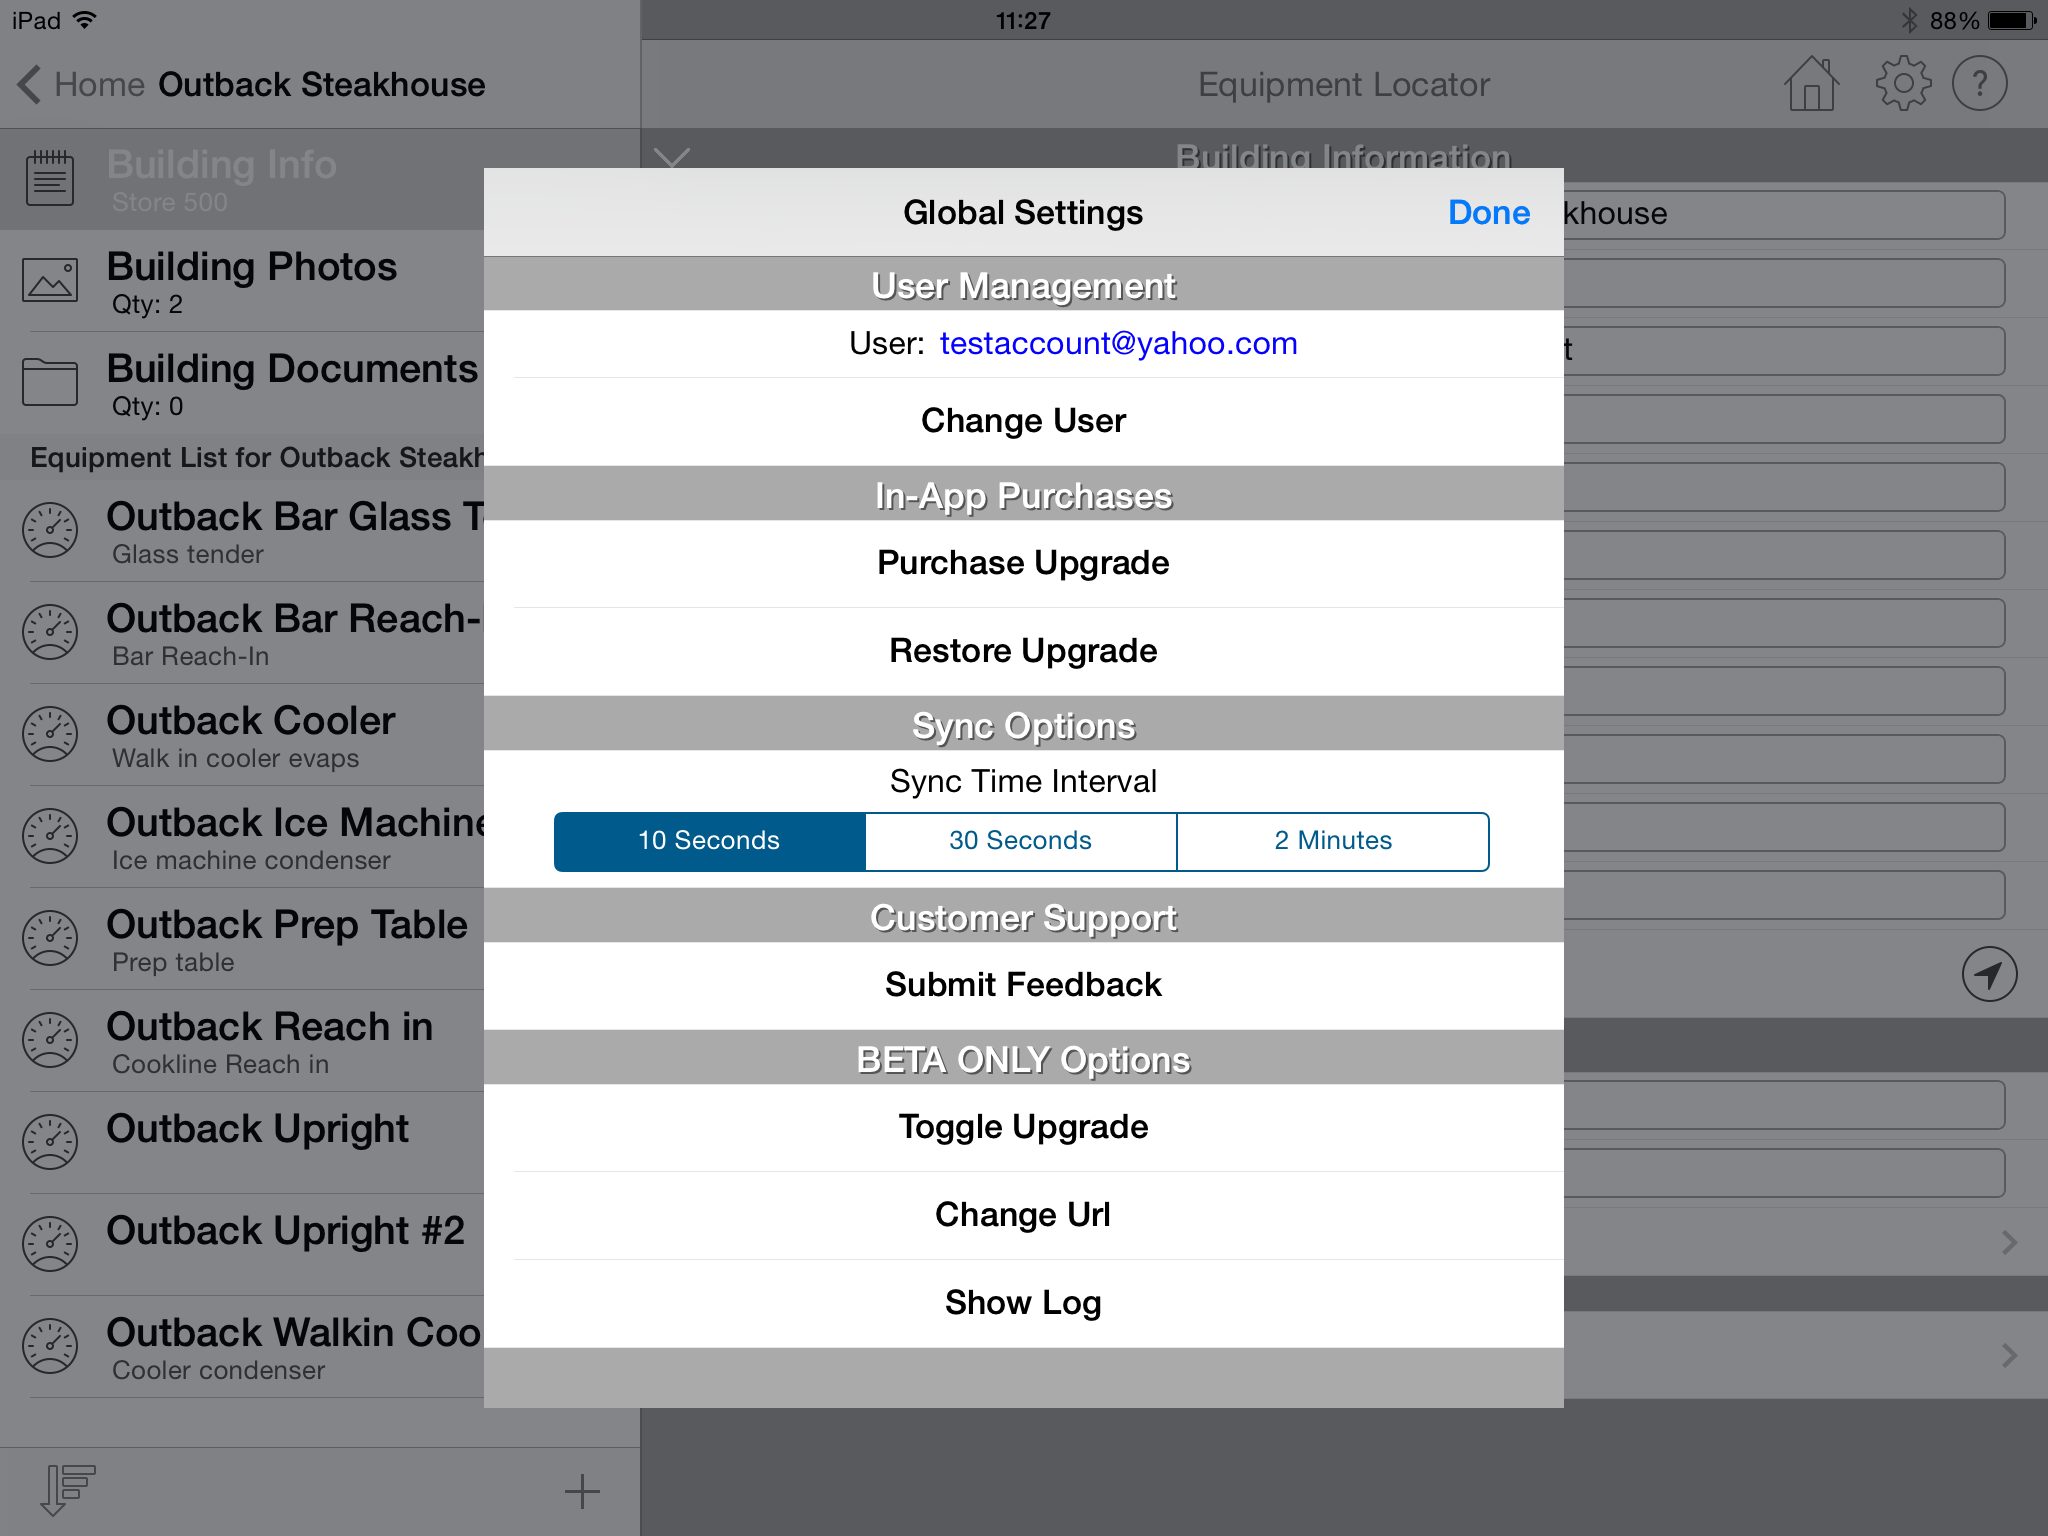
User Management
This section allows you to register or log in if you have not done either yet. Click the button (either labeled "Login" or "Change User" to display the form that allows you to login or register the app using the login/registration screen discussed above. If you have already logged in, the login email is displayed in this section. If you wish to log in as another user, you can do so here.In-App Purchases:
Select the Purchase Upgrade option to purchase the premium Equipment Locator features. These features include:
- Ability to add an unlimited number of customized inputs for buildings, equipment, and maintenance items
- Allows you to add more than 5 photos or 1 document for each building, equipment, or maintenance item.
Sync Options:
This section allows you to select how often the Locator app syncs its data with the Locator Cloud. You can select an interval of 10 seconds, 30 seconds, or 2 minutes. The less often you sync, the less battery power your device will utilize. A small indicator will appear in the upper left-hand corner of your device every time the app syncs.
Customer Support:
Click the "Submit Feedback" cell to open your email client on your device and submit feedback to us. Also, a log file is attached to this email allowing us to help debug any issues you may be encountering.
Security
The HVAC ResLoad-J and the accompanying HVAC ResLoad-J Cloud utilize the following security measures to ensure that your project information is safe and secure, including:- User Authentication: To synchronize information to and from the cloud and also to log into the web portal, you must input proper login and password information.
- Data Sharing: Any project information that is shared with other users can ONLY be shared with users within your company. Users can only belong to your company upon approval by the company administrator.
- Encryption: All information is transmitted from the mobile app to the cloud and vice versa using 1024-bit SSL encryption. This means that the information is transmitted without any risk of hackers intercepting and unencrypting the data.
- Secure server w/Backup: The server(s) that host the HVAC ResLoad-J Cloud are hosted on Microsoft Azure which is Microsoft's scalable and secure cloud infrastructure service that is continually updated. In addition, we route all traffic through Cloudflare that further secures the website by adding firewall functionality, secure DNS-routing, web-page caching, and denial-of-service (DOS) protection.