 HVAC Load Plus Online Help
The HVAC Load Plus app is the first HVAC heating and cooling load calculation app for the Apple iPhone based upon industry standard calculation methods (ACCA Manual J8-Abridged).
The HVAC Load Plus app is the first comprehensive HVAC heating and cooling load calculation
app for the Apple iPhone based upon industry standard calculation methods.
This app allows you to create an unlimited number of projects, perform comprehensive heating and cooling load calculations using the extensive built-in database of weather data, opaque types, window types, and skylight types, then email the results so you can import them into a spreadsheet on your desktop for more complete analysis. The functionality of this app is quite extensive so this help will provide a good reference for any questions you may have on how to use it.
The following describes the project input information that first appear when you select a project name:
Reports: Select this option to display the list of various reporting options including summary and comprehensive reports that you are able to email.
Template (or Default) Project
The HVAC Load Plus app includes a default project (called "_Default"). This project includes default block load information including one of each of opaque, window, skylight, and room types. This default project is used as the basis for all new projects that are created (except for those that are copied from existing projects). You can edit all of the data in this default project by selecting the "_Default Project" and editing as you would any normal project. However, you cannot add new opaques, windows, and skylights within this default project.
Weather Inputs
The weather form is accessed by selecting the icon next to the city input text box in the "Project Inputs" form discussed above. This form allows you to specify the physical location of the building anywhere in the world. The weather database contains over 1000 cities worldwide. Each city includes information such as its elevation, temperatures, and latitude; all values that are used in the HVAC load calculations. When this screen appears, you can select whether to display US/Canadian cities or any city outside of North America. After making this selection, you can scroll through the list of cities to find the one closest to the location of the building that you are analyzing.
Block Load Info
Select the "Block Load Info" selection in the "Project Inputs" form to display a list of 5 block load input types:

You will notice that below each of the above titles are total cooling and heating load values. These values represent totals for each of the categories above. For example, the cooling and heating load calues below the "Block Load Info" title display the total block cooling and heating loads. The values below the "Opaque List" title display the total cooling and heating load contributions due to walls, roofs, floors, doors, and ceilings.
General Info
This form allows you to input basic information about the building for purposes of calculating block load cooling and heating loads. This form contains three (3) "pages" of information. To navigate from one page to the next, horizontally swipe your finger across the screen. The little "dot" indicators at the bottom of the screen tell you which page you are on. The following is an explanation of each page of inputs and results:
PAGE 1
General Inputs
The section at the bottom of the form displays total block cooling and heating loads and airflow results. These values immediately update as you update any of the above inputs.
PAGE 2
Access page 2 by swiping your finger horizontally along the iPhone screen. The following will appear:
Setpoint and Infiltration Inputs
The section at the bottom of the form displays total block cooling and heating loads and airflow results. These values immediately update as you update any of the above inputs.
PAGE 3
This page displays cooling and heating load breakdown values. It includes the following cooling load component items:
The opaque list displays a list of walls, doors, roofs, floors, or ceilings associated with the current building. The following describes how to create, edit, and delete opaques:
Select the opaque item that you want to edit and a new form will appear. It allows you to input information about individual opaque items, and it contains three (3) "pages" of information. To navigate from one page to the next, horizontally swipe your finger across the screen. The little "dot" indicators at the bottom of the screen tell you which page you are on. The following is an explanation of each page of inputs and results:
PAGE 1
Opaque Inputs
The section at the bottom of the form displays total block cooling and heating loads and airflow results. These values immediately update as you update any of the above inputs.
PAGE 2
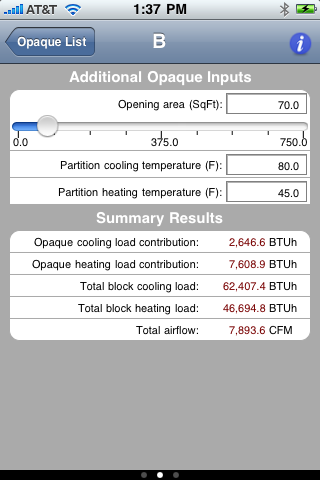
Additonal Opaque Inputs
These are additional inputs associated with the current opaque item. The types of inputs displayed in this form vary depending upon the chosen opaque type.
The section at the bottom of the screen displays cooling and heating load contributions by the current opaque item and also displays total block cooling and heating loads and airflow results. These values immediately update as you update any of the inputs.
PAGE 3
This page displays cooling and heating load breakdown values. It includes the following cooling load component items:
The window/door list displays a list of windows and glass-doors associated with the building. The following describes how to create, edit, and delete windows and doors:
Select the window/door item that you want to edit and a new form will appear. It allows you to input information about individual opaque items, and it contains three (3) "pages" of information. To navigate from one page to the next, horizontally swipe your finger. The little "dot" indicators at the bottom of the page tell you which page you are on. The following is an explanation of each page of inputs and results:
PAGE 1
Window/Door Inputs
The section at the bottom of the screen displays cooling and heating load contributions by the current window/door item and also total block cooling and heating loads and airflow results. These values immediately update as any of the input values change.
PAGE 2
Additional Window/Door Inputs
The section at the bottom of the screen displays cooling and heating load contributions by the current window/door item and also total block cooling and heating loads and airflow results. These values immediately update as any of the input values change.
PAGE 3
This page displays cooling and heating load breakdown values. It includes the following cooling load component items:
The skylight list displays a list of roof-mounted skylights associated with the building. The following describes how to create, edit, and delete skylights:
Select the skylight item that you want to edit and a new form will appear. It allows you to input information about individual skylight items, and it contains three (3) "pages" of information. To navigate from one page to the next, horizontally swipe your finger. The little "dot" indicators at the bottom of the page tell you which page you are on. The following is an explanation of each page of inputs and results:
PAGE 1
Skylight Inputs
The section at the bottom of the screen displays cooling and heating load contributions by the current skylight item and also total block cooling and heating loads and airflow results. These values immediately update as any of the input values change.
PAGE 2
Additional Skylight Inputs
The section at the bottom of the screen displays cooling and heating load contributions by the current skylight item and also total block load cooling and heating loads and airflow results. These values immediately update as any of the input values change.
PAGE 3
This page displays cooling and heating load breakdown values. It includes the following cooling load component items:
Select the "System Info" option to display a form that allows you to input information related to the HVAC system.
PAGE 1
System Inputs
The section at the bottom of the screen displays cooling and heating load contributions by the current system items (ventilation, blower heat gain and duct heat loss/gain) and also total block cooling and heating loads and airflow results. These values immediately update as any of the input values change.
PAGE 2
This page displays cooling and heating load breakdown values. It includes the following cooling load component items:
The settings form is accessed by pressing the small "i" icon located in the upper right-hand portion of the screen on all of the main input forms. This form allows you to input a number of maximum allowable and step values. The following is an explanation of each input:
The reports are accessed by selecting the "Reports" selection on the main project inputs page. The following options appear on the reports page:
This app allows you to create an unlimited number of projects, perform comprehensive heating and cooling load calculations using the extensive built-in database of weather data, opaque types, window types, and skylight types, then email the results so you can import them into a spreadsheet on your desktop for more complete analysis. The functionality of this app is quite extensive so this help will provide a good reference for any questions you may have on how to use it.
Quick Start
The following is a list of hints and suggestions to quickly get started using the HVAC Load Plus application:- The app comes preinstalled with a number of sample projects and a "default template" project. The sample projects include a medium-sized and large house. The "default" project is the base project used to create all new projects. You can edit this project at any time and assign values more appropriate to the jobs that you perform.
- To create a new project, select the "+" button in the upper right-hand corner of the project list screen. You can input a new project name or select an existing project to copy from.
- You will notice that a number of input values are displayed in a "maroon" color. These signify inputs that are calculated based upon other input selections but may be overridden. For example, the heating floor area is automatically set equal to the cooling floor area. However, you can override the heating floor area by manually inputting a value into the text box (or sliding the slider control). To restore the auto-calculation functionality of the input, just enter 0 or erase the value in the input box. If you want to enter a value of 0 for this input, slide the indicator along the slider control all the way to the left to 0. This functionality applies to all inputs that are auto-calculated.
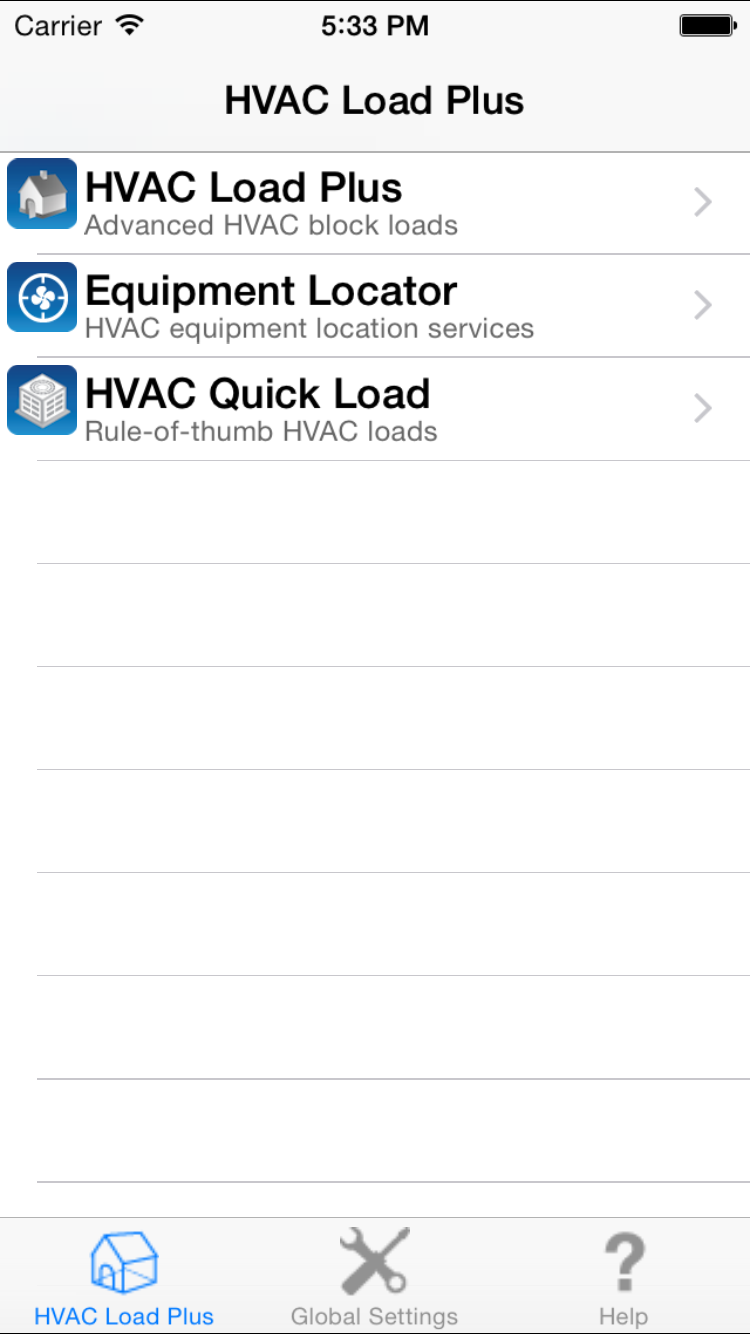
Overview
When you first open the HVAC Load Plus application, you will see 3 tabs at the bottom of your screen:- The "HVAC Load Plus" tab
is the first screen that appears when you start up the application. It includes two options:
- HVAC - Advanced Block Loads: Select this option to begin using the comprehensive HVAC block load functionality. Once you select this option, the list of block load projects will appear.
- HVAC - Rule of Thumb Loads: Select this option to perform rule-of-thumb load calculations. Click here for help on the quick load functionality. Please note that only the advanced block load functionality is discussed in this help screen.
- The "Global Settings" tab allows you to specify global settings such as whether to use IP (Imperial) or SI units. Read the "Global Settings" section below for more details.
- The "Help" tab displays this help screen.
HVAC - Advanced Block Loads
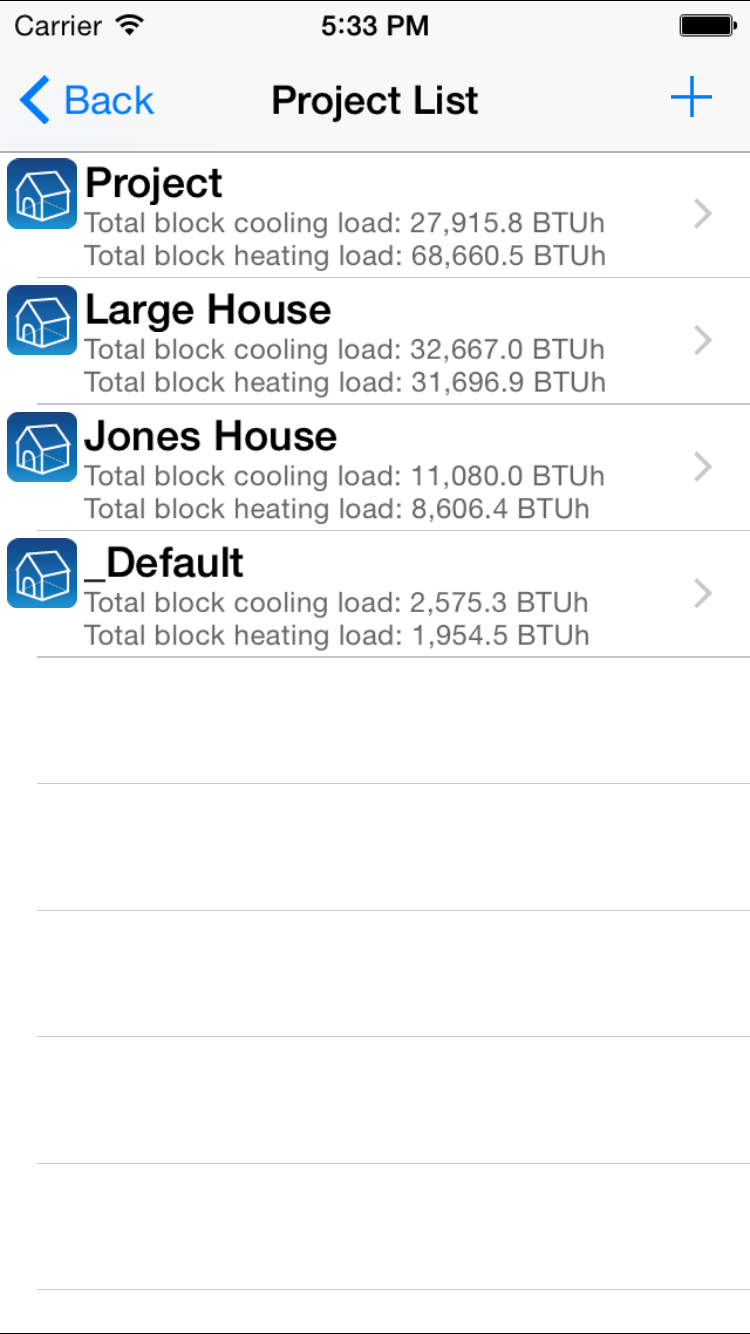
Once you select the "HVAC - Advanced Block Loads" option, the project list form will appear. The following describes how to create, edit, and delete projects:
- Create a New Project: To create a new project, click the "+" button located in the upper right-hand corner of the screen. A new form will appear allowing you to enter a new project name. The "_Default" project is always used as the basis for creating a new project (See "Template Projects" below for more information on the "_Default" project). Also, you can copy from an existing project by pressing the button labelled "Copy from existing project >>". A list of all existing projects will appear allowing you to select from one. When you return to the "Add Project" screen, type in a new project name.
- Edit an Existing Project: To edit an existing project, select the project name with your finger and the next form will slide onto the screen allowing you to input information about the project.
- Delete an Existing Project: Swipe your finger across the name of the project that you wish to delete. A "delete" button will appear allowing you to press it to delete the project.
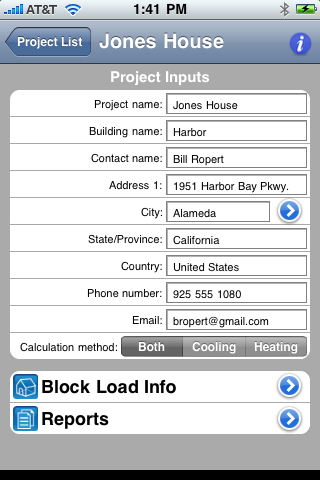
The following describes the project input information that first appear when you select a project name:
- Project name: This is the name that you originally inputted when you created the project. You can change the project name in this text box. To do so, tap your finger within the text box and the standard iPhone keyboard will pop up allowing you to type in a new name. This keyboard will appear anytime you tap your finger within any of the textboxes in this app.
- Building name: Input the building name. This name will appear in the comprehensive HTML report (see below for more details).
- Contact name: Input the client contact name for this project.
- Address 1: Input the street address.
- City: Select the icon on the far right to display the weather form. This form contains a list of 1000+ cities worldwide with corresponding weather data. See below for details about this weather form.
- State/Province: This input will automatically be filled in based upon the city selection above. You can also override this value.
- Country: This input will automatically be filled in based upon the city selection above. You can also override this value.
- Phone number: Input the client phone number.
- Email: Input the client email address.
- Calculation method: Select from one of three options: "Both", "Cooling", or "Heating". If you select "Both", then both cooling and heating loads will be calculated. If you select "Cooling", only cooling loads will be calculated. If you select "Heating", only heating loads will be calculated.
Reports: Select this option to display the list of various reporting options including summary and comprehensive reports that you are able to email.
Template (or Default) Project
The HVAC Load Plus app includes a default project (called "_Default"). This project includes default block load information including one of each of opaque, window, skylight, and room types. This default project is used as the basis for all new projects that are created (except for those that are copied from existing projects). You can edit all of the data in this default project by selecting the "_Default Project" and editing as you would any normal project. However, you cannot add new opaques, windows, and skylights within this default project.
Weather Inputs
The weather form is accessed by selecting the icon next to the city input text box in the "Project Inputs" form discussed above. This form allows you to specify the physical location of the building anywhere in the world. The weather database contains over 1000 cities worldwide. Each city includes information such as its elevation, temperatures, and latitude; all values that are used in the HVAC load calculations. When this screen appears, you can select whether to display US/Canadian cities or any city outside of North America. After making this selection, you can scroll through the list of cities to find the one closest to the location of the building that you are analyzing.
- Latitude: This is the city's latitude value in degrees North or South Latitude. An "S" for southern latitudes or an "N" northern latitudes is located after the latitude value (i.e. 42N for Boston, USA or 52S for Sydney, Australia)
- Elevation (Ft or M): This is the city's elevation above sea level in feet (meters).
- Summer dry-bulb (F or C): This is the ASHRAE 1% summer design dry-bulb temperature for the city. This means that the summer temperature has been equaled or exceeded by 1% of the totals hours during the months of June through September.
- Summer wet-bulb (Coinc.) (F or C): This is the wet-bulb temperature that occurs coincidentally with the 1% summer dry-bulb temperature listed above.
- Winter dry-bulb (F or C): This is the ASHRAE 99% winter design dry-bulb temperature for the city. This means that the winter temperature has been equaled or exceeded by 99% of the total in the months of December, January, and February.
- Daily range: This is the average daily temperature swing during the summer. You can select "L" for low (swing less than 16 deg F), "M" for
medium (swing between 16 and 25 deg. F), or "H" for high (swing greater than 25 deg F.).
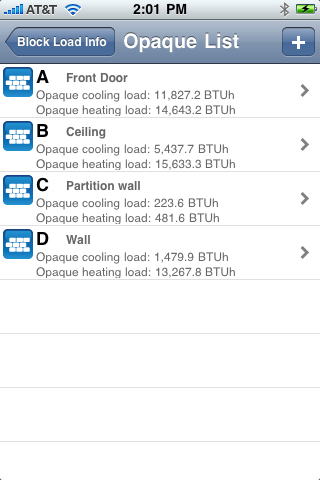
Block Load Info
Select the "Block Load Info" selection in the "Project Inputs" form to display a list of 5 block load input types:
- General Info: This option allows you to input general block load information about the building.
- Opaque List: This option allows you to input one or more opaque building envelope types include walls, roofs, floors, doors, and ceilings.
- Window/Door List: This option allows you to input one or more clear glass window or door types.
- Skylight List: This option allows you to input one or more skylight types.
- System Info: This option allows you to input HVAC system related information such as ventilation and duct heat gain/loss values.
You will notice that below each of the above titles are total cooling and heating load values. These values represent totals for each of the categories above. For example, the cooling and heating load calues below the "Block Load Info" title display the total block cooling and heating loads. The values below the "Opaque List" title display the total cooling and heating load contributions due to walls, roofs, floors, doors, and ceilings.
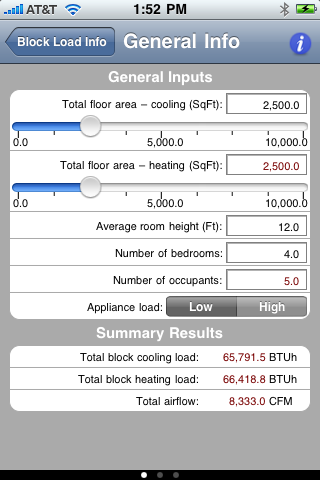
General Info
This form allows you to input basic information about the building for purposes of calculating block load cooling and heating loads. This form contains three (3) "pages" of information. To navigate from one page to the next, horizontally swipe your finger across the screen. The little "dot" indicators at the bottom of the screen tell you which page you are on. The following is an explanation of each page of inputs and results:
PAGE 1
General Inputs
- Total floor area - cooling (SqFt or SqM): Input the total building floor area that is cooled. You can manually input a value into the textbox by placing your finger within it, and the standard iPhone keyboard will pop up. Also, you can slide the indicator along the slider control located just below the textbox. As you slide the indicator, the value will update immediately (This behavior applies to all textboxes with accompanying slider controls). Also, the "Total floor area - heating" input will automatically update as you update the cooling value, since in a majority of cases, the cooling and heating floor areas are the same.
- Total floor area - heating (SqFt or SqM): Input the total building floor area that is heated. As explained above, this value is automatically updated according to the cooling floor area input discussed above. You can manually override this value by inputting a value or sliding the slider control. You will notice that the color of the text turns from maroon to black to indicate that the value is overridden. If you wish to have the value "calculated" once again, just input a value of 0 or nothing, and the calculated value will return.
- Average room height (Ft or M): Input the average room height of all rooms in the building. This is used to determine total volume for purposes of calculating infiltration and ventilation results.
- Number of bedrooms: Input the approximate number of bedrooms in the house or building. This value is used to to determine the number of people that occupy the building. You will notice that the next input shows the number of people, and it is calculated according to the number of bedrooms plus 1.
- Number of occupants: Input the number of occupants (or people) in the house or building. As explained above, this value is automatically updated according to the number of bedrooms. You can manually override this value by inputting a value. You will notice that the color of the text turns from maroon to black to indicate that the value is overridden. If you wish to have the value "calculated" once again, just input a value of 0 or nothing, and the calculated value will return.
- Appliance load: Select a high (2400 BTUh) or low (1200 BTUh) appliance load for the entire building. This load includes heat given off by dish washers, dryers, and other household appliances.
The section at the bottom of the form displays total block cooling and heating loads and airflow results. These values immediately update as you update any of the above inputs.
PAGE 2
Access page 2 by swiping your finger horizontally along the iPhone screen. The following will appear:
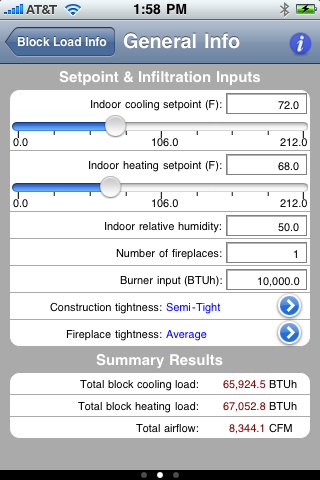
Setpoint and Infiltration Inputs
- Indoor cooling setpoint (F or C): Input the house or building cooling (summer) setpoint. You can manually input a value into the textbox by placing your finger within it, and the standard iPhone keyboard will pop up. Also, you can slide the indicator along the slider control located just below the textbox. As you slide the indicator, the value will update immediately.
- Indoor heating setpoint (F or C): Input the house or building heating (winter) setpoint. You can either input a value or slide the indicator along the slider control located just below the textbox.
- Indoor relative humidity: Input the indoor relative humidity value. This value is important for calculating latent infiltration and ventilation load contributions. In most cases, this value is between 45 and 55%.
- Number of fireplaces: Input the # of fireplaces in the home. This information is used to calculate infiltration airflow values.
- Burner input (BTUh or W): Input the total furnace burner input in BTUh or W. This value is used to calculate infiltration airflow values.
- Construction tightness: Select the icon on the right-hand side of this cell to display a picker control that includes the following
options for the quality of construction of the building:
- Tight
- Semi-Tight
- Average
- Semi-Loose
- Loose
- Fireplace tightness: Select the icon on the right-hand side of this cell to display a picker control that includes the following
options for the quality of construction of the fireplace:
- Tight
- Semi-Tight
- Average
- Semi-Loose
- Loose
The section at the bottom of the form displays total block cooling and heating loads and airflow results. These values immediately update as you update any of the above inputs.
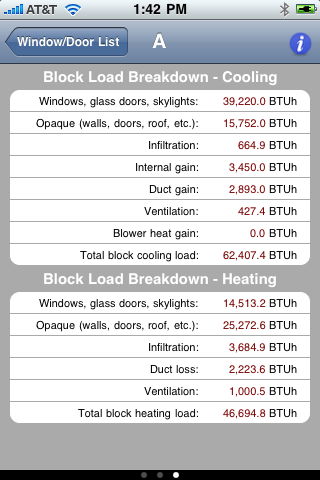
PAGE 3
This page displays cooling and heating load breakdown values. It includes the following cooling load component items:
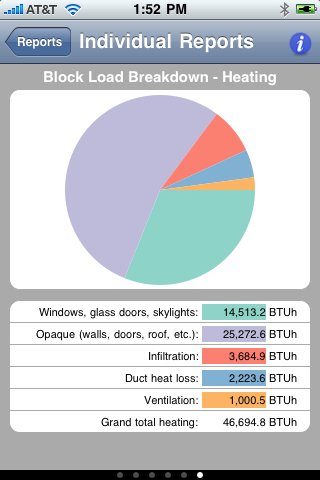
- Window, glass doors, and skylights
- Opaque (wall, roof, floor, etc.)
- Infiltration
- Internal gain
- Duct gain
- Ventilation
- Blower heat gain
- Totals
- Window, glass doors, and skylights
- Opaque (wall, roof, floor, etc.)
- Infiltration
- Duct loss
- Ventilation
- Totals
The opaque list displays a list of walls, doors, roofs, floors, or ceilings associated with the current building. The following describes how to create, edit, and delete opaques:
- Create a New Opaque Item: To create a new opaque item, click the "+" button located in the upper right-hand corner of the screen. A new form will appear that displays the next available alphabetic letter to be assigned to the opaque. Each opaque has a unique alphabetic letter assigned to it. Click the "Save" button to add the new opaque. The new opaque is based upon the opaque item located in the "_Default" project. If you wish to copy from an existing opaque already located in the current project, select the "Copy from existing opaque" to display a list of all existing opaques then select the opaque you wish to copy.
- Edit an Existing Opaque: To edit an existing opaque, select the opaque name with your finger and the next form will slide onto the screen allowing you to input information about it.
- Delete an Existing Opaque: Swipe your finger across the name of the opaque that you wish to delete. A "delete" button will appear allowing you to press it to delete the opaque.
Select the opaque item that you want to edit and a new form will appear. It allows you to input information about individual opaque items, and it contains three (3) "pages" of information. To navigate from one page to the next, horizontally swipe your finger across the screen. The little "dot" indicators at the bottom of the screen tell you which page you are on. The following is an explanation of each page of inputs and results:
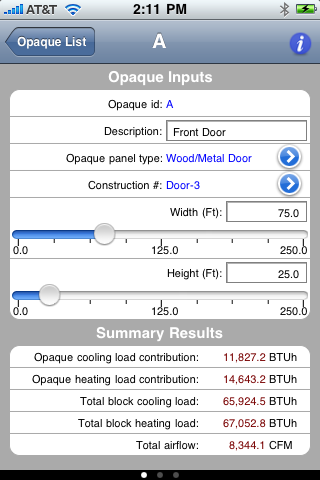
PAGE 1
Opaque Inputs
- Opaque id: This is a read-only input that displays the alphabetic id that was initially assigned to the opaque item.
- Description: You can input a short description that describes what the current opaque item is (East Wall, etc.). This description is displayed on the opaque list page described above, and it is also displayed in the HTML report described below.
- Opaque panel type: Select the icon located on the far right hand side of this cell, and a picker control will appear that allows you to describe the
type of opaque item. The following is the list of options:
- Wood/Metal Door: Select this option if the opaque item is an opaque-colored door (not a 50%+ glass door)
- Above Grade Wall: Select this option if the opaque item is an above-grade wall.
- Basement Wall (Below Grade): Select this option if the opaque item is a basement wall where a majority of the square area is below grade.
- Partition Wall: Select this option if the opaque item is an internal partition wall that is adjacent to an unconditioned space.
- Ceiling: Select this option if the opaque item is a ceiling that is part of an external roof system.
- Partition Ceiling: Select this option if the opaque item is a partition ceiling adjacent to an unconditioned space.
- Floor: Select this option if the opaque item is an on-grade or above-grade floor.
- Construction #: Select the icon on the far right-hand side of this cell to display a picker control that allows you to select
a construction number list applicable to the specific opaque type. The list of construction items will vary depending upon the selected opaque type. As you select each different
opaque type, it will default to "None". The following is a list of descriptions of each of the construction number lists:
- Wood/Metal Door List: This list of construction numbers ranges from "Door-1" to "Door-13" and includes a number of opaque door construction types. The u-value and a longer description of the construction item appear below the picker control.
- Above Grade Wall List: This list of construction numbers range from "Wall-1" to "Wall-88" and includes a number of opaque wall construction types. One or two u-values, the exterior code ('b' for brick and 's' for stucco), and a longer description of the construction item appear below the picker control.
- Basement Wall (Below Grade) List: This list of construction numbers ranges from "Base-1" to "Base-10" and includes a number of below-grade wall construction types. A list of depth-dependent u-values and a longer description of the construction item appear below the picker control.
- Partition Wall List: This list of construction numbers ranges from "Wall-1" to "Wall-88" and includes a number of partiton wall construction types. One or two u-values, the exterior code ('b' for brick and 's' for stucco), and a longer description of the construction item appear below the picker control.
- Ceiling List: This list of construction numbers ranges from "Ceil-1" to "Ceil-48" and include a number of ceiling construction types. One u-value and a longer description of the construction item appear below the picker control.
- Partition Ceiling List: This list of construction numbers ranges from "Ceil-1" to "Ceil-48" and includes a number of ceiling construction types. One u-value and a longer description of the construction item appear below the picker control. This option differs from the one above in that you are able to specify a cooling and heating partition temperature values in the next screen.
- Floor List: This list of construction numbers ranges from "Floor-1" to "Floor-35" and includes a number of floor construction types. A longer description of the construction item appears below the picker control.
- Width and Height (Ft): These two options will appear with corresponding slider controls if the "Wood/Metal Door", "Above Grade Wall", "Basement Wall", "Partition Wall", and "Floor" options are chosen. These inputs should be self explanatory.
- Length and Height (Ft): These two options will appear with corresponding slider controls if the "Ceiling" and "Partition Ceiling" options are chosen. These inputs should be self explanatory.
The section at the bottom of the form displays total block cooling and heating loads and airflow results. These values immediately update as you update any of the above inputs.
PAGE 2
Additonal Opaque Inputs
These are additional inputs associated with the current opaque item. The types of inputs displayed in this form vary depending upon the chosen opaque type.
- Opening area (SqFt or SqM): This input and its accompanying slider control allow you to specify the area of any opening(s) in the opaque type. For example, if you select an above-grade wall, you can specify the total area of the window and door openings.
- Shaded (Yes or No): This selector appears only if you select the "Above Grade Wall" option. It allows you to specify whether the wall is shaded (i.e. - a northern-facing wall or one that is shaded by trees or other buildings).
- Below grade floor depth (Ft or M): This option appears only if you select the "Basement Wall" option. It allows you to input the number of feet or meters the basement wall is below-grade.
- Partition cooling and heating temperatures (F or C): This combination of inputs appears if you select the "Partition Wall" or "Partition Ceiling" opaque types. These two inputs represent the temperatures of the space adjacent to the current opaque item during cooling or heating seasons, respectively. For example, if the current partition wall is adjacent to a garage, the summer partition temperature may be around 95 deg F and the winter partition temperature may be around 45 deg F.
- Slope: This input appears if you select the "Ceiling" or "Partition Ceiling" opaque types. If allows you to input the slope of the ceiling in degrees from 0 (horizontal) to 90 (vertical).
- Length of exposed edge (Ft or M): This input appears if you select the "Floor" opaque type. It allows you to input the total length of exposed edge of floor to the surrounding grade. Please note that this input only applies to floor types "Floor-28" and beyond (concrete slab-on-grade floor). For all other floor types, this input is ignored, and the floor area is used to calculate cooling and heating loads.
The section at the bottom of the screen displays cooling and heating load contributions by the current opaque item and also displays total block cooling and heating loads and airflow results. These values immediately update as you update any of the inputs.
PAGE 3
This page displays cooling and heating load breakdown values. It includes the following cooling load component items:
- Window, glass doors, and skylights
- Opaque (wall, roof, floor, etc.)
- Infiltration
- Internal gain
- Duct gain
- Ventilation
- Blower heat gain
- Totals
- Window, glass doors, and skylights
- Opaque (wall, roof, floor, etc.)
- Infiltration
- Duct loss
- Ventilation
- Totals
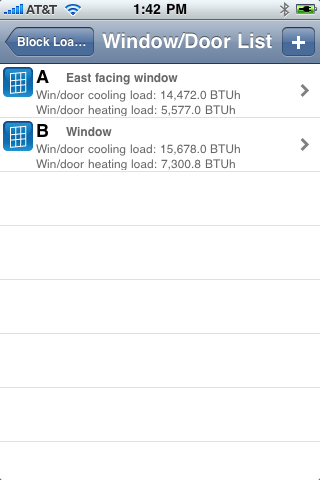
The window/door list displays a list of windows and glass-doors associated with the building. The following describes how to create, edit, and delete windows and doors:
- Create a New Window/Door Item: To create a new window/door item, click the "+" button located in the upper right-hand corner of the screen. A new form will appear that displays the next available alphabetic letter to be assigned to the window/door. Each window/door has a unique alphabetic letter assigned to it. Click the "Save" button to add the new window/door. The new window/door is based upon the window/door item located in the "_Default" project. If you wish to copy an existing window/door already located in the current project, select the "Copy from existing window/door" to display a list of all existing windows and doors then select the window/door that you wish to copy.
- Edit an Existing Window/Door: To edit an existing window/door, select the window/door name with your finger and the next form will slide onto the screen allowing you to input information about it.
- Delete an Existing Window/Door: Swipe your finger across the name of the window/door iten that you wish to delete. A "delete" button will appear allowing you to press it to delete the window/door.
Select the window/door item that you want to edit and a new form will appear. It allows you to input information about individual opaque items, and it contains three (3) "pages" of information. To navigate from one page to the next, horizontally swipe your finger. The little "dot" indicators at the bottom of the page tell you which page you are on. The following is an explanation of each page of inputs and results:
PAGE 1
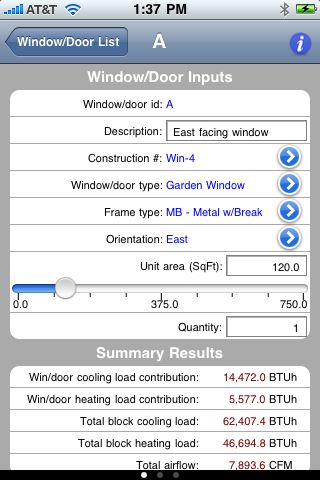
Window/Door Inputs
- Window/door id: This is a read-only input that displays the alphabetic id that was initially assigned to the window/door item.
- Description: Input a short description of the current window/door item (i.e. - East Window, Backdoor, etc.). This description is displayed on the window/door list page described above, and it is also displayed in the HTML report described below.
- Construction #: Select the icon on the far right-hand side of this cell to display a picker control that allows you to select a window or glass door type. The construction numbers range from "Win-1" to "Win-11". As you select each one, the full description displays below the picker list. After selecting the desired window or door type, press the button in the upper left-hand corner to return to the previous screen. The selected construction # will appear in the cell.
- Window/door type: Select the icon on the far right-hand side of this cell to display a picker control that allows you to select
the window/door type. The following are the list of options:
- Default
- Bay Window
- Garden Window
- French Door
- Frame type: Select the icon on the far right-hand side of this cell to display a picker control that allows you to select
the frame type. The following are the list of options:
- M - Metal No Break
- MB - Metal With Break
- W - Wood
- V - Vinyl
- Orientation: Select the icon on the far right-hand side of this cell to display a picker control that allows you to select
the orientation of the window/door type. The following are the list of options:
- North
- South
- East
- West
- NE
- NW
- SE
- SW
- Unit area (SqFt or SqM): Input or slide the indicator along the slider control to specify the total area of the window or door. As you input or update the value, the results at the bottom of the screen will immediately update.
- Quantity: Input the number of windows or doors of this type.
The section at the bottom of the screen displays cooling and heating load contributions by the current window/door item and also total block cooling and heating loads and airflow results. These values immediately update as any of the input values change.
PAGE 2
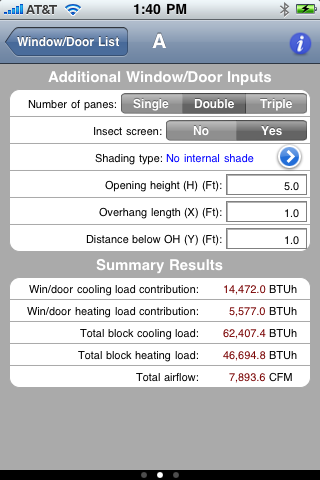
Additional Window/Door Inputs
- Number of panes: Specify the number of window panes using thes selector: "Single", "Double", or "Triple".
- Insect screen: Specify "Yes" if an insect screen is located adjacent to the window. This affects internal shading factors.
- Shading type: Select the icon on the far right-hand side to display a picker that allows you to select from three
different internal shading options:
- No internal shade
- Blinds w/slats at 45 deg.
- Drapes or rollers half drawn
- Opening height (H) (Ft or M): Input the height of the window or glass door opening in feet or meters.
- Overhang length (X) (Ft or M): Input the length of the overhang (if any) that is shading the window or glass door.
- Distance below OH (Y) (Ft or M): Input the distance below the overhang that the top of the window or glass door is located.
The section at the bottom of the screen displays cooling and heating load contributions by the current window/door item and also total block cooling and heating loads and airflow results. These values immediately update as any of the input values change.
PAGE 3
This page displays cooling and heating load breakdown values. It includes the following cooling load component items:
- Window, glass doors, and skylights
- Opaque (wall, roof, floor, etc.)
- Infiltration
- Internal gain
- Duct gain
- Ventilation
- Blower heat gain
- Totals
- Window, glass doors, and skylights
- Opaque (wall, roof, floor, etc.)
- Infiltration
- Duct loss
- Ventilation
- Totals
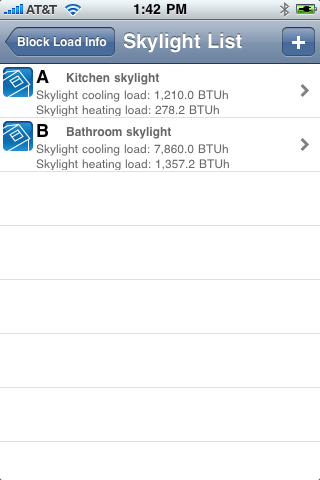
The skylight list displays a list of roof-mounted skylights associated with the building. The following describes how to create, edit, and delete skylights:
- Create a New Skylight Item: To create a new skylight item, click the "+" button located in the upper right-hand corner of the screen. A new form will appear that displays the next available alphabetic letter to be assigned to the skylight. Each skylight has a unique alphabetic letter assigned to it. Click the "Save" button to add the new skylight. The new skylight is based upon the skylight item located in the "_Default" project. If you wish to copy an existing skylight already located in the current project, select the "Copy from existing skylight" to display a list of all existing skylights then select the skylights that you wish to copy.
- Edit an Existing Skylight: To edit an existing skylight, select the skylight name with your finger and the next form will slide onto the screen allowing you to input information about it.
- Delete an Existing Skylight: Swipe your finger across the name of the skylight iten that you wish to delete. A "delete" button will appear allowing you to press it to delete the skylight.
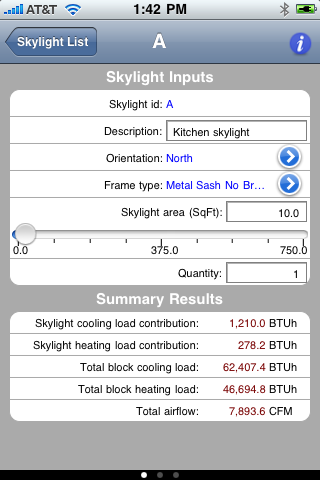
Select the skylight item that you want to edit and a new form will appear. It allows you to input information about individual skylight items, and it contains three (3) "pages" of information. To navigate from one page to the next, horizontally swipe your finger. The little "dot" indicators at the bottom of the page tell you which page you are on. The following is an explanation of each page of inputs and results:
PAGE 1
Skylight Inputs
- Skylight id: This is a read-only input that displays the alphabetic id that was initially assigned to the skylight item.
- Description:Input a short description of the current skylight item (i.e. - East Facing Skylight, etc.). This description is displayed on the skylight list page described above, and it is also displayed in the HTML report described below.
- Orientation: Select the icon on the far right-hand side of this cell to display a picker control that allows you to select
the orientation of the skylight type. The following are the list of options:
- North
- South
- East
- West
- NE
- NW
- SE
- SW
- Frame type: Select the icon on the far right-hand side of this cell to display a picker control that allows you to select
the frame type. The following are the list of options:
- Metal Sash No Break
- Metal, Alum Clad Wood
- Skylight area (SqFt or SqM): Input or slide the indicator along the slider control to specify the total area of the skylight. As you input or update the value, the results at the bottom of the screen will immediately update.
- Quantity: Input the number of skylights of this type.
The section at the bottom of the screen displays cooling and heating load contributions by the current skylight item and also total block cooling and heating loads and airflow results. These values immediately update as any of the input values change.
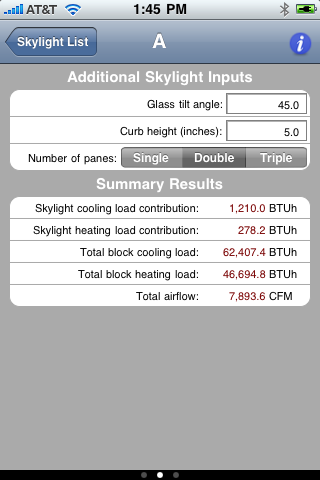
PAGE 2
Additional Skylight Inputs
- Glass tilt angle: Input the horizontal tilt of the skylight from 0 to 90 degrees.
- Curb height (inches or cm): Input the height of the curb around the skylight in inches or centimeters.
- Number of panes: Specify the number of window panes using the selector: "Single", "Double", or "Triple".
The section at the bottom of the screen displays cooling and heating load contributions by the current skylight item and also total block load cooling and heating loads and airflow results. These values immediately update as any of the input values change.
PAGE 3
This page displays cooling and heating load breakdown values. It includes the following cooling load component items:
- Window, glass doors, and skylights
- Opaque (wall, roof, floor, etc.)
- Infiltration
- Internal gain
- Duct gain
- Ventilation
- Blower heat gain
- Totals
- Window, glass doors, and skylights
- Opaque (wall, roof, floor, etc.)
- Infiltration
- Duct loss
- Ventilation
- Totals
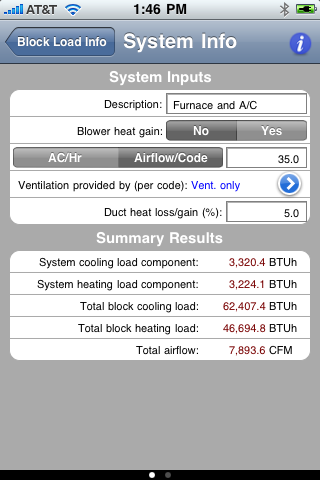
Select the "System Info" option to display a form that allows you to input information related to the HVAC system.
PAGE 1
System Inputs
- Description: Input a short description of the HVAC system.
- Blower heat gain: Select "Yes" or "No" to specify any heat contribution to the cooling load due to blower heat. This adds about 1700 BTUh to the total system load.
- AC/HR and Airflow/Code This combination selector and input box allows you to specify the quantity of outside air. If you select "AC/HR", input the number of air changes/hour of outside air. If you select "Airflow/Code", input a total airflow value (CFM or L/s) for outside air. This value may or may not be used to calculate the total ventilation cooling and heating loads, depending upon the option selected next.
- Ventilation provided by (per code): This option allows you to select from 3 combinations of ventilation types:
- None: No ventilation is calculated
- Ventilation only: Only the ventilation quantity inputted above is used to calculate the total heating and cooling load contribution due to ventilation.
- Ventilation and Infiltration: A combination of the infiltration airflow and the ventilation airflow inputted above are used to determine the total ventilation airflow used to calculate heating and cooling loads due to ventilation.
- Duct heat loss/gain (%): Input a percentage value from 0 to 100% to represents the approximate heat loss and gain due to airflow friction along the duct work. Usually, this value is between 5 and 10% of total cooling or heating loads.
The section at the bottom of the screen displays cooling and heating load contributions by the current system items (ventilation, blower heat gain and duct heat loss/gain) and also total block cooling and heating loads and airflow results. These values immediately update as any of the input values change.
PAGE 2
This page displays cooling and heating load breakdown values. It includes the following cooling load component items:
- Window, glass doors, and skylights
- Opaque (wall, roof, floor, etc.)
- Infiltration
- Internal gain
- Duct gain
- Ventilation
- Blower heat gain
- Totals
- Window, glass doors, and skylights
- Opaque (wall, roof, floor, etc.)
- Infiltration
- Duct loss
- Ventilation
- Totals
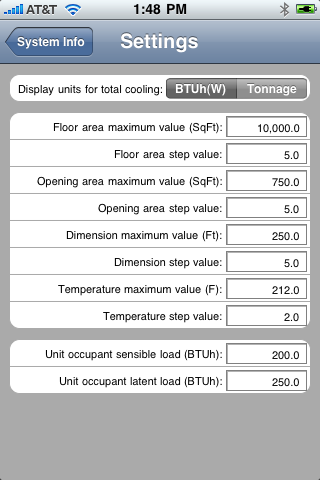
The settings form is accessed by pressing the small "i" icon located in the upper right-hand portion of the screen on all of the main input forms. This form allows you to input a number of maximum allowable and step values. The following is an explanation of each input:
- Display units for total cooling: Select either "BTUh(W)" or "Tonnage". This selection determines the units displayed for all of the total cooling load values.
- Floor area maximum value (SqFt or SqM): Input the maximum allowable floor area value that is displayed on the slider control that accompanies the floor area inputs.
- Floor area step value: Input the "step" value for the floor area input. This value is the amount that the floor area increases or decreases as you move the slider indicator along the slider control. If you specify 0, then incr/decr is continuous.
- Opening area maximum value (SqFt or SqM): Input the maximum allowable opening area value that is displayed on the slider control that accompanies the opening area inputs.
- Opening area step value: Input the "step" value for the opening area input. This value is the amount that the opening area increases or decreases as you move the slider indicator along the slider control. If you specify 0, then incr/decr is continuous.
- Dimension maximum value (Ft or M): Input the maximum allowable width/height/length values that are displayed on the slider controls that accompany these various inputs.
- Dimension step value: Input the "step" value for the dimension inputs. This value is the amount that the dimension value increases or decreases as you move the slider indicator along the slider control. If you specify 0, then incr/decr is continuous.
- Temperature maximum value (F or C): Input the maximum allowable temperature values that are displayed on the slider controls that accompany the temperature inputs.
- Temperature step value: Input the "step" value for the temperature inputs. This value is the amount that the temperature value increases or decreases as you move the slider indicator along the slider control. If you specify 0, then incr/decr is continuous.
- Unit occupant sensible load (BTUh or W): Input the amount of sensible load that one person contributes to the cooling load. This value is multiplied by the number of people to determine the internal cooling load contribution.
- Unit occupant latent load (BTUh or W): Input the amount of latent load that one person contributes to the cooling load. This value is multiplied by the number of people to determine the internal cooling load contribution.
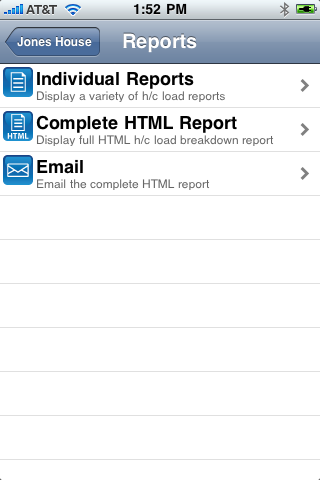
The reports are accessed by selecting the "Reports" selection on the main project inputs page. The following options appear on the reports page:
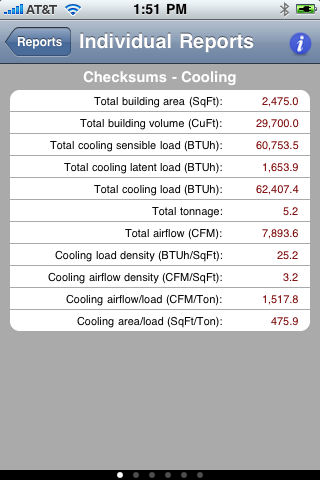
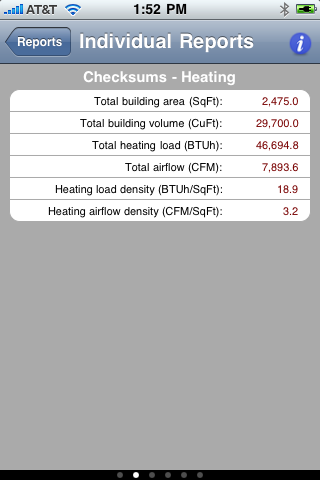
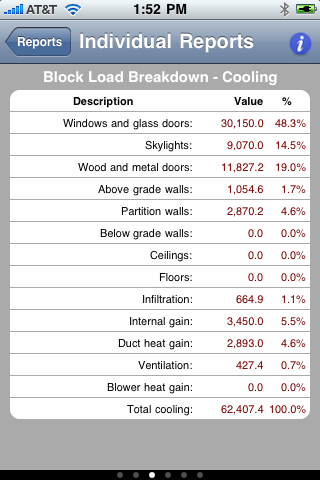
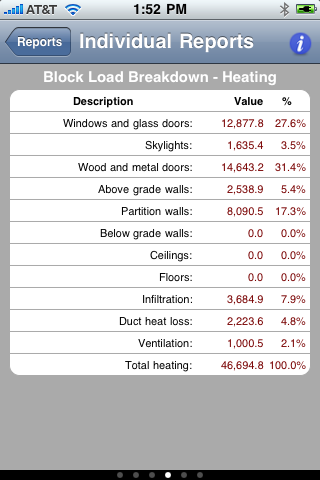
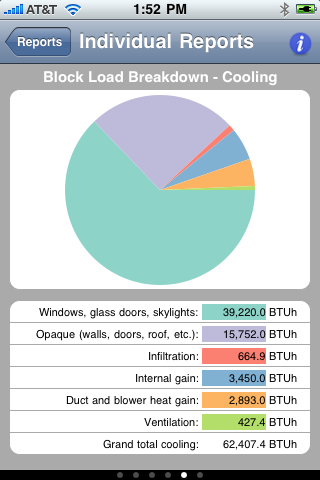
- Individual Reports: This option allows you to display six (6) on-screen reports including 2 checksum reports (one for
cooling and one for heating), 2 complex cooling and heating load breakdown reports, and 2 cooling and heating load breakdown pie charts.
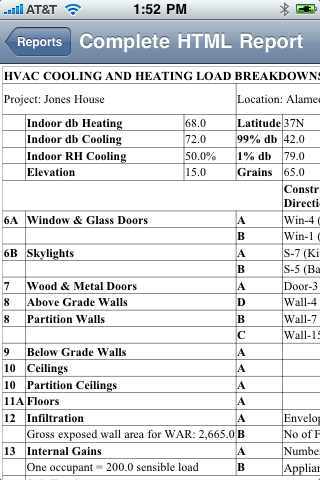
- Complete HTML Report: This option allows you to display a complete HTML breakdown report that displays every individual
component of the cooling and heating loads. As you display this report on your mobile screen, you can use your finger to navigate throughout
the entire report.
- Email: This option allows you to email the above HTML report and also includes a .CSV attachment that you can open in Excel or other spreadsheet formats.
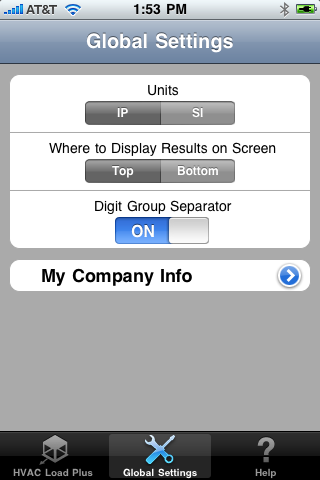
Global Settings Tab
This form can be accessed by selecting the "Global Settings" tab on the home-page screen that first appears when you start the HVAC Load Plus application. The following is an explanation of each of the inputs:- Units: This selector allows you to specify whether to display all values in IP (Imperial or English) or SI (Metric) units. When you return to the main input forms, all values will reflect the new units.
- Where to Display Results on Screen: This option only applies to the "HVAC Quick Load" function. If you select "Top", the results are displayed at the top of the screen. If you select "Bottom", the results are displayed at the bottom of the screen.
- Digit Group Separator (Thousands Separator): This selector allows you to specify whether a thousands separator (ie - a comma - "1,000.00") should be utilized in all the input and output values. Specify "On" to include it, and "Off" to not include it. This option is important for international users of this application, where a comma is often not used as a digit separator.
- My Company Info: Selet this option to display a new form that allows you to input your company demographic information. This
information is displayed on the HTML report discussed above. It includes the following inputs:
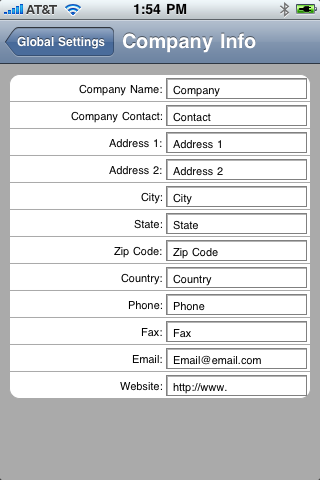
- Company name
- Company contact
- Address 1
- Address 2
- City
- State
- Zip Code
- Country
- Phone
- Fax
- Website